
Ever feel like your car mirror is looking a little too boring during your morning commute?
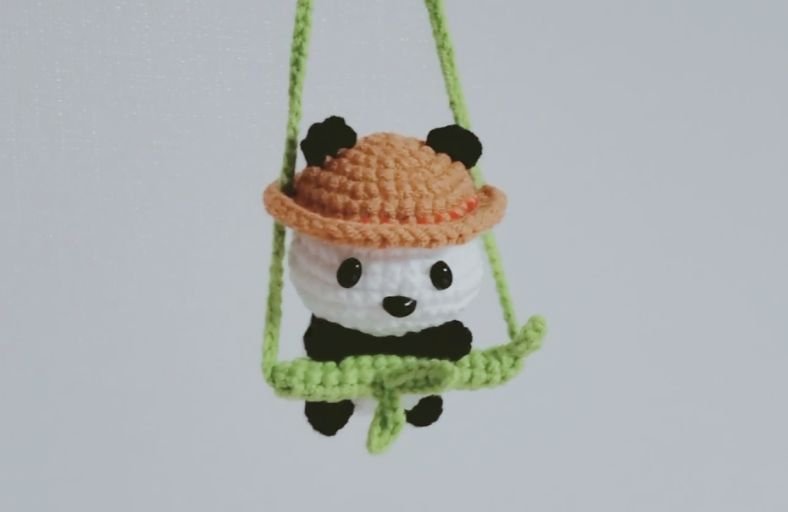
Bring a delightful touch of nature and cuteness to your daily drives with this adorable Panda Car Hanger!
Featuring a sweet little panda wearing a classic conical straw hat while happily chilling on a bamboo swing, this project turns simple yarn into the ultimate handmade vehicle accessory.
Materials and Preparation
Materials:
- Yarn (Cotton or Acrylic Yarn, Sport/DK weight):
- White yarn for the head and body.
- Black yarn for the eyes, ears, arms, and legs.
- Light Brown / Straw / Tan yarn for the conical hat.
- Green yarn for the bamboo branch swing and hanging cord.
- A small length of red yarn for the decorative hat string detail.
- Stuffing: Fiberfill polyfill stuffing to give your panda a plump, cozy shape.
- Safety Eyes & Nose: 1 pair of 6 mm black safety eyes and 1 small oval safety nose (or black embroidery thread).
Tools:
- Crochet Hook: 2.5 mm – 3.0 mm hook (keep stitches tight so stuffing does not peek through).
- Yarn Needle: For sewing pieces together and weaving in loose ends.
- Stitch Marker: To mark the end of continuous rounds.
- Scissors: Standard craft scissors.
Preparation Notes:
- Maintain consistent tension throughout the project, especially on the head and body, to keep the stuffing inside.
- Familiarize yourself with working in continuous spirals as well as working into back loops or front loops for textured details.
Abbreviations and Notes
Abbreviations:
- MR: Magic Ring
- ch: Chain stitch
- sc: Single Crochet
- inc: Single Crochet Increase (2 sc in the same stitch)
- dec: Single Crochet Decrease (sc2tog)
- hdc: Half Double Crochet
- dc: Double Crochet
- sl st: Slip Stitch
- BLO: Back Loop Only
- FLO: Front Loop Only
Pattern Notes:
- The head, body, ears, and limbs are worked in continuous rounds (spirals) without joining at the end of each round unless specified.
- The bamboo branch swing is created by working in rounds around a chain base or tubular structure, forming a sturdy bar for the panda to hold onto.

Gauge, Approximate Size, and Pattern Notes
Gauge:
Exact gauge is not critical for this project. Keep your stitches firm and snug to ensure the fiberfill remains hidden.
Finished Size:
The finished panda figurine measures approximately 2.5–3 inches (6.35–7.62 cm) in height, while the complete hanger assembly hangs down around 8–10 inches (20.32–25.4 cm).
Special Techniques:
- Color Changing: Change yarn colors on the last yarn over of the previous stitch for smooth color transitions between white, black, and green.
- BLO/FLO Shading: Used on the straw hat to create the distinct brim flare and realistic texture.
Step-by-Step Pattern
Part 1: Head and Body
Head
Worked with White Yarn in continuous rounds:
- R1: MR 6 sc (6)
- R2: 6 inc (12)
- R3: (sc, inc)*6 (18)
- R4: (2 sc, inc)*6 (24)
- R5: (3 sc, inc)*6 (30)
- R6–R10: 30 sc (30)
- Insert safety eyes between R7 and R8, about 5 stitches apart, and attach the safety nose centered between them.
- R11: (3 sc, dec)*6 (24)
- R12: (2 sc, dec)*6 (18)
- Start stuffing the head firmly.
- R13: (sc, dec)*6 (12)
- R14: 6 dec (6)
- Fasten off, weave tail through FLO of remaining 6 stitches, pull tight to close, and hide thread.
Body
Worked with White Yarn:
- R1: MR 6 sc (6)
- R2: 6 inc (12)
- R3: (sc, inc)*6 (18)
- R4: (2 sc, inc)*6 (24)
- R5–R8: 24 sc (24)
- R9: (2 sc, dec)*6 (18)
- R10: 18 sc (18)
- R11: (sc, dec)*6 (12)
- Stuff the body firmly with polyfill.
- Fasten off, leaving a long tail for sewing to the head.

Part 2: Conical Straw Hat and Bamboo Swing
Conical Straw Hat
Worked with Light Brown / Tan Yarn:
- R1: MR 4 sc (4)
- R2: (sc, inc)*2 (6)
- R3: (sc, inc)*3 (9)
- R4: (2 sc, inc)*3 (12)
- R5: (3 sc, inc)*3 (15)
- R6: (4 sc, inc)*3 (18)
- R7: (2 sc, inc)*6 (24)
- R8: (3 sc, inc)*6 (30)
- R9: FLO (4 sc, inc)*6 (36)
- R10: (5 sc, inc)*6 (42)
- Fasten off. Optional: Embroider a tiny red accent line or string around the hat brim base.
Bamboo Branch Swing
Worked with Green Yarn:
- Foundation: Ch 26.
- R1: Starting in 2nd ch from hook, sc in each ch across (25 sc), turn.
- R2–R4: ch 1, 25 sc across (25), turn.
- Fold the strip lengthwise into a cylinder bar and sc or sl st the long edges together to form a sturdy bamboo pole.
- Hanging Cord: Attach green yarn to one side of the bamboo bar, ch 50–60 (adjust length as desired for rear-view mirror hanging), connect to the opposite end of the bamboo bar with a sl st, and ch 10 extra to create a tying loop. Fasten off.
- Bamboo Leaves (Make 2): Ch 6, start in 2nd ch: sl st, sc, hdc, sc, sl st. Fasten off and sew onto the bamboo branch.
Part 3: Facial Details & Limbs
Head: Eye Patches (Make 2)
Worked with Black Yarn:
- R1: MR 6 sc, sl st to first sc to join. (6)
- Fasten off, leaving a yarn tail to sew around the safety eyes.
Head: Ears (Make 2)
Worked with Black Yarn:
- R1: MR 6 sc (6)
- R2: (sc, inc)*3 (9)
- R3: 9 sc (9)
- Fasten off, leaving a long tail for sewing onto the upper sides of the head.
Body: Arms (Make 2)
Worked with Black Yarn:
- R1: MR 6 sc (6)
- R2–R6: 6 sc (6)
- Do not stuff. Flatten the open end and sc 3 across to close. Fasten off, leaving a tail for sewing.
Body: Legs (Make 2)
Worked with Black Yarn:
- R1: MR 6 sc (6)
- R2: (sc, inc)*3 (9)
- R3–R5: 9 sc (9)
- Stuff lightly. Fasten off, leaving a tail for sewing.
Part 4: Assembly & Finishing
- Facial Setup: Attach black eye patches onto the head before securing safety eyes if needed, or sew the patches neatly around the eyes. Sew ears onto R4–R6 on both sides of the head.
- Body Attachment: Sew the head securely onto the stuffed body using the long yarn tail.
- Limbs Assembly: Position the black legs at the bottom base of the body so the panda sits flat. Position arms on the sides of the chest facing forward so they can grip the bamboo branch.
- Hat Attachment: Place the conical straw hat on top of the panda head, centering it between the ears, and stitch lightly in place.
- Swing Mounting: Attach the panda body seated firmly on top of the green bamboo bar. Wrap the panda arms around the bamboo pole and stitch them in place to make it look like it is clinging to the swing.
- Final Touch: Secure all loose ends inside the body. Your Panda Car Hanger is ready to take a ride with you!
Detailed Pattern Breakdown
1. Head and Body Construction
The base figurine uses standard 3D spherical Amigurumi techniques:
- Head Geometry: Starts from a tight 6-stitch Magic Ring and expands evenly up to 30 stitches to create a gentle, rounded forehead. The decrease section tapers back down symmetrically to form a clean neck base.
- Body Form: Built from a 24-stitch max cylinder, giving the panda a cute chubby stomach that sits nicely on top of the bamboo swing structure.
2. Conical Straw Hat and Bamboo Swing Mechanics
- Conical Hat: Gradual increments from R1 through R8 build a neat 3D cone shape. Switching to
FLOon R9 forces the stitches outward horizontally, forming the traditional wide brim of a straw hat in a single seamless piece. - Bamboo Swing: The main pole is created as a thick crocheted rectangle rolled into a tube, giving it enough structural rigidity to hold the weight of the panda figurine without drooping in the middle.
3. Limb Placement and 3D Assembly
- Dynamic Pose: The arms are deliberately left unstuffed near the top to remain flexible, allowing them to wrap around the green bamboo branch realistically.
- Weight Balance: Sewing the bottom legs directly onto the bamboo pole ensures that the hanger stays balanced and vertical while swinging in your car.
Pattern Question
Question: How do I make sure the panda stays firmly attached to the bamboo swing and does not tilt while driving?
Answer: When assembling, sew both the bottom of the panda’s body and its two front arms directly into the green bamboo pole using strong yarn stitches. Stitching at three distinct points (the base seat and both hands) prevents the panda from flopping forward or sliding off the swing when your vehicle is in motion.