
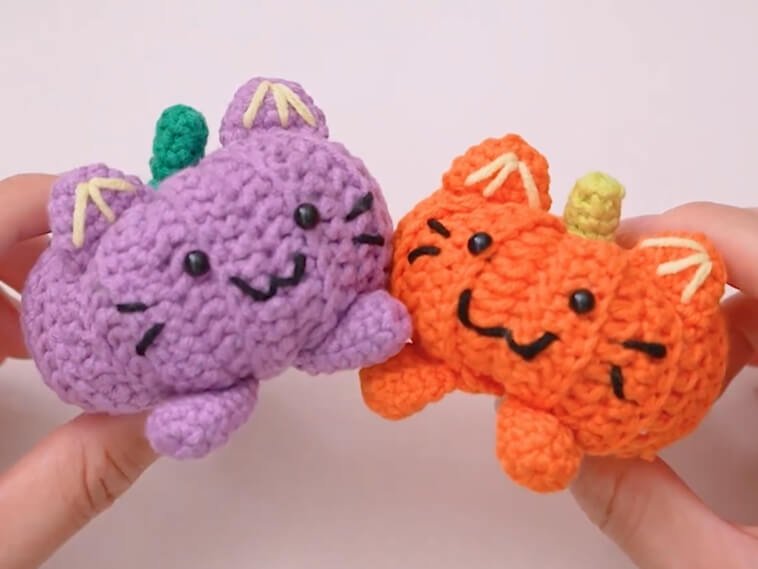
Ever wondered what happens when a cheeky black cat squeezes itself directly into a plump Halloween pumpkin? You get the ultimate spooky-cute plushie!
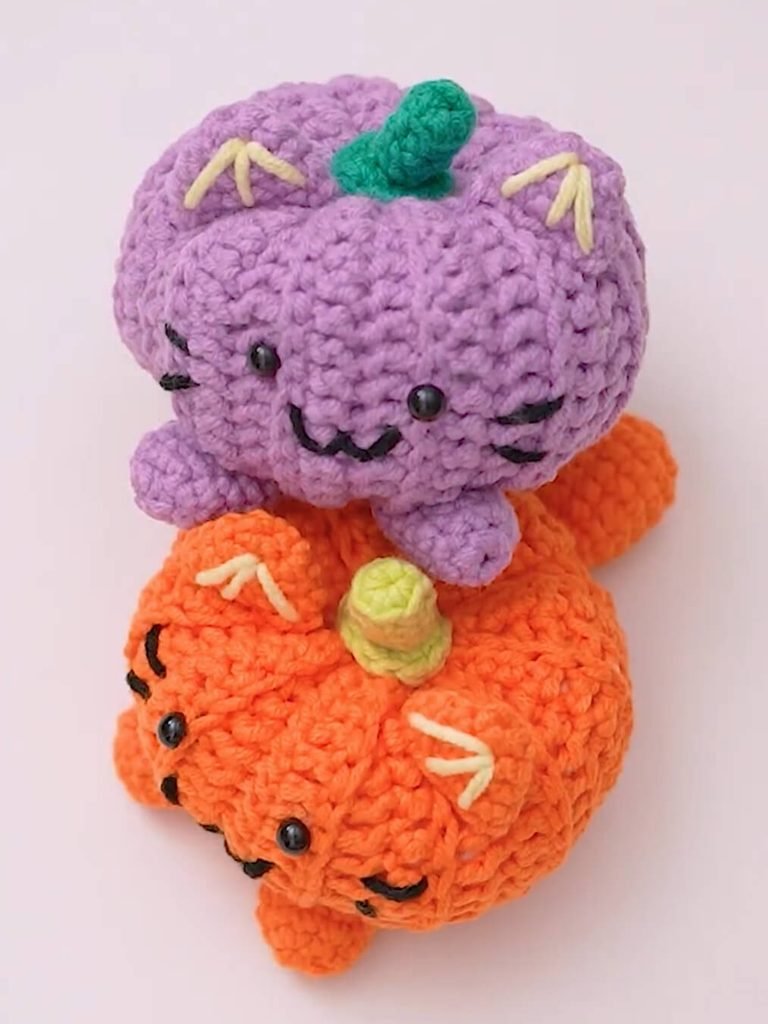
This Mini Pumpkin Halloween Cat is an absolute joy to whip up, combining the ridged texture of a classic pumpkin with tiny feline ears, little paws, and a sweet stitched face.
Whether you are whipping up last-minute trick-or-treat favors or adding a dash of hand-crocheted charm to your backpack, this project brings instant festive cheer.
Materials and Preparation
Materials:
- Yarn: 4-ply cotton yarn in Orange (or Purple for a spooky variant), Green (for the stem), Light Yellow/Pink (for inner ear details), and Black (for facial embroidery).
- Safety Eyes / Eye Beads: 1 pair of 5 mm eye beads or safety eyes.
- Stuffing: Polyester fiberfill (Polyfill) for filling the main body and small parts.
Tools:
- Crochet Hook: 3.5 mm crochet hook.
- Yarn Needle: Tapestry needle for sewing parts and embroidering details.
- Forceps or Tweezers: Handy for pushing fiberfill into tiny limbs and the stem.
- Scissors: Standard craft scissors.
Preparation Notes:
- Master basic stitches such as single crochet (
sc), half double crochet (hdc), double crochet (dc), and working in loop options likeBLO(Back Loop Only) andFLO(Front Loop Only). - Keep your tension consistent throughout the body panel to ensure uniform ridges on your pumpkin cat.
Abbreviations and Notes
Abbreviations:
- ch: Chain
- sc: Single Crochet
- inc: Single Crochet Increase (2 sc in the same stitch)
- hdc: Half Double Crochet
- dc: Double Crochet
- sl st: Slip Stitch
- MR: Magic Ring
- BLO: Back Loop Only
- FLO: Front Loop Only
- st(s): Stitch(es)
Pattern Notes:
- Hands, Ears, Tail, and Stem: Worked in continuous or joined rounds as indicated.
- Main Body: Worked as a ribbed flat panel in back-and-forth rows using
BLOto achieve the signature pumpkin ridge texture, then seam-joined into a cylinder and cinched at both ends.
Gauge, Approximate Size, and Pattern Notes
Gauge:
Gauge is not critical for this small project, but work with a tight enough tension so that the stuffing does not show through the stitches.
Finished Size:
Approximately 2.5 inches to 3 inches (6.35 cm to 7.62 cm) in width, perfect for keychains or bag charms.
Special Techniques:
- BLO Ribbing: Working stitches into the back loop only across rows creates a stretchy, deeply grooved fabric that naturally mimics pumpkin sections.
- Cinched Cylinder Shaping: Closing top and bottom openings tightly creates a rounded, squishy amigurumi shape.
Step-by-Step Pattern
Part 1: Main Body (Pumpkin Base)
Worked in flat rows using Orange or Purple yarn:
- Foundation: Ch 20.
- Row 1: Work in
BLO. Starting in the 2nd ch from hook: 1 sc, 3 hdc, 12 dc, 3 hdc, 1 sc (20 sts). Turn. - Row 2–26: Ch 1, turn. Work in
BLOacross: 1 sc, 3 hdc, 12 dc, 3 hdc, 1 sc (20 sts). - Assembly of Body: Fold the rectangular panel so Row 1 meets Row 26. Sl st both edges together along the sides to form a open-ended tube.
Part 2: Hands, Ears, Tail & Stem
Hands (Make 2):
Worked in rounds with Orange or Purple yarn:
- R1: MR 6 sc (6). Sl st to join, ch 1.
- R2: (1 sc, inc)*3 (9). Sl st to join, ch 1.
- R3–R6: 9 sc (9). Sl st to join, ch 1. Fasten off, leaving a long tail for sewing.
Ears (Make 2):
Worked in rounds with Orange or Purple yarn:
- R1: MR 6 sc (6). Sl st to join, ch 1.
- R2: (2 sc, inc)*2 (8). Sl st to join, ch 1.
- R3: (3 sc, inc)*2 (10). Sl st to join, ch 1.
- R4: (4 sc, inc)*2 (12). Sl st to join, ch 1.
Tail (Make 1):
Worked in rounds with Orange or Purple yarn:
- R1: MR 6 sc (6). Sl st to join, ch 1.
- R2: ( inc)*6 (12). Sl st to join, ch 1.
- R3: (3 sc, inc)*3 (15). Sl st to join, ch 1.
- R4–R5: 15sc .Sl st to join, ch 1.
- R6: (3sc, dec)*3 (12). Sl st to join, ch 1.
- R7: (2sc, dec)*3 (9). Sl st to join, ch 1.
Stem (Make 1):
Worked with Green yarn:
- R1: MR 6 sc (6). Sl st to join, ch 1.
- R2 (BLO): 6 sc in
BLO(6). Sl st to join, ch 1. - R3–R4: 6 sc (6). Sl st to join, ch 1.
- R5 (FLO): inc in every st around in
FLO(12). Sl st to join. Fasten off, leaving a tail for attachment.
Part 3: Assembly & Finishing
- Bottom Cinch: Thread a yarn needle with main color yarn through the bottom edge stitches of the body cylinder, pull tightly to gather closed, and knot securely.
- Face & Eyes Placement:
- Insert/sew the 5 mm eye beads on the front face area, leaving approximately 5 rows/ridges between them.
- Embroider a tiny cat mouth, whiskers, and eye details using black thread/yarn.
- Stuffing: Fill the body firmly with polyester fiberfill using forceps or your fingers.
- Top Cinch: Thread a yarn needle through the top edge stitches, pull tight to gather the top closed, and secure the end.
- Attaching Components:
- Sew the Green Stem directly over the top cinched opening.
- Sew the two Ears onto the top sides of the pumpkin body. Option: Embroider light-colored inner ear lines using yellow or light pink yarn.
- Sew the two Hands onto the lower front of the body, pointing slightly outward.
- Sew the Tail onto the back lower section.
- Attach a keychain ring or lanyard loop to the stem or top center.
Detailed Pattern Breakdown
1. Main Body Breakdown:
- Tapered Height Transition: By starting each row with 1
sc, stepping up to 3hdc, building height with 12dcin the middle, and tapering back down to 3hdcand 1sc, the body panel naturally curves at both top and bottom edges. - BLO Ridges: Consistently working in
BLOacross all 26 rows creates 13 distinct dimensional ridges around the body, mimicking the natural segments of a pumpkin when folded into a tube.
2. Appendages (Hands, Ears & Tail) Breakdown:
- Uniform Cylinder Construction: The paws, ears, and tail share a simple, structured 9-stitch cylindrical pattern (
MR 6 sc, increase to 9sc, hold for 4 rounds). This keeps all feline elements proportional to the compact pumpkin body. - Ears vs. Limbs: Pinching the top flat gives a sharp ear shape, while stuffing lightly keeps hands and tail rounded and cute.
3. Stem Breakdown:
- Angle and Flare Techniques: Starting with
BLOin R2 creates a sharp 90-degree turn for the vertical stalk base. Ending R5 withFLOincreases (inc in FLO) flares the bottom outwards, mimicking a real pumpkin vine attachment point and providing a neat base to sew flat against the gathered body.
Pattern Question:
Question 1: How do I make sure the pumpkin ridges stay defined after stuffing?
Answer: Avoid overstuffing with fiberfill. The goal is to make the body squishy and soft so the BLO ridges remain distinct. If you pack the fiberfill too tight, the fabric stretches outwards and flattens out the ribbed effect.
Question 2: Can I make this pattern without sewing the hands separately?
Answer: While the hands need to be made individually to give them a cute 3D effect resting on the front, you can save time by crocheting them ahead and weaving the yarn tails directly into the body seam during final assembly.
Question 3: How do I adjust this pattern to make a larger plushie instead of a keychain?
Answer: You can easily scale up this pattern by using plush velvet yarn or chunky chenille yarn with a larger hook (such as 4.5 mm or 5.0 mm). Keep the exact same stitch counts to create a palm-sized cuddly plushie without modifying the math!