
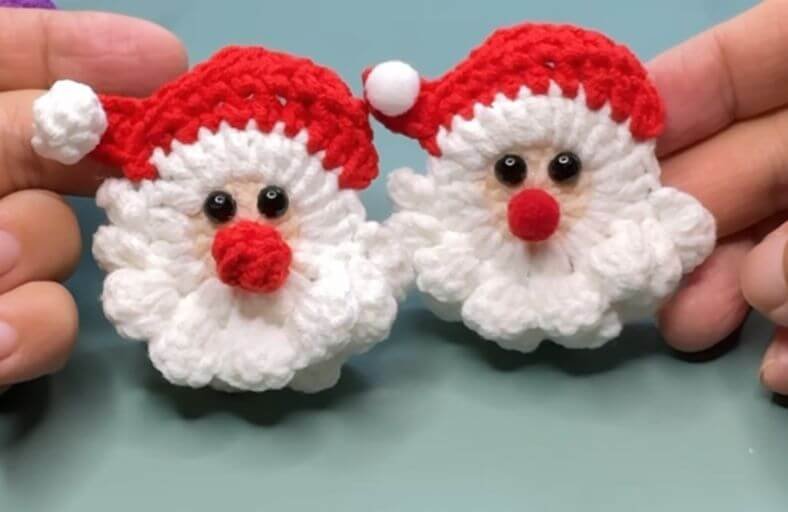
Ever wondered how to trap the jolly magic of Christmas in the palm of your hand without making a mess with chimney soot?
This adorable mini Santa Claus applique is here to sprinkle instant holiday cheer on your tree ornaments, festive garlands, or winter gift wrapping!
Featuring a textured layered beard, a sweet little red nose, and a cozy folded cap, this cheerful project is quick, fun, and completely addicting to make.
Materials and Preparation
Materials:
- Yarn: 4-ply milk cotton yarn in three key holiday shades:
- Skin tone / beige yarn (for Santa’s face)
- White yarn (for the fluffy layered beard and hat trim)
- Red yarn (for the classic Santa hat and round nose)
- Eyes: 2 flat-back safety eyes or tiny black beads
- Stuffing & Adhesives: Hot glue gun (for attaching eyes, nose, and hat pom-pom) and a tiny scrap of yarn or fiberfill for the nose
Tools:
- Crochet Hook: 2.5 mm crochet hook (a smaller size keeps stitches neat and defined)
- Yarn Needle: Tapestry needle for weaving in yarn tails
- Stitch Marker: Essential for identifying the first stitch of each round
- Scissors: Sharp craft scissors
Preparation Notes:
- Master your fundamental US terms like chain (
ch), single crochet (sc), half double crochet (hdc), double crochet (dc), double crochet increase (dc inc), and magic ring (MR). - Keep your tension smooth and steady, especially when working the front and back loop chain spaces for the beard layers.
Abbreviations and Notes
Abbreviations:
- MR: Magic Ring
- ch: Chain stitch
- sc: Single crochet
- hdc: Half double crochet
- dc: Double crochet
- dc inc: Double crochet increase (2 dc in the same stitch)
- sl st: Slip stitch
- st(s): Stitch(es)
Pattern Notes:
- The face base is worked in joined rounds. Always pay close attention to stitch placement when switching between the skin tone center and the white beard layers.
- The layered beard uses alternating chain-space loops and shell stitches (sc, 3 dc, sc) worked across turning rows to create a full 3D ruff.
- The hat is worked directly onto the upper edge of the face before attaching the pom-pom and nose.

Gauge, Approximate Size, and Pattern Notes
Gauge:
Gauge is not critical for this decorative piece. Just keep your stitches tight enough so the beard layers stay crisp and hold their ruffled shape.
Finished Size:
The completed Santa measures approximately 2.5 inches (6.4 cm) in height and 2.2 inches (5.6 cm) in width.
Special Techniques:
- Textured Shell Beard Layers: Alternating chain loop bases (ch 3, sl st) with shell clusters (sc, 3 dc, sc) creates a luxurious ruffled beard effect.
- Integrated Hat Construction: Working the hat directly into the outer face stitches ensures a seamless finish with zero awkward sewing lines.
Step-by-Step Pattern
Part 1: Face & Beard Base
Head Center (Skin Tone Yarn):
- R1: In MR, ch 2, 12 dc. Tighten the loop. Join with sl st to the first st (12 dc).
Beard Base (Switch to White Yarn):
- R2: Ch 1, insert hook into chain space and join white yarn. Ch 2, 12 dc inc (work 2 dc in each st around). Join with sl st to first st (24 dc).
Part 2: Layered Beard Ruffles
Beard Layer 1:
- R3: [Ch 3, skip 1 st, sl st in next st] 6 times across the lower half to form 6 chain loops. Ch 1, turn work.
- R4: Into each ch-3 loop work: (1 sc, 3 dc, 1 sc). Repeat across all 6 loops (6 shell groups completed). Ch 1, turn work.
Beard Layer 2:
- R5: Work sl st behind Layer 1 loops into the underlying stitches, [ch 3, sl st] 5 times to form 5 chain loops across. Ch 1, turn work.
- R6: Into each ch-3 loop work: (1 sc, 3 dc, 1 sc) across all 5 loops (5 shell groups completed). Ch 1, turn work.
Beard Layer 3:
- R7: Work sl st into the center of first shell group, [ch 3, skip 1 st, sl st] 4 times to form 4 chain loops. Ch 1, turn work.
- R8: Into each ch-3 loop work: (1 sc, 3 dc, 1 sc) across all 4 loops (4 shell groups completed). Fasten off white yarn.

Part 3: Santa’s Hat & Nose
Santa Hat (Red Yarn):
Attach red yarn at the top edge of the head in the 2nd stitch from the beard:
- R1: Ch 3, 3 dc in the same st, 3 hdc in next st, 2 sc in next st, sl st in next st. Ch 1, turn.
- R2: 3 sc, 2 hdc, 2 dc, 1 hdc, 1 sc. Ch 1, turn.
- R3: 5 sc, 4 sl st. Ch 5 (forming the pointed tip of the hat), sc in 4th ch from hook, 3 hdc down the chain. Sl st back into the hat edge to secure. Fasten off and weave in ends.
White Pom-Pom (White Yarn):
- R1: In MR, ch 1, 6 sc (6). Tighten ring, join with sl st, fasten off.
Red Nose (Red Yarn):
- R1: In MR, ch 1, 6 sc (6). Tighten ring, join with sl st to first st.
- R2–R3: 6 sc (6).Fasten off, tuck yarn tail inside to stuff, and pinch into a small round button.
Part 4: Edging, Assembly & Finishing
- Pom-Pom Attachment: Use a hot glue gun to attach the white pom-pom securely to the pointed tip of the folded red hat.
- Facial Features: Glue the two flat-back black eyes onto the skin-tone center of the face, spacing them evenly above the beard line.
- Nose Placement: Glue the round red nose right between and slightly below the eyes, nestled against the top layer of the white beard.
- Finishing: Trim any excess yarn tails and flatten the beard ruffles gently with your fingers.
Detailed Pattern Breakdown
1. Face & Beard Base Breakdown:
- Construction begins from the center of the face using a Magic Ring with 12 double crochets in skin-tone yarn to create a flat circular facial canvas.
- Transitioning to white yarn in Round 2 doubles the stitch count with 12 double crochet increases (reaching 24 stitches), establishing a sturdy white foundation ring that serves as the anchor for both the beard ruffles and the red hat.
2. Layered Beard Ruffles Breakdown:
- The cascading beard is built using an alternating two-step technique: creating chain-loop arches (ch 3, sl st) followed by filling those loops with soft shell clusters (1 sc, 3 dc, 1 sc).
- Each subsequent layer (Layer 1 with 6 groups, Layer 2 with 5 groups, and Layer 3 with 4 groups) is anchored slightly behind or between the previous row. This step-down reduction creates a realistic tapered 3D beard effect that flares outwards gracefully.
3. Hat, Nose, and Assembly Breakdown:
- The hat is sculpted directly onto the top unworked stitches of the face base. Graduating stitch heights from double crochets down to half-double and single crochets creates the iconic sloping curve of Santa’s cap, while an extended 5-chain tail forms the drooping point.
- The 3D ball nose and pom-pom are worked separately in tight single crochet rounds (6 sc) before being assembled with glue alongside the flat-back eyes for a clean, polished finish.
Pattern Question:
Question: How can I make sure the white beard layers lay flat and do not curl forward awkwardly?
Answer: When creating the chain-3 loops for each beard layer (R3, R5, and R7), make sure you are inserting your hook firmly through the back structural loops of the stitches from the base round rather than pulling on the front shells.
Keeping your slip stitches snug and ensuring your hook size matches the yarn thickness (2.5 mm for 4-ply cotton) will keep the ruffles crisp, layered, and perfectly aligned against Santa’s face!