
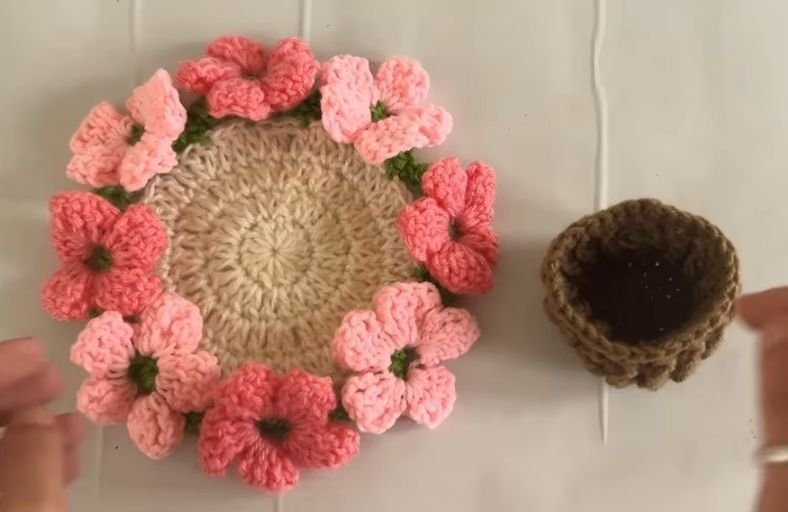
Ever wanted your coffee mug to rest on a blooming garden, only to tuck the whole floral meadow neatly away into a cozy little plant pot when tea time is over?
This adorable 2-in-1 project transforms a functional table coaster into a plush, blooming potted plant display in seconds.
Whether you are looking to brighten up your desk or craft the ultimate handmade gift for a plant lover who cannot keep real succulents alive, this step-by-step pattern brings pure joy to your hook.
Materials and Preparation
Materials:
- Base Coaster Yarn: Worsted or DK weight cotton yarn in Off-White / Cream for the main coaster body.
- Leaf & Stem Yarn: Green cotton yarn for the leafy borders and flower bases.
- Flower Petals Yarn: Cotton yarn in two shades of pink (Light Pink and Deep Pink) or your favorite floral shades.
- Pot Yarn: Medium brown cotton yarn for the textured basket pot.
Tools:
- Crochet Hook: 3.0 mm crochet hook (or size needed to obtain a firm stitch density).
- Yarn Needle: Tapestry needle for weaving in ends and shaping.
- Stitch Marker: To mark rounds where necessary.
- Scissors: Craft scissors for trimming yarn tails.
Preparation Notes:
- Using 100% cotton yarn is highly recommended for coasters as it provides great heat resistance, absorbs moisture, and offers crisp stitch definition.
- Keep your tension smooth and relaxed while working the base disc to ensure it lies completely flat without curling at the edges.
Abbreviations and Notes
Abbreviations:
- MR: Magic Ring
- ch: Chain
- sc: Single Crochet
- inc: Single Crochet Increase (2 sc in the same stitch)
- dc: Double Crochet
- dc inc: Double Crochet Increase (2 dc in the same stitch)
- tr: Treble / Triple Crochet (Yarn over twice)
- FPdc: Front Post Double Crochet
- BPdc: Back Post Double Crochet
- sl st: Slip Stitch
- BLO: Back Loop Only
- st(s): Stitch(es)
Pattern Notes:
- The coaster base and flower petals are constructed in joined rounds, finishing each round with a slip stitch.
- The plant pot utilizes Front Post and Back Post stitches to create a realistic ribbed, woven basket texture.
- Make multiple flower coasters so you can stack them together inside the single potted base for a full, lush bouquet display.
Gauge, Approximate Size, and Pattern Notes
Gauge:
Rounds 1–3 of the Coaster Base = approximately 2.5 inches (6.35 cm) in diameter. Exact gauge is not critical, but stitches should remain even.
Finished Size:
- Coaster Diameter: Approximately 4.5–5 inches (11.4–12.7 cm) including the outer flower petals.
- Pot Height: Approximately 2 inches (5.08 cm) tall with a 2.5-inch (6.35 cm) base diameter.
Special Techniques:
- Front Post & Back Post Ribbing: Worked around the post of the stitches from the previous round to build a thick, sturdy pot wall.
- Petal Base Arches: Created using chain loops and treble crochet clusters to form 3D, elevated flower petals around the rim.
Step-by-Step Pattern
Part 1: Coaster Base
Worked in joined rounds using Cream / Off-White yarn:
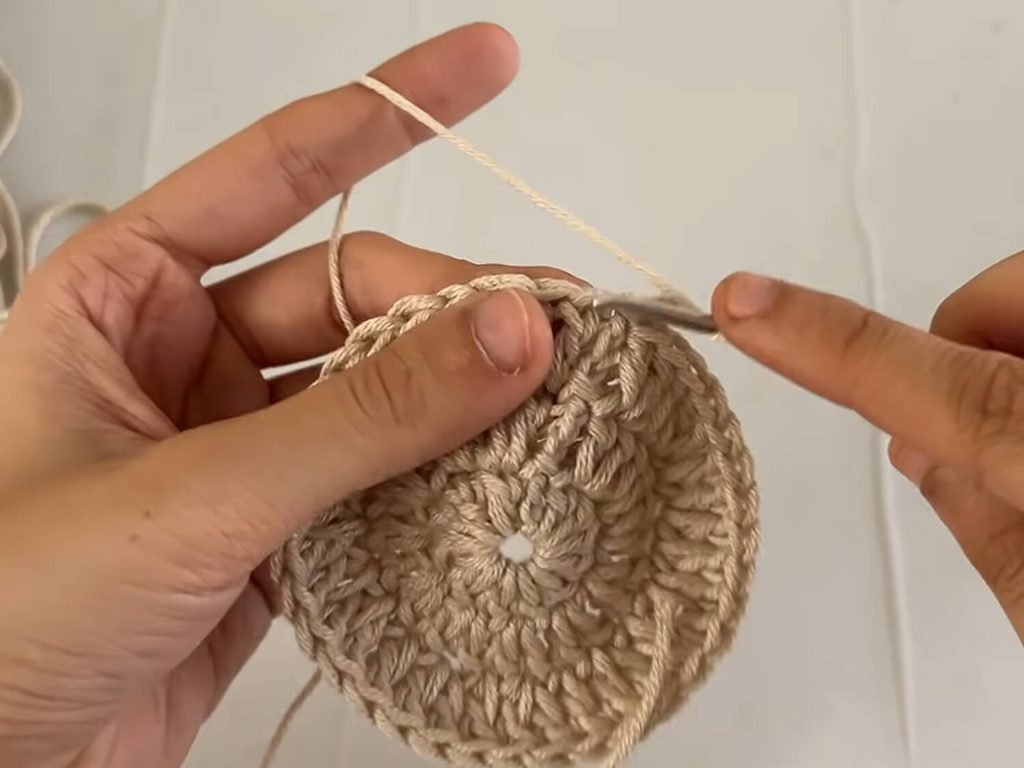
- R1: Make a MR, ch 3 (counts as first dc), work 11 dc into the ring. Pull ring tight, sl st to the top of the first dc (12 sts).
- R2: ch 3, 2 dc in each st around (12 dc inc). Sl st to the first dc (24 sts).
- R3: ch 3, (1 dc in next st, dc inc in next st) repeat 12 times around. Sl st to the first dc (36 sts).
- R4: ch 3, (1 dc in each of the next 2 sts, dc inc in next st) repeat 12 times around. Sl st to the first dc (48 sts).Fasten off and weave in ends.
Part 2: Green Leaf & Stem Frame
Attach Green yarn to any stitch on the outer edge of R4 of the Coaster Base:
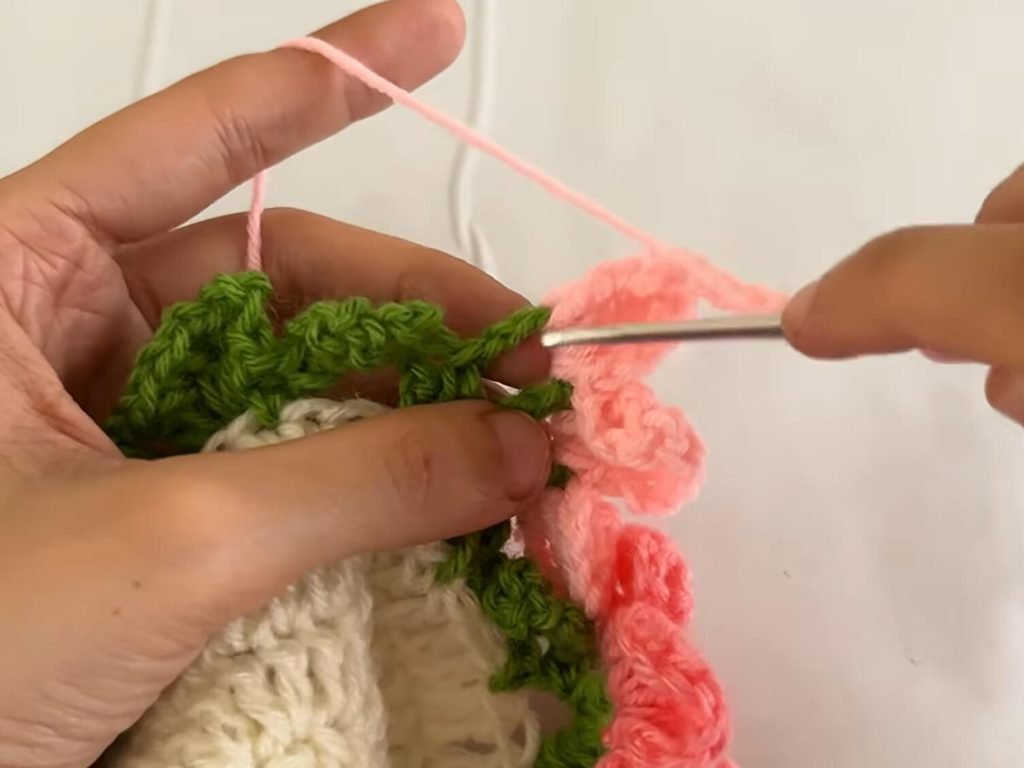
- R1 (Border Chain Loops): ch 1, 1 sc in the same st, *ch 5, skip 2 sts, 1 sc in the next st; repeat from * around, ending with ch 5, sl st into the first sc.
- R2 (Stem Base & Leaf Petal Holders):
- In the first ch-5 loop: 1 sc, ch 4, 1 dc, ch 1, 1 dc, ch 1, 1 dc, ch 1, 1 dc, ch 4, 1 sc.
- In the next ch-5 loop (Leaf Loop): 1 sc, ch 7, sl st into the 3rd ch from hook, ch 3, 1 sc in the same loop space.
- Repeat alternating the Flower Base Loop and Leaf Loop in every chain space across the round. Sl st to join, fasten off, and weave in ends.
Part 3: Puff Flowers & Plant Pot
Flower Petals (Make 6 Puff Flowers on the Rim Frame)
Attach Pink yarn into the first ch-4 space of the Flower Base Frame:
- Petal 1: ch 3, work 4 tr into the ch-4 space, ch 3, 1 sc into the next ch-1 space.
- Petal 2: ch 3, work 4 tr into the ch-1 space, ch 3, 1 sc into the next ch-1 space.
- Petal 3: ch 3, work 4 tr into the ch-1 space, ch 3, 1 sc into the next ch-1 space.
- Petal 4: ch 3, work 4 tr into the ch-1 space, ch 3, 1 sc into the next ch-4 space.
- Petal 5: ch 3, work 4 tr into the ch-4 space, ch 3, 1 sc into the same space.Fold the 5 petals slightly inward to form a cup shape, sl st behind the first petal to secure into a round puff flower, fasten off, and weave in tail. Repeat for all flower locations around the coaster using alternating pink shades.
Plant Pot Container
Worked using Medium Brown yarn:
- R1: MR, ch 1, 6 sc into the ring. Sl st to join (6 sts).
- R2: ch 1, 2 sc in each st around (12 sts).
- R3: ch 1, (1 sc, inc) repeat 6 times (18 sts).
- R4: ch 1, (2 sc, inc) repeat 6 times (24 sts).
- R5: ch 1, (3 sc, inc) repeat 6 times (30 sts).
- R6 (Base Edge): ch 2, in BLO work 30 dc around. Sl st to the first dc (30 sts).
- R7–R9 (Basket Texture): ch 2, (FPdc around the next st, BPdc around the following st) repeat 15 times around. Sl st to join (30 sts).
- R10 (Top Lip Rim): ch 1, 30 sc around. Sl st to the first sc (30 sts).Fasten off and hide all loose ends.
Part 4: Assembly & Finishing
- Coaster Finishing: Gently steam iron or block the central cream disc if necessary to ensure it rests flat on surfaces while the puff flowers curl upright around the rim.
- Stacking and Pot Display: Fold the outer puff flowers of your coaster inward toward the center. Roll or tuck the coaster body neatly down into the brown container pot. The 3D flowers will pop out from the top, forming an adorable mini potted plant!
Detailed Pattern Breakdown
1. Flat Base Disc Geometry
- Gradual Circular Expansion: The center coaster base utilizes classic flat circle mathematics (12 rightarrow 24 rightarrow 36 rightarrow 48 stitches). Every round increases by exactly 12 double crochet stitches (
dc inc), distributing the expansion evenly to prevent bubbling or warping. - Surface Area Optimization: By stopping the cream base at 48 stitches, the central area provides the perfect flat resting diameter for standard coffee mugs or glass tumblers without hitting the raised flowers.
2. Dual-Function Border Frame Architecture
- Anchoring Arches: The green border uses alternating
ch 5loops anchored byscto establish a flexible structural ring around the base disc. - Petal Foundation vs. Leaf Spurs: The second green round strategically splits into two functional types: multi-chain arches that act as five-chamber anchors for 3D flower petals, and extended
ch 7leaf loops that stick out between flowers for realistic foliage contrast.
3. Ribbed Post Pot Construction
- BLO Angle Transition: Switching to Back Loop Only (
BLO) on Round 6 of the pot creates a clean 90-degree corner fold between the flat bottom base and vertical side walls. - Alternating Post Texture: Alternating Front Post Double Crochet (
FPdc) and Back Post Double Crochet (BPdc) pushes stitches forward and backward, forming a thick, sturdy ribbed texture that holds its shape as a container without needing stiff plastic inserts or cardboard linings.
Pattern Question:
Question: Why does my coaster base curve up like a bowl instead of laying flat, and how can I fix it?
Answer: A coaster curling into a bowl shape usually happens if your stitch tension is too tight or if stitches were skipped during the increase rounds. Make sure you strictly follow the 12-stitch expansion count on every round (12, 24, 36, 48). If your natural tension is very firm, try switching to a 3.5 mm hook for the cream center base, or gently block your flat disc with a light steam iron before adding the green border.
Question: How do I make the puff flowers stand up round and full around the coaster rim?
Answer: The secret to full, perky petals lies in using Treble Crochet (tr) stitches rather than standard double crochets. Treble stitches provide extra height and drape. Once you complete all 5 petals for a single flower, pull the first and last petal toward each other at the back and anchor them together with a sl st. This cup shape forces the petals outward into a 3D bloom.
Question: How many coasters can fit inside one crochet pot?
Answer: A single pot made with this pattern comfortably holds 1 to 2 folded coasters while maintaining a plump, healthy “potted plant” appearance. If you want to store a set of 4 coasters inside one container, simply add one more increase round to the pot base (Round 5: 4 sc, inc = 36 sts) and work two extra rounds of ribbed post stitches for extra depth!