
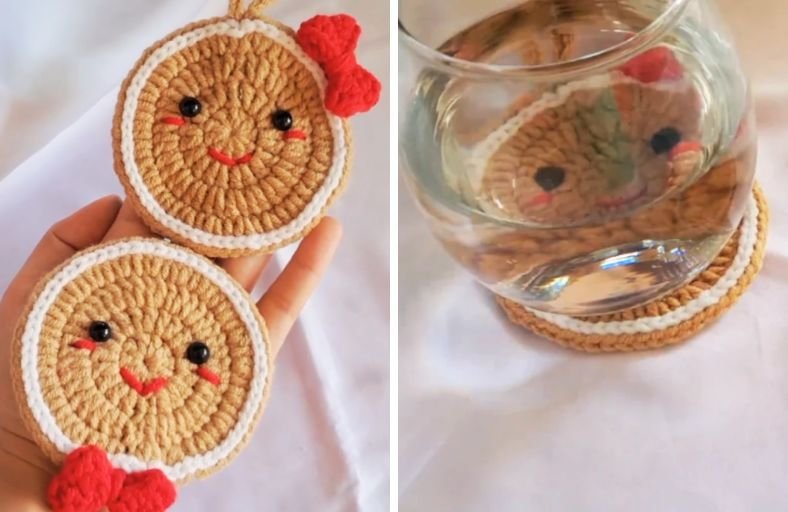
Ever wished your morning cup of coffee or tea could get into the holiday spirit along with you?
Or maybe your Christmas tree is begging for a sprinkle of handmade sweetness that looks delicious enough to eat? Enter this adorable Gingerbread Man pattern: the ultimate two-in-one festive project!
With a cute embroidered smile, rosy cheeks, a classic white icing border, and a bright red bow tie, this quick crochet creation functions as a sturdy drink coaster or a charming hanging ornament.
Grab your favorite brown yarn and hook, because we are baking up some yarny holiday magic today!
Materials and Preparation
Materials:
- Base Yarn: Brown/Tan yarn (light worsted or cotton yarn works best for coaster firmness).
- Icing Yarn: White yarn for the surface crochet icing border.
- Bow Yarn: Red yarn for the cute bow embellishment.
- Details Yarn: Small amounts of red yarn for embroidery (mouth and blush lines).
- Eyes: 8 mm safety eyes (for ornament version) or black felt/embroidery thread (recommended if making a flat coaster).
Tools:
- Crochet Hook: 3.0 mm – 3.5 mm crochet hook (choose a size that produces dense, firm stitches).
- Yarn Needle: Tapestry needle for weaving in ends, cinching the bow, and sewing details.
- Stitch Marker: Essential for tracking the first stitch of each round.
- Scissors: Craft scissors.
Preparation Notes:
- If you plan to use this piece primarily as a coaster, consider using 100% cotton yarn. Cotton absorbs moisture well, holds up against hot mugs, and maintains a nice flat shape.
- Keep your gauge even and tension firm so the coaster lays completely flat without curling up at the edges.
Abbreviations and Notes
Abbreviations:
- MR: Magic Ring
- ch: Chain
- sc: Single Crochet
- hdc: Half Double Crochet
- dc: Double Crochet
- inc: Double Crochet Increase (2 dc in the same stitch)
- sl st: Slip Stitch
Pattern Notes:
- The main face disc is worked in joined rounds using standard Double Crochet (
dc). Each round starts withch 3and closes with asl stinto the first double crochet of that round. - The white icing detail uses Surface Crochet worked directly between the stitch posts of the final round.
- The bow is crocheted as a long flat strip with mirrored shaping on both sides, then folded and wrapped in the center to create a neat 3D bow shape.

Gauge, Approximate Size, and Pattern Notes
Gauge:
Exact gauge is not critical for this project. Working with a 3.0 mm hook and worsted weight yarn will naturally yield a sturdy, flat circle suitable for standard drinkware.
Finished Size:
Approximately 4 inches (10 cm) in diameter.
Special Techniques:
- Surface Slip Stitch Crochet: Insert the hook from the front to the back of your fabric between stitch posts, yarn over from behind, and pull a loop through to create a chain-like icing border on the surface.
- Center Wrap Bow Technique: The bow strip is folded into a ring, sewn closed, and tightly wrapped with yarn around the center to create crisp bow gathers.
Step-by-Step Pattern
Part 1: Main Face Disc (Gingerbread Base)
Work in joined rounds with Brown Yarn:
- R1: Start with a MR. Ch 3 (does not count as a stitch), work 10 dc into the magic ring. Pull the tail to close the ring tightly. Join with a sl st to the top of the first dc. (10 dc)
- R2: Ch 3, work 2 dc in each stitch around (inc in every stitch). Join with a sl st to the first dc. (20 dc)
- R3: Ch 3, work 2 dc in each stitch around (inc in every stitch). Join with a sl st to the first dc. (40 dc)
- R4: Ch 3, [1 dc in the first stitch, 2 dc in the next stitch] 20 times. Join with a sl st to the first dc. (60 dc)
Note for finishing the Base:
- If making a Coaster: Fasten off brown yarn and weave in ends.
- If making an Ornament: Do not cut the yarn yet! Ch 15 to 20 (depending on your preferred hanging loop length), then sl st back into the exact same base stitch to create the hanging loop. Fasten off and weave in ends.
Part 2: White Icing Border
Work on the front surface of Round 4 with White Yarn:
- Create a slip knot with white yarn on your hook.
- Hold the white yarn on the back/underside of the gingerbread disc.
- Insert your hook from the front face through to the back, placing it between the vertical stitch bars/posts of the outer round.
- Yarn over on the back side and pull the loop through to the front.
- Insert your hook into the next space between stitch bars, yarn over from behind, and pull through both the fabric and the loop on your hook (Surface Slip Stitch).
- Continue making surface slip stitches all the way around the circle until the icing frame is complete.
- Fasten off, cut yarn, and weave the tails securely into the back of the disc.

Part 3: Facial Details & Accessories
Eyes and Smile:
- Eyes: Attach 8 mm safety eyes between Round 2 and Round 3 (spaced approximately 3 to 4 stitches apart). If making a coaster, cut two small circles from black felt or embroider French knots with black thread so the surface remains flat for glasses.
- Mouth & Blush: Using red yarn and a yarn needle, embroider a curved smile centered right below the eyes. Add two small horizontal straight stitches on either side of the smile for blush marks.
Red Bow Tie / Hair Bow
Work in rows along a central chain with Red Yarn:
- Foundation: Ch 17.
- Side 1 (Working down the chain):
- Skip the first chain from hook.
- Sl st in the 2nd chain from hook.
- Sc in the next chain.
- Hdc in the next chain.
- Dc in each of the next 2 chains.
- Hdc in the next chain.
- Sc in the next chain.
- Sl st in the next chain (Center midpoint of bow).
- Sl st in the next chain.
- Sc in the next chain.
- Hdc in the next chain.
- Dc in each of the next 2 chains.
- Hdc in the next chain.
- Sc in the next chain.
- Sl st in the last chain.
- Side 2 (Working along the opposite side of the foundation chain):
- Sl st in the same end space to turn around to the bottom loops of the foundation chain.
- Sc in the next chain.
- Hdc in the next chain.
- Dc in each of the next 2 chains.
- Hdc in the next chain.
- Sc in the next chain.
- Sl st in the center midpoint chain.
- Sl st in the next chain.
- Sc in the next chain.
- Hdc in the next chain.
- Dc in each of the next 2 chains.
- Hdc in the next chain.
- Sc in the next chain.
- Sl st in the last chain.
- Fasten off, leaving a long tail (about 12 inches / 30 cm) for assembly and sewing.
Part 4: Assembly & Finishing
- Shape the Bow: Bring the two outer short ends of the crocheted bow strip together to form a ring and sew the ends securely with your tapestry needle.
- Wrap the Center: Pinch the center of the ring to form a classic bow shape. Take the long yarn tail and wrap it tightly around the middle 5 to 6 times until you get a neat, cinched center node. Secure the wrap on the back with a knot.
- Attach the Bow:
- For a Coaster: Sew the bow at the bottom edge or side margin of the gingerbread disc so it does not block drinks placed in the center.
- For an Ornament: Sew the bow at the top near the hanging loop (for a hair bow) or at the bottom center (for a bow tie).
- Backing (Optional): If you want to hide all back embroidery threads or safety eye backings, crochet a second plain brown disc (R1–R4) and glue or sew it back-to-back with the main disc, or glue a piece of felt onto the back.
Detailed Pattern Breakdown
1. Main Base Disc Geometry
The gingerbread base relies on standard flat circle mathematics using double crochet stitches.
- Round 1 (10 dc): Setting 10 double crochets into a magic ring gives the project enough height while establishing a sturdy core.
- Round 2 & 3 (100% Increase): By doubling every stitch in Rounds 2 and 3, the circle expands rapidly without cupping.
- Round 4 (1 dc, inc sequence): Transitioning to a standard expansion ratio
(1 dc, 1 inc)brings the final stitch count to 60, creating a perfect 4-inch base that is flat and broad enough for mugs.
2. Surface Crochet Icing Framing
Instead of sewing a separate chain cord onto the face, surface crochet stitches are worked directly into the spaces between stitch bars in Round 4. This technique anchors the white icing seamlessly flush against the brown base, creating a clean bakery-style icing effect that will not snag or detach.
3. Symmetrical Double-Sided Bow Construction
The bow uses a clever single-strip layout worked on both sides of a 17-chain foundation.
- Graduated Stitch Heights: Stepping up from
sl sttosc,hdc, anddcbefore stepping back down tosl stcreates natural triangular lobes on both ends. - Center Cinch: Repeating the exact height sequence on the opposite side of the foundation chain produces a balanced butterfly shape. Wrapping yarn tightly around the middle pulls the stitches inward, instantly converting the flat strip into a realistic 3D bow.
Pattern Questions
Question: How do I ensure my gingerbread coaster stays completely flat and doesn’t curl up at the edges?
Answer: Curling usually happens when your stitch tension is too tight or when stitch counts vary. Make sure you do not skip any increase stitches in Round 4. If your work still cups slightly, use a steam iron (or wet block your finished cotton coaster) by pinning it flat on a blocking board and letting it dry completely.
Question: Can I make this pattern safer or more practical for holding hot coffee cups?
Answer: Absolutely! Safety eyes can create an uneven surface that causes glasses or mugs to tilt. For a coaster version, replace plastic safety eyes with flat felt circles glued down with fabric glue, or embroider the eyes using black yarn. Using 100% cotton yarn will also improve heat resistance and absorbency.
Question: What is the easiest way to make the back look clean if I give this as a gift?
Answer: You can crochet a second brown circle following Part 1 (R1 to R4) and join both pieces back-to-back using a round of single crochet or simple fabric glue. Alternatively, cut a neat circle out of cork sheet or craft felt and glue it onto the back side. This hides all embroidery tails while giving the coaster an extra non-slip grip!