
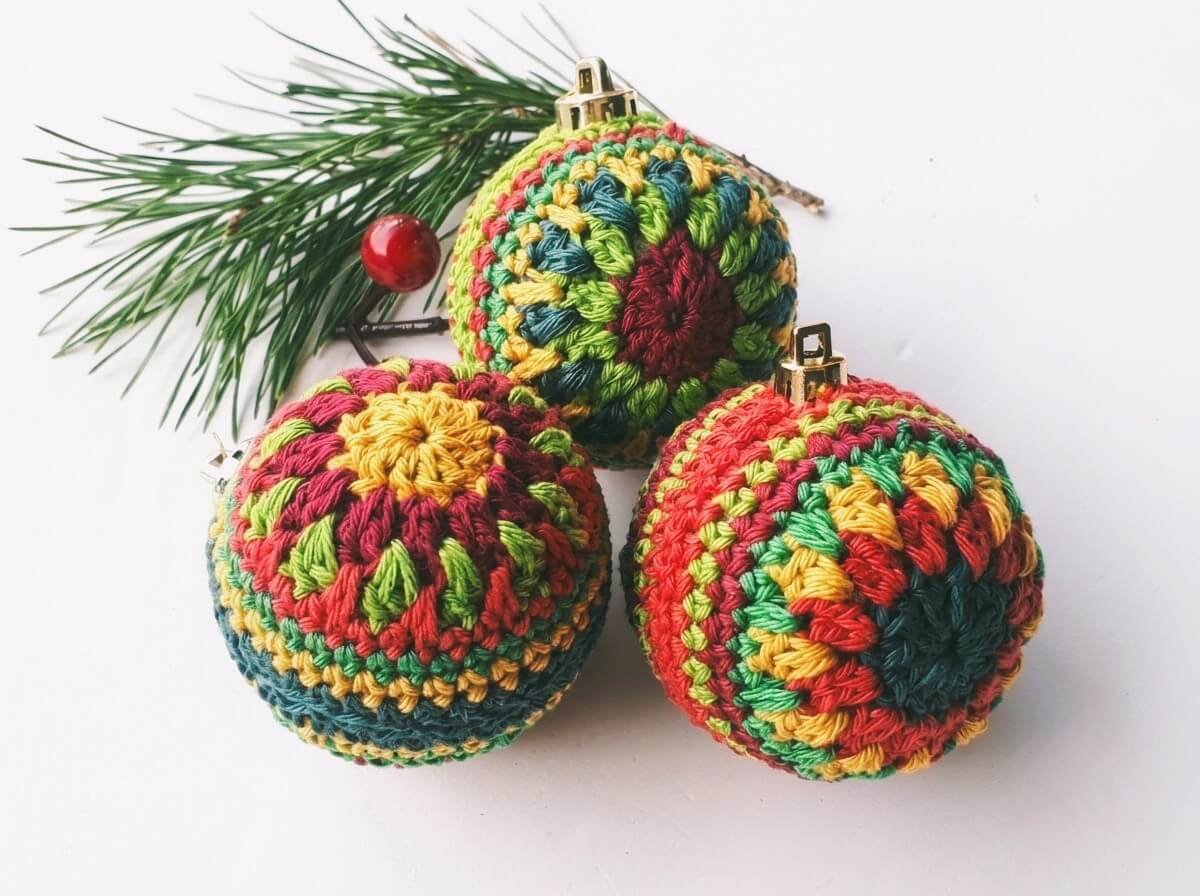
Looking to add a splash of handmade magic to your holiday decor without spending endless hours on a complex project?
Transforming ordinary, plain ornaments into vibrant, eye-catching holiday treasures is one of the most rewarding festive crafts!
This beginner-friendly project lets you raid your yarn stash, experiment with cheerful color combinations, and dress up basic baubles in cozy crochet jackets that your family will cherish year after year.
Materials and Preparation
Materials:
- Yarn: 4-ply / Fingering weight (or sport weight) cotton yarn in your favorite festive colors (e.g., Red, Cream, Yellow, Green, Pink, Blue). (Note: Light DK weight yarn or acrylic yarn can also be used if preferred).
- Core Ornament: 3-inch (approx. 7.5 cm / 80 mm) round plastic Christmas baubles or polystyrene foam balls.
Tools:
- Crochet Hook: 3.0 mm crochet hook (or 3.5 mm if using DK weight yarn).
- Yarn Needle: Tapestry / darning needle for sewing the two halves together.
- Scissors: Standard craft scissors.
Preparation Notes:
- You should be comfortable with basic crochet stitches such as the magic ring, chain, single crochet, double crochet, slip stitch, and working long/spike stitches.
- Using cotton yarn provides a crisp stitch definition and smooth texture.
- Do not worry about weaving in every single loose end perfectly, as the yarn tails can easily be tucked and hidden inside the bauble cover before seaming!
Abbreviations and Notes
Abbreviations:
- MR: Magic Ring
- ch: Chain
- sl st: Slip Stitch
- sc: Single Crochet
- dc: Double Crochet
- spike st: Spike Stitch (Long Single Crochet worked into 2 rounds below)
Pattern Notes:
- Each bauble is constructed by making two identical dome-shaped motifs (Halves) that wrap around the ornament core and are sewed together along the center seam.
- The motif is worked in joining rounds. Every double crochet round begins with
ch 3(which counts as the firstdc) and ends with asl stinto the top of that initialch 3. - You can change yarn colors at the start of every round to create colorful rings.

Gauge, Approximate Size, and Pattern Notes
Gauge:
Gauge is flexible for this project. The key is to check the fit of your crochet dome against your ornament sphere around Round 5 or 6. The piece should sit slightly snugger than the ornament since crochet fabric stretches.
Finished Size:
Designed to fit standard sphere ornaments measuring approximately 3 inches (7.6 cm) in diameter (approx. 9.4 inches / 24 cm in circumference).
Special Techniques:
- Spike Stitch (Long Single Crochet): Worked in Round 4 by inserting the hook down into Round 2 (between the double crochet pairs), pulling up a loose loop to the height of the current round, and completing a single crochet.
- Crocheting Over Tails: Working your stitches over color-change yarn tails reduces finishing time significantly.
Step-by-Step Pattern
Part 1: First Dome Motif (First Half)
- Round 1: Start with Color A. Make a MR, ch 3 (counts as 1 dc), work 11 dc into the MR. Pull ring tight. Sl st to the top of the beginning ch-3 to join. Fasten off. (12 dc)
- Round 2: Join Color B in any stitch. Ch 3 (counts as 1 dc), 1 dc in the same stitch. Work 2 dc into each stitch around. Sl st to top of beginning ch-3 to join. Fasten off. (24 dc)
- Round 3: Join Color C in any space between two dc pairs from Round 2. Ch 3 (counts as 1 dc), 1 dc in same space. Ch 1, skip next 2 dc, 2 dc in next space; repeat from * to * around. Ch 1, sl st to top of beginning ch-3 to join. Fasten off. (12 sets of [2 dc, ch 1])
- Round 4: Join Color D (contrast color) in any dc stitch from Round 3. Ch 1, 1 sc in same st, 1 sc in next st. Work 1 spike st (reach down into Round 2 between the two dc stitches, pull loop up to height), 1 sc in each of the next 2 dc stitches; repeat from * to * around. Sl st to initial sc to join. Fasten off. (36 stitches)
- Round 5: Join Color E in any stitch. Ch 1, 1 sc in same st, 1 sc in each stitch around. Sl st to initial sc to join. Fasten off. (36 sc)
- Round 6: Join Color F (or re-join Color A) in any stitch. Ch 1, 1 sc in same st, 1 sc in each stitch around. Sl st to initial sc to join. Fasten off. (36 sc)

Part 2: Second Dome Motif (Second Half)
- Repeat Round 1 through Round 6 of Part 1 exactly as written.
- (Optional) If your ornament core is slightly larger, add an optional Round 7 (sc in each st around) to one or both halves to achieve the perfect coverage.
Part 3: Additional Decorative Accents
Hanging Loop / Ornament Cap Opening:
- No extra crochet cap needed! The central opening from Round 1 or the natural gap at the top closure fits neatly around the ornament’s top hanging mechanism.
Part 4: Assembly & Finishing
- Assembly:
- Tuck any remaining loose yarn ends into the inside of the crochet cups.
- Insert the plastic or foam ornament sphere inside the two crochet halves, positioning the top hanging loop through the top center opening.
- Thread a yarn needle with a coordinating length of yarn (approx. 20 inches / 50 cm).
- Align the edge stitches of both halves. Pass the needle through corresponding stitches from one half to the other in a whipstitch or tapestry stitch manner, pulling tightly as you work around.
- Secure the end tightly around the top, weave in the final tail, and trim.
Detailed Pattern Breakdown
1. Central Wheel & Expanding Base (Rounds 1–2):
- Round 1: Establishes the 12-stitch circular foundation using a Magic Ring. The 12 double crochet stitches form a sturdy, flat center circle.
- Round 2: Doubles the stitch count from 12 to 24 by performing a standard flat-circle expansion (2 dc into every stitch). This sets up the base diameter needed for a sphere cover.
2. Openwork & Texture Accents (Rounds 3–4):
- Round 3: Introduces decorative gaps by creating 12 two-dc clusters separated by chain-1 spaces. This cluster setup provides the structural slots needed for the next round’s feature stitch.
- Round 4: Features long spike stitches worked over Round 3 down into the center of the double crochet pairs of Round 2. This creates a stunning starburst or sunburst effect while increasing the stitch count to 36.
3. Curving & Seaming Shell (Rounds 5–6):
- Rounds 5–6: By discontinuing all increases and working plain single crochet rounds (36 sc), the piece stops expanding outward and naturally cups inward into a neat hemispherical dome.
- Assembly: Joining two opposing domes over the sphere creates a snug 3D jacket held securely by friction and central seaming.
Pattern Question:
Question: What should I do if my crochet cover turns out too loose or too small for my plastic baubles?
Answer: Because plastic ornaments vary slightly in circumference, fitting as you go is key! If your cover feels too loose, drop down a hook size (e.g., from 3.0 mm to 2.5 mm) or omit Round 6.
If it is too small and leaves a wide gap around the equator, simply add an extra round of single crochet (Round 7) to one or both halves before seaming. The crochet fabric will stretch comfortably as you whipstitch the two halves together!