
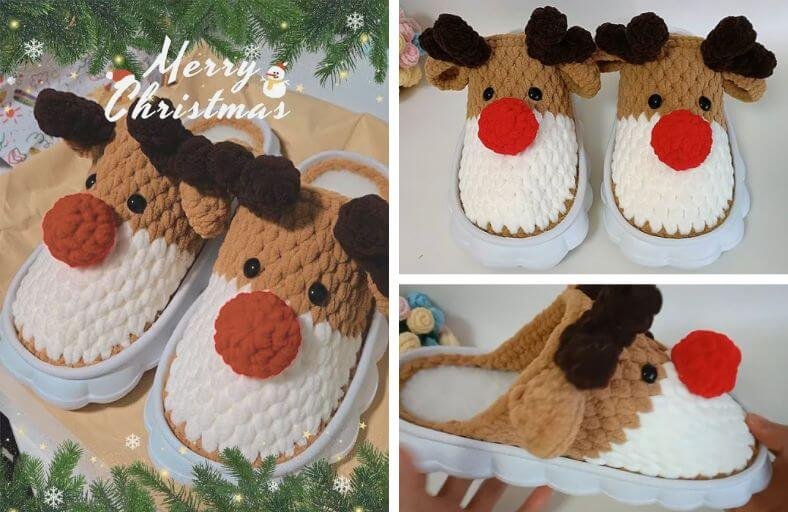
Looking to step up your cozy home footwear game with a touch of holiday magic?
These adorable Crochet Reindeer Slippers combine plush 6mm chenille yarn with sturdy pre-made shoe soles, turning a fun craft session into the ultimate pair of warm, cloud-like house shoes.
Complete with 3D antlers, floppy ears, and a bright red nose, this project is as fun to make as it is to wear.
Materials and Preparation
Materials:
- Yarn: 6mm Super Bulky Chenille Yarn in White (for the snout/front upper), Caramel/Brown (for the upper base), Dark Brown (for the antlers), and Red (for the nose).
- Soles: A pair of cloud crochet shoe soles with pre-drilled edge holes (US size 7.5: 8 / EU 38: 39 recommended).
- Eyes: Two 12mm safety eyes or doll eyes with backs/glue.
- Stuffing: A tiny pinch of polyfill (optional, for shaping the nose).
Tools:
- Crochet Hooks: 3.0 mm hook (for the main shoe upper) and 4.0 mm hook (for accessories like antlers and ears).
- Accessories: 9 stitch markers, yarn needle, scissors, and craft glue (if securing eyes).
Preparation Notes:
- Before starting, make sure your pre-drilled shoe soles are clean and free of debris inside the rim holes.
- Working with chenille yarn requires a light touch to prevent shedding, but keep your stitches firm enough around the sole so the upper stays securely attached.
Abbreviations and Notes
Abbreviations:
- ch: Chain
- sc: Single Crochet
- hdc: Half Double Crochet
- inc: Single Crochet Increase (2 sc in the same stitch)
- dec: Single Crochet Decrease (sc2tog / pull up loops in 2 sts, yarn over, pull through 3 loops)
- sl st: Slip Stitch
- MR: Magic Ring / Magic Circle
- st(s): Stitch(es)
Pattern Notes:
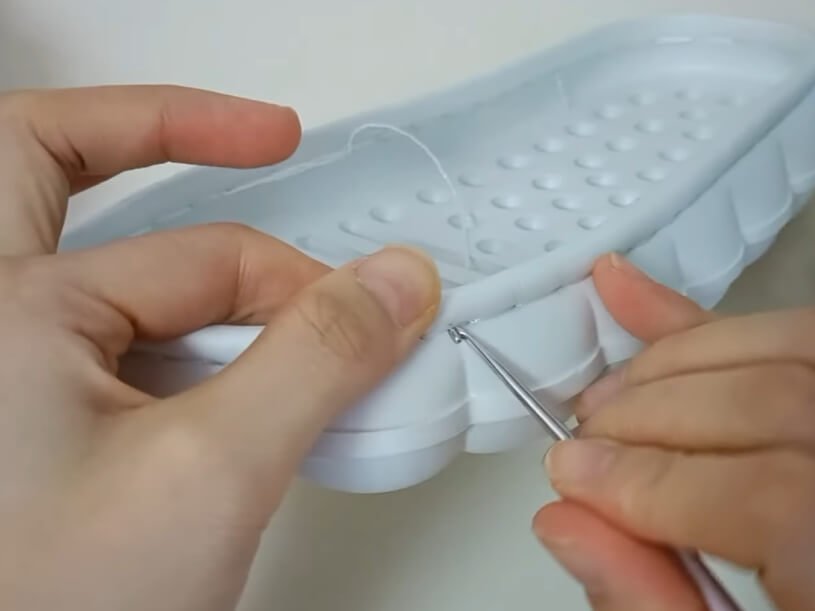
- The base foundation attaches directly to the inner pre-punched holes of the cloud soles using a 3.0 mm hook.
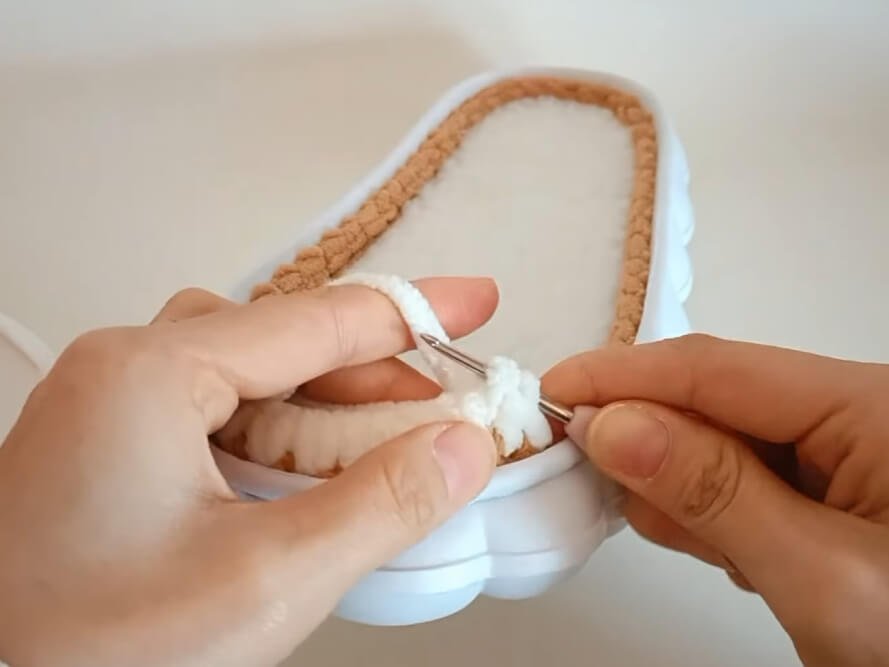
- The slipper upper is worked in specialized space: based rows across the front of the sole, pulling the yarn ball through the open loop at the end of each row (control line method) to turn neatly without tangling.
- Antlers, ears, and nose are crocheted separately using a 4.0 mm hook and sewn onto the slipper upper during final assembly.
- Original design and pattern credit belongs to Vicky Crochet.
Gauge, Approximate Size, and Pattern Notes
Gauge:
Gauge is determined primarily by your shoe sole size. Work your stitches snugly along the sole border to prevent gaps between the sole and the plush upper.
Finished Size:
Designed to fit US Women’s size 7.5: 8 (EU 38: 39 / 24.0: 24.5 cm), but easily adaptable by adding or reducing rows across the main foot bridge.
Special Techniques:
- Insole Foundation Stitching: Working single crochet stitches directly into the inner rim holes of the sole to create a sturdy foundation anchor.
- Sole Loop-Pass Method: Passing the entire slipper sole through the active loop at the end of each upper row to lock the working yarn in place along the edge.
Step-by-Step Pattern
Part 1: Sole Foundation Round & Toe Setup
Using White Chenille Yarn and 3.0 mm Crochet Hook:
- Round 1: Insert hook into an inner stitch hole on the sole, pull up a loop, ch 1. Work 1 sc in the second stitch hole (mark this first sc). Work 1 sc into each remaining hole around the inner rim of the sole. Join with a sl st to the first marked sc. Fasten off, pull loop large, and cut yarn. Re-insert the soft inner sole pad into the shoe.
- Toe Center Setup: Count and locate the central 7 stitches at the front toe cap. Place stitch markers on the left and right boundary stitches to ensure alignment.
Part 2: Main Slipper Upper (Foot Bridge)
Work with White Chenille Yarn in pattern spaces across the toe cap:
- Row 1: Join yarn in the stitch to the right of the marked toe section, ch 1. Work 1 hdc in the stitch to the left, then work 1 additional hdc in the same space (first 2-hdc cluster). Repeat this pattern across the central 7 stitches (7 hdc clusters total). Sl st into the next sole stitch, ch 1. Expand the working loop, pass the entire sole through the loop to form the side control line, and pull snug.
- Row 2: Pull loop through from the next stitch on the right, ch 1. Work 2 hdc in each space between the clusters of the previous row across (8 hdc clusters total). Sl st into the next sole stitch, ch 1, pass sole through loop, pull snug.
- Row 3: Pull loop through from next stitch on right, ch 1. Work 2 hdc in each space across (9 hdc clusters total). Sl st into next sole stitch, ch 1, pass sole through loop.
- Rows 4–8: Repeat the pattern in the same manner, adding 1 hdc cluster space per row until reaching Row 8.
- Row 9 (Color Change): Work 15 hdc cluster patterns across Row 9 (or count to match your sole size), then sl st into the next sole stitch while switching to Caramel/Brown yarn. Ch 1, pass sole through loop.
- Rows 10–15: Continue working 2 hdc in each space across using Caramel yarn until reaching Row 15.
- Row 16 (Leveling & Border Row): Pull yarn through from the next right stitch, ch 1. Work 1 sc at the beginning edge of the previous row, 1 sc into each st across the top edge, 1 sc at the end of the previous row, 1 sc into the sole stitch, then sl st to finish. Ch 1, cut yarn, and weave in ends.
Part 3: Reindeer Accessories
Head: Antlers (Make 4 pieces: 2 Large Branch, 2 Small Branch)
Using Caramel/Dark Brown Yarn and 4.0 mm Hook:
Large Antler Main Stem:
- Round 1: MR 5 sc (5)
- Round 2: Ch 1, 5 sc around (5)
- Round 3: Ch 1, 5 sc around (5)
- Fasten off, leaving a tail.
Small Antler Branch:
- Round 1: MR 5 sc (5)
- Round 2: Ch 1, 5 sc around (5)
- Do not cut yarn; join small branch directly to the first stitch of the Large Stem with a sl st.
Combined Antler Base:
- Round 4: Ch 1, work 5 sc around the Large Stem section, then 4 sc around the Small Branch section (9 sc total). Sl st to first sc.
- Round 5: Ch 1, (1 sc, dec) * 3 times (6 sc). Sl st, fasten off leaving a long tail for sewing.
Body: Ears (Make 2)
Using Caramel Yarn and 4.0 mm Hook:
- Round 1: MR 6 sc (6)
- Round 2: Ch 1, 2 sc in each st around (inc * 6) (12)
- Round 3: Ch 1, (1 sc, inc) * 6 times (18)
- Sl st to join, fasten off leaving a long tail for sewing. Pinch the bottom base slightly before attaching.
Nose (Make 1)
Using Red Yarn and 4.0 mm Hook:
- Round 1: MR 6 sc (6)
- Round 2: Ch 1, 2 sc in each st around (12)
- Round 3: Ch 1, (1 sc, inc) * 6 times (18)
- Round 4: Ch 1, (1 sc, dec) * 6 times (12)
- Sl st to join, fasten off leaving a long tail for sewing.
Part 4: Assembly & Finishing
- Antler Attachment: Position two assembled antlers symmetrical on top of the brown section of the foot bridge and sew securely with a yarn needle.
- Ear Attachment: Fold the ear bases slightly to create a cup shape, then sew them directly outside/below each antler.
- Nose Placement: Sew the puffy red nose onto the center of the white snout area.
- Eyes: Insert/glue two 12mm black safety eyes symmetrically between the nose and ears.
- Repeat all steps for the second slipper to complete your pair!
Detailed Pattern Breakdown
1. Shoe Sole Foundation & Expansion Bridge:
- The slipper construction starts directly on the shoe sole rim using a 3.0 mm hook. Work 1 sc into each pre-drilled inner hole to anchor the entire upper.
- The front foot bridge builds up from a central 7-stitch window. By working 2-hdc clusters in the gaps between stitches and looping the entire sole through the yarn after each row, the fabric expands naturally across the instep without creating bulky seams.
2. Two-Tone Color Transition & Edge Leveling:
- The lower portion uses White chenille yarn to simulate a reindeer’s light snout, while the upper instep transitions to Caramel yarn at Row 9.
- Because rows progress diagonally along the sole rim, Row 16 uses single crochet stitches along the raw sides to balance out uneven row heights before finishing.
3. 3D Accessory Sculpting:
- Antlers: Created by joining two small cylindrical tubes (MR 5 sc) into a single 9-sc round, then reducing down with
decstitches to form a branch structure. - Ears & Nose: Simple flat round pieces are transformed into 3D shapes using increases and decreases, giving the reindeer facial features depth and charm.
Pattern Question:
Question: Why do I need to pass the entire slipper sole through the active loop at the end of every row?
Answer: Because the slipper upper is attached directly to the rigid shoe sole, you cannot turn the work around in the traditional way without twisting your yarn.
Passing the sole through the enlarged working loop acts as a lock-stitch along the side edge. It creates a clean control line along the sole rim and allows you to start the next row smoothly from the opposite side without cutting your yarn!