
Have you ever looked at boutique holiday decor and thought, “I could totally make that, but will it actually look like a store-bought heirloom?”
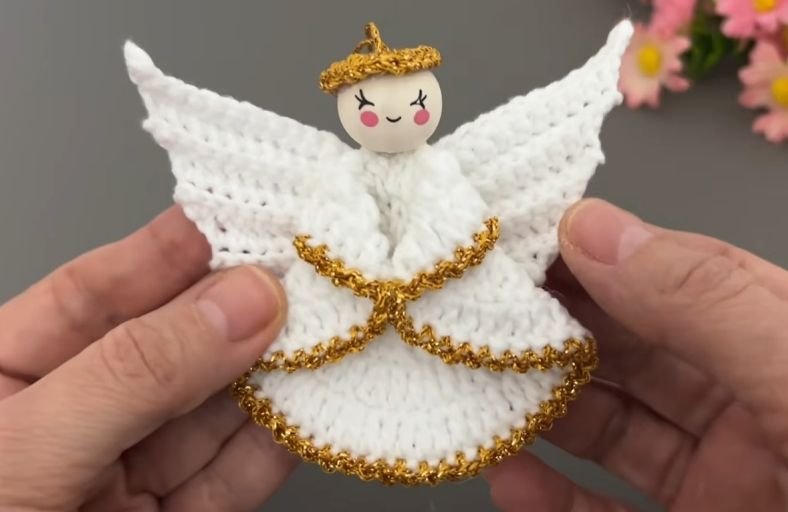
Good news: this exquisite crochet angel ornament combines dainty textured stitches with shiny metallic accents and smooth wooden bead elements, giving you that high-end designer look without the luxury price tag.
Whether you are trimming your own Christmas tree or whipping up thoughtful handmade gifts for loved ones, this step-by-step project is pure festive magic.
Materials and Preparation
Materials:
- Yarn:
- Fine or Sport weight cotton yarn in White (for the dress skirt and wings).
- Gold glitter / metallic thread or yarn (for the halo and delicate picot-like dress edging).
- Wooden Bead: 1 painted or natural wooden bead (22 mm diameter) with a pre-painted sweet angel face, or a plain wooden bead you can paint yourself.
- Hanging Cord: Gold cord or thread to loop through the bead for hanging.
Tools:
- Crochet Hook: 2.0 mm to 2.5 mm hook (choose a size that produces neat, tight stitches so the wings hold their structured shape).
- Yarn Needle: Tapestry needle for weaving in yarn ends and assembling components.
- Scissors: Craft scissors for trimming threads.
- Stitch Marker: Optional, but useful for keeping track of turning chains and joins.
Preparation Notes:
- Familiarize yourself with basic stitches such as double crochet (
dc), single crochet (sc), slip stitch (sl st), and back loop only (BLO) techniques. - Keep your tension smooth and consistent, especially when working the ribbing on the wings in
BLO, so both wings match symmetrically.
Abbreviations and Notes
Abbreviations:
- MR: Magic Ring (Double-wrapped ring for extra security)
- ch: Chain stitch
- sc: Single Crochet
- dc: Double Crochet
- sl st: Slip Stitch
- BLO: Back Loop Only
- st(s): Stitch(es)
Pattern Notes:
- The Dress Skirt is worked in flat circular join rounds starting from a magic ring and expanding with double crochet increases.
- The Glitter Edging uses an alternating
sl standch 1pattern worked along the outer edge of the skirt circle. - The Angel Wings are worked back-and-forth in rows using
BLOsingle crochets attached into a double-wrapped magic ring to create a feather-like ribbed texture. - The Halo is crocheted around a chain loop sized to fit over the 22 mm head bead.
Gauge, Approximate Size, and Pattern Notes
Gauge:
Gauge is not critical for this ornament project, but maintaining a tight stitch density helps the wings stay firm and upright without sagging.
Finished Size:
Approximately 4.5 in (11.5 cm) tall by 4 in (10.2 cm) wide across the wingspan when using the recommended yarn weight and a 22 mm head bead.
Special Techniques:
- Double-Wrapped Magic Ring: Wrapping yarn twice around your finger before starting the ring provides maximum durability when working multiple wing foundation rows into a single central loop.
- Back Loop Only (BLO) Wing Ribbing: Working single crochets exclusively in the back loop creates raised ridges that mimic feathered angel wings.
- Picot-Style Metallic Trim: Combining
sl stwithch 1gives a delicate scalloped finish to the dress hemline.
Step-by-Step Pattern
Part 1: Angel Dress Skirt
Crochet with white yarn:
- R1: Start with MR. ch 3 (counts as 1 dc), work 15 dc into MR. Join with sl st to top of initial ch 3 (16 dc)
- R2: ch 3 (counts as 1 dc), 1 dc into same st. Work 2 dc into each remaining st around. Join with sl st (32 dc)
- R3: ch 3 (counts as 1 dc), 1 dc into same st, 1 dc in next st. Repeat (2 dc in next st, 1 dc in next st) all around. Join with sl st (48 dc)
- R4: ch 3 (counts as 1 dc), 1 dc into same st, 1 dc in next 2 sts. Repeat (2 dc in next st, 1 dc in next 2 sts) all around. Join with sl st (64 dc)
Skirt Edging
Attach gold glitter yarn to any stitch along the outer edge of R4:
- Edging Round: Attach gold yarn, [ch 1, sl st in next st] repeat continuously in every stitch around the circle. Fasten off and weave in ends.
Part 2: Angel Wings (Make 2)
Crochet with white yarn:
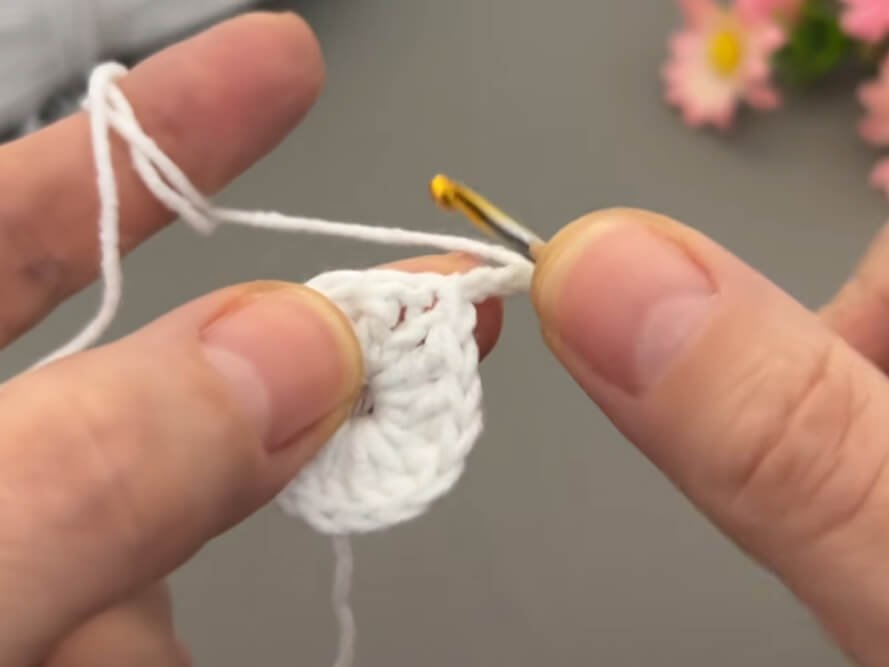
- Foundation: Wrap white yarn twice around your finger to make a double Magic Ring.
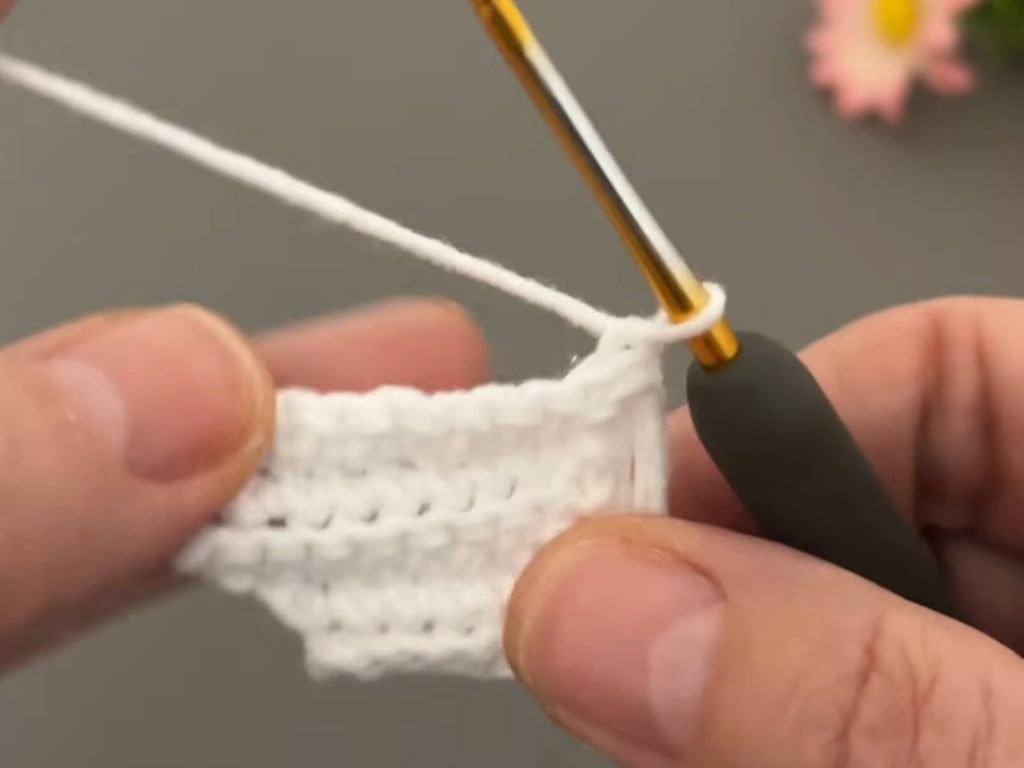
- Row 1: ch 7, skip first ch from hook, 1 sc in next 6 chains (6 sc). sl st into the magic ring to join. ch 1, turn.
- Row 2: Skip first ch and the sl st. Working in BLO, make 1 sc in BLO of next 6 sts (6 sc). ch 3, turn.
- Row 3: Skip first ch, 1 sc in next 2 chains. Working in BLO, 1 sc in BLO of next 6 sts (8 sc). sl st into the magic ring. ch 1, turn.
- Row 4: Skip first ch and the sl st. Working in BLO, 1 sc in BLO of next 8 sts (8 sc). ch 3, turn.
- Row 5: Skip first ch, 1 sc in next 2 chains. Working in BLO, 1 sc in BLO of next 8 sts (10 sc). sl st into the magic ring. ch 1, turn.
- Row 6: Skip first ch and the sl st. Working in BLO, 1 sc in BLO of next 10 sts (10 sc).
- Continue repeating this stepping pattern by adding ch 3 turns at the outer edge to expand wing length until reaching desired wing size. Fasten off leaving a long tail for sewing. Repeat for the second wing. Pull the double magic ring tight to gather wing bases.
Part 3: Angel Halo & Head Assembly
Halo (Vòng Hào Quang):
Crocheted with metallic/gold glitter yarn:
- Foundation: ch 10. Join with sl st to first ch to form a loop (adjust chain count if using a bead size other than 22 mm).
- R1: ch 1, work 22 sc directly into the chain loop. Join with sl st to first sc. Fasten off leaving a tail for assembly.
Part 4: Assembly & Finishing
- Folding the Dress: Take the finished circle skirt and fold the upper two sides inward toward the front center so they overlap slightly, forming a cone-shaped angel gown with a scalloped gold trim along the hemline and collar folds.
- Attaching the Wings: Position the two winged pieces symmetrically behind the folded dress body and stitch them firmly to the back using a yarn needle.
- Mounting the Head: Thread a gold hanging cord through the center top of the dress, feed both ends up through the 22 mm wooden face bead, and secure the bead directly onto the top collar of the dress.
- Placing the Halo: Crown the wooden bead head with the gold crocheted halo, securing it with a small stitch or a tiny drop of craft glue if needed.
- Final Touches: Neatness is key! Weave in all loose yarn ends thoroughly and adjust the folds of the dress so it hangs gracefully.
Detailed Pattern Breakdown
1. Skirt Construction & Geometric Expansion:
- Round 1 (Foundation): The skirt starts from a standard magic ring containing 16 double crochets (
16 dc), establishing a solid flat circle base. - Round 2 (100% Increase): Doubling every stitch by placing
2 dcin each stitch expands the count to32 dc, maintaining a perfectly flat plane without cupping. - Rounds 3 & 4 (Proportional Expansion): Following classic flat circle geometry, Round 3 increases every second stitch (
48 dc), and Round 4 increases every third stitch (64 dc). - Edging Detail: Switching to gold glitter thread for an alternating
sl standch 1sequence creates a micro-scalloped trim that mimics delicate embroidery cord.
2. Wing Mechanics & Step-Ribbing Technique:
- Double-Wrapped Ring Anchor: Because multiple wing rows anchor back into the center ring, double-wrapping the magic ring prevents the center loop from stretching out or snapping under tension.
- Short-Row Stepping: Wings expand outwards by adding a
ch 3extension at the outer tip every two rows. Skipping 1 chain and making2 scon the turning chain increases the row count by 2 stitches per extension cycle (6 sc$\rightarrow$8 sc$\rightarrow$10 sc). - Back Loop Only (BLO) Depth: Working solely in
BLOon return rows forces the unworked front loops outward, producing raised parallel ridges that mimic layered feather plumage.
3. Halo Fitting & Assembly Logic:
- Loop Sizing: A
ch 10foundation ring forms a snug ring collar that sits perfectly over a 22 mm round bead. - Dense Single Crochet Covering: Working
22 scdirectly into thech 10space coats the base chain completely in shimmering metallic stitches without leaving gap holes. - Fabric Folding: Folding the flat circle inward creates natural drape lines for the angel’s robe, giving the illusion of a full 3D gown while keeping construction quick and easy.
Pattern Questions
Question 1: What if my wooden head bead is larger or smaller than 22 mm? How do I adjust the halo size?
Answer: You can easily adapt the halo to fit any bead diameter. Measure around the top crown of your bead with your foundation chain. If your bead is smaller (e.g., 15–18 mm), reduce your foundation to ch 7 or ch 8 and work around 16 to 18 sc into the loop. For larger beads (25 mm+), increase the foundation to ch 12 or ch 14 and adjust the single crochet coverage accordingly until the loop sits snugly on the head.
Question 2: Why do my wings curl instead of laying flat when attached to the back?
Answer: Curling usually happens when your stitch tension is too tight or when stitches are skipped during the BLO return rows. Make sure you count your stitches on every row (6 sc, 8 sc, 10 sc) and keep a moderate, even tension. Lightly blocking your wings with a steam iron (held an inch away) or lightly spraying them with starch before sewing will ensure they stay crisp and flat.
Question 3: How do I keep the folded dress skirt from opening up over time?
Answer: After folding the two outer edges of the circular skirt inward to meet at the center front, use your yarn needle and a matching piece of white yarn to place 2 or 3 tiny hidden tacking stitches along the inner overlapping fold. This holds the elegant cone shape permanently in place without affecting the drape of the hemline.