
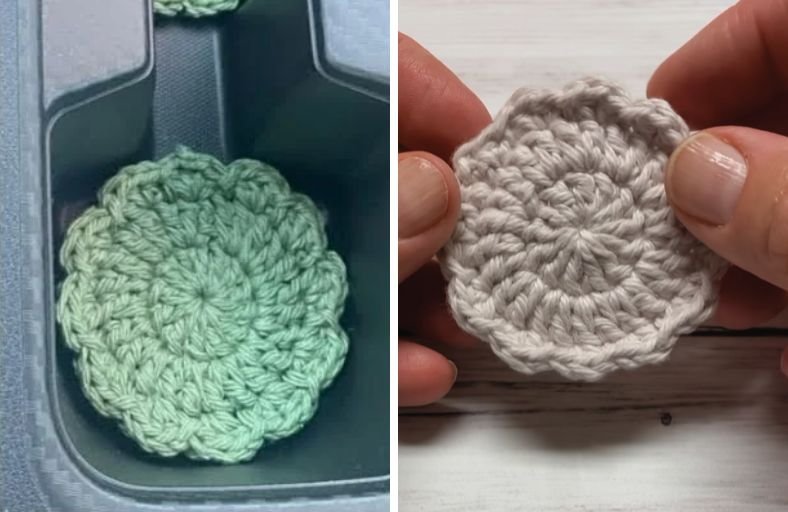
Have you ever looked at your car’s sad, empty cupholders and thought they needed a serious cute upgrade?
Say goodbye to boring vehicle interiors and sticky residue with this adorable flower power car coaster project!
Perfect for stash-busting, quick gifts, or adding a pop of handmade cheer to your daily commute, this floral accessory works up faster than your morning coffee brew.
Materials and Preparation
Materials:
- Yarn: 100% Cotton Yarn (such as Lily Sugar’n Cream) in your choice of color (yellow, green, terracotta, or sage work wonderfully). Cotton absorbs moisture well and holds its shape under hot or cold drinks.
Tools:
- Crochet Hook: 3.5 mm (US E-4) crochet hook.
- Yarn Needle: Tapestry/yarn needle for weaving in ends.
- Scissors: Sharp craft scissors.
Preparation Notes:
- You should be familiar with fundamental stitches such as the Magic Ring (
MR), Chain (ch), Half Double Crochet (hdc), Double Crochet (dc), and Slip Stitch (sl st). - Cotton yarn is sturdy and non-stretchy, allowing you to pull your Magic Ring snug without fear of breaking the strand.
Abbreviations and Notes
Abbreviations:
- MR: Magic Ring
- ch: Chain
- sl st: Slip Stitch
- hdc: Half Double Crochet
- hdc inc: Half Double Crochet Increase (2 hdc in the same stitch)
- dc: Double Crochet
- dc inc: Double Crochet Increase (2 dc in the same stitch)
Pattern Notes:
- Initial
ch 2at the start of rounds does NOT count as a double crochet stitch. - Joining is done with a
sl stinto the first actual stitch of the round, not into the initial turning chains. - If your coaster curls slightly when finished, do not worry: cotton coasters naturally flatten out over time inside your vehicle’s cupholder.

Gauge, Approximate Size, and Pattern Notes
Gauge:
Gauge is not critical for this project, but maintaining a firm, neat tension ensures the coaster fits neatly into standard automobile cupholders.
Finished Size:
Approximately 2.75 to 3.0 inches in diameter (7.0 cm to 7.6 cm), tailor-made to fit standard automotive cupholders.
Special Techniques:
- Seamless Petal Join: On Round 3, an extra half double crochet is worked directly into the joining space before slip stitching into the first petal, ensuring a continuous scalloped floral border without visible gaps.
Step-by-Step Pattern
Part 1: Main Center Base (Rounds 1–2)
- Round 1: Start with a
MR,ch 2(does not count as a stitch). Work 12dcinto theMR. Pull tail firmly to close the ring. Join withsl stto the top of the firstdc. (12dc) - Round 2:
ch 2. Work 2dcin the same stitch and in each stitch around (dc incin every stitch). Join withsl stto the top of the firstdc. (24dc)
Part 2: Scalloped Flower Edging (Round 3)
- Round 3:
ch 1,hdcin the same stitch,sl stin the next stitch. (2hdcin the next stitch,sl stin the next stitch) repeat around until 1 stitch remains before the final join. - Final Petal Finishing: Work 1
hdcdirectly into the joining space from Round 2.sl stinto the base of the very firsthdcto blend the final petal seamlessly into the start of the round.
Part 3: Assembly & Finishing
- Cut yarn leaving a 4-inch tail. Fasten off by pulling the tail through the final loop.
- Flip over to inspect your initial
MRcenter; pull the tail tight once more to ensure zero hole remains in the middle. - Using your yarn needle, weave both the starting and ending yarn tails securely into the back loops of Round 1 and Round 2.
- Trim excess yarn. Flatten the finished coaster with your palm, and it is ready to brighten up your car!
Detailed Pattern Breakdown
1. Central Base Geometry (Rounds 1–2):
- Round 1: The foundation relies on a 12-stitch
dcmagic circle. The initialch 2serves merely as height elevation rather than a true stitch, avoiding an unsightly gap along the join line whensl stconnects to the first truedc. - Round 2: Standard flat circle expansion dictates doubling the stitch count from 12 to 24 by placing a
dc incinto every available stitch from Round 1. This produces a smooth, perfectly round flat disk that lines the base of standard vehicle cupholders.
2. Scalloped Petal Border Architecture (Round 3):
- Round 3: The floral edge converts flat rounds into scalloped petals through alternating height variations. Each 2-stitch sequence pairs an
hdc incwith a lowsl st. The dramatic height shift betweenhdc(medium stitch) andsl st(flat stitch) draws the edges up and down, forming mini flower petals along the outer perimeter. - Closing Gap Technique: Rather than ending abruptly on a raw stitch, working a final
hdcinto the seam space bridges the structural gap at the seam line. This completes the symmetry so all 12 scalloped petals look identical around the entire circle.
Pattern Questions
Question: Why is 100% cotton yarn recommended instead of acrylic or polyester yarn for car coasters?
Answer: Cotton yarn provides superior absorbency for condensation leaking from cold beverage cups, preventing liquid from pooling at the bottom of your vehicle’s cupholder.
Furthermore, cotton is highly heat-resistant, so it will not warp, melt, or degrade under direct sunlight through your car windows.
Question: My coaster is curling slightly at the edges after finishing Round 3. How can I make it lie completely flat?
Answer: Mild curling is completely normal right after completing decorative edging with short repeat patterns. You can lightly steam-block the coaster using an iron held an inch away, or simply place it in your car cupholder. The weight of a cup and ambient humidity inside the car will flatten it out completely within a short time.
Question: Can I alter the size of this car coaster if my vehicle has unusually large or small cupholders?
Answer: Yes! To make a smaller coaster, switch to a 3.0 mm hook or use single crochets for Round 1 and Round 2. To make a larger coaster, add an extra expansion round between Round 2 and Round 3 (such as ch 2, 1 dc, 1 dc inc repeated around for 36 stitches) before executing the floral petal edging.