
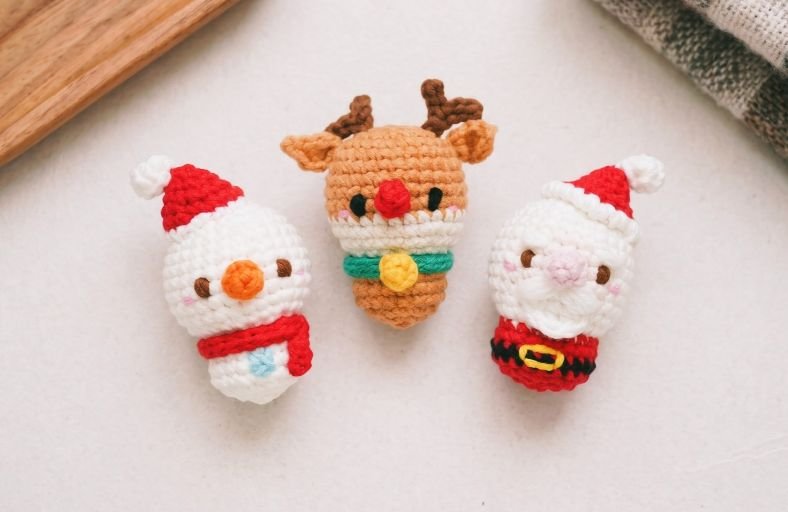
Ready to turn your yarn stash into the ultimate holiday cheer? Forget boring store-bought plastic baubles: this year, your Christmas tree is getting a major upgrade with the cutest festive trio in town.
Meet your new holiday crafting project: an adorable Reindeer, a cheerful Santa, and a cozy Snowman.
The genius secret behind this set? They all share one foundational base body shape.
By mastering clever color swaps, simple face embroidery, and a few custom mini accessories, you can whip up an entire village of festive hanging ornaments in a single afternoon.
Let’s grab your hook and bring these tiny festive companions to life!
Materials and Preparation
Materials:
- Yarn: 4-ply cotton yarn in Brown, Beige, Dark Brown, White, Red, Yellow, Orange, Green, Black, Pink, and Light Blue.
- Stuffing: Polyester fiberfill (Polyfill) to bring your little holiday trio to life with squishy goodness.
Tools:
- Crochet Hook: 3.0 mm crochet hook (or sized appropriately to keep stitches tight and prevent fiberfill from peeking out).
- Yarn Needle: Tapestry needle for seamless assembly and delicate face embroidery.
- Stuffing Tool: Wooden stick or chopsticks to help push stuffing evenly into tiny corners.
- Scissors: Sharp craft scissors.
- Stitch Marker: Essential for tracking the beginning of each round.
Preparation Notes:
- All three characters utilize the exact same foundational 3in1 head-to-body shape.
- Tension consistency is key: keep your stitches tight so that the polyester fiberfill remains completely hidden inside.
- Ensure all yarn color transitions are executed smoothly on the last loop of the preceding stitch for crisp color breaks.
Abbreviations and Notes
Abbreviations:
- MR: Magic Ring
- ch: Chain stitch
- sc: Single crochet
- inc: Single crochet increase (2 sc in the same stitch)
- dec / inv dec: Invisible single crochet decrease (sc2tog using front loops only)
- hdc: Half double crochet
- dc: Double crochet
- sl st: Slip stitch
- BLO: Back loop only
- FLO: Front loop only
Pattern Notes:
- Each round starts with a ch 1 and ends with a sl st into the first stitch of the round to maintain a clean, symmetrical shape.
- The head and body are crocheted in one continuous piece without cutting the main working thread during body transition.
- Face features, collars, hats, and embellishments are crocheted separately and stitched securely onto the base body.
- Original design and pattern credit belongs to AnDesign_Craft.
Gauge, Approximate Size, and Pattern Notes
Gauge:
Not critical for this amigurumi project. Ensure your hook size produces a tight fabric to keep stuffing hidden.
Finished Size:
Approximately 3.0 inches (7.5 cm) to 3.5 inches (9.0 cm) in height, making them the perfect proportions for hanging tree ornaments or festive keychains.
Special Techniques:
- Invisible Decrease (inv dec): Insert hook into front loops only of two consecutive stitches, yarn under, pull through, yarn under, pull through both loops.
- BLO Transition: Using back loops only on Round 13 forms a clean defined ridge between the neck and the lower body.
- FLO Ridge for Beard: Round 11 of Santa leaves front loops open so the beard can be worked directly onto the face.
Step-by-Step Pattern
Part 1: Main Base Body (Reindeer, Santa, & Snowman Base)
Reindeer Base Body
Start with Brown yarn:
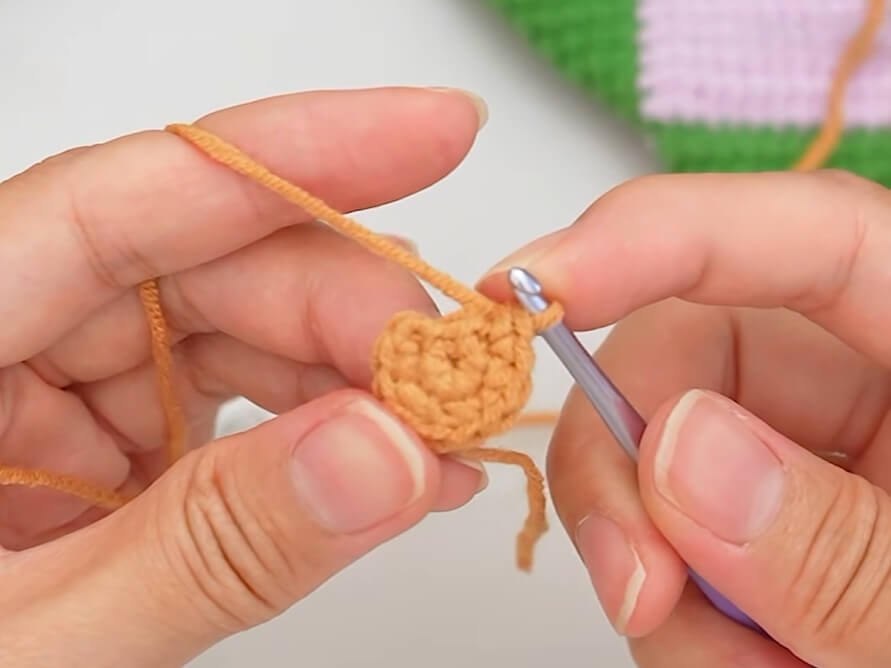
- R1: MR 6 sc, sl st (6)
- R2: ch 1, 6 inc, sl st (12)
- R3: ch 1, (sc, inc)*6, sl st (18)
- R4: ch 1, (inc, 2 sc)*6, sl st (24)
- R5: ch 1, (7 sc, inc)*3, sl st (27)
- R6–R8: ch 1, 27 sc, sl st (27)
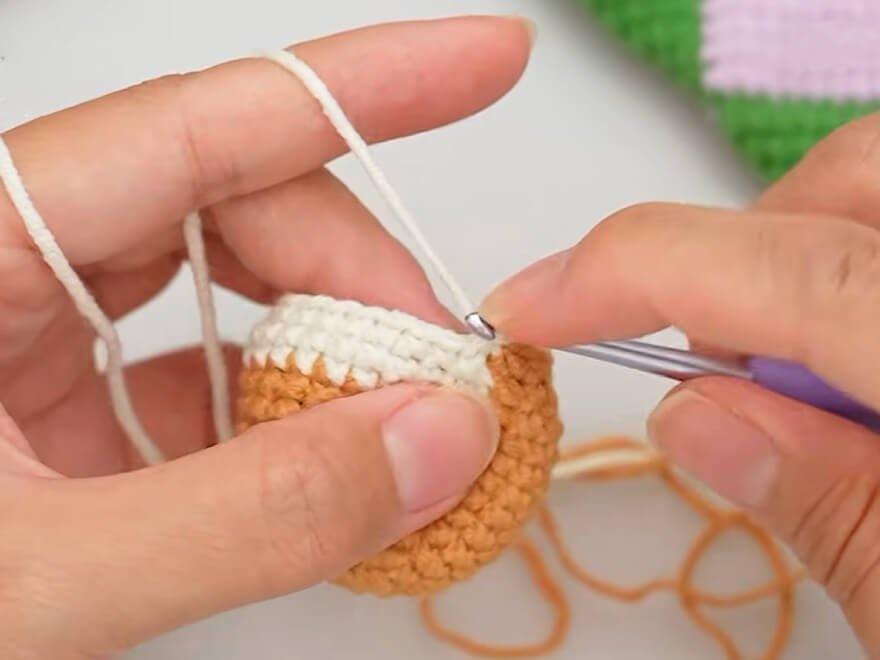
- R9–R10: ch 1, 7 sc (Brown), switch to Beige yarn 13 sc, switch to Brown yarn 7 sc, sl st (27)
- R11: ch 1, 7 sc (Brown), switch to Beige yarn inv dec, 7 sc, inv dec, 2 sc, switch to Brown yarn 5 sc, inv dec, sl st (24)
- R12: ch 1, inv dec, 2 sc, inv dec, 1 sc, switch to Beige yarn 1 sc, inv dec, 2 sc, inv dec, 2 sc, inv dec, switch to Brown yarn 2 sc, inv dec, 2 sc, sl st (18)Fasten off Beige yarn. Keep Brown yarn active.
- R13 (BLO): ch 1, 18 BLO sc, sl st (18)
- R14–R16: ch 1, 18 sc, sl st (18)
- Stuff the head and body firmly with fiberfill.
- R17: ch 1, (1 sc, inv dec)*6, sl st (12)
- R18: ch 1, 6 inv dec, sl st (6)
- Fasten off, leave a tail, weave through front loops, and pull tight to close.
Santa Base Body
Start with White yarn:
- R1–R4: Work exact same pattern as Reindeer R1–R4 using White yarn (24)
- R5: ch 1, 10 sc (White), switch to Skin Tone yarn 6 sc, switch to White yarn 11 sc, sl st (27)
- R6–R9: ch 1, 9 sc (White), switch to Skin Tone yarn 8 sc, switch to White yarn 10 sc, sl st (27)Fasten off Skin Tone yarn.
- R10: ch 1, 27 sc (White), sl st (27)
- R11: ch 1, 7 sc, inv dec, 1 sc, 6 BLO sc (leave FLO for beard), inv dec, 7 sc, inv dec, sl st (24)
- R12: ch 1, (inv dec, 2 sc)*6 (White), sl st (18)Switch to Red yarn for Body:
- R13 (BLO): ch 1, 18 BLO sc (Red), sl st (18)
- R14: ch 1, 18 sc (Red), sl st (18)
- R15: ch 1, 18 sc (Black for Belt), sl st (18)
- R16: ch 1, 18 sc (Red), sl st (18)
- Stuff firmly with fiberfill.
- R17: ch 1, (1 sc, inv dec)*6 (Red), sl st (12)
- R18: ch 1, 6 inv dec (Red), sl st (6)
- Fasten off and weave closed.
Snowman Base Body
Work entirely in White yarn:
- R1–R4: Work exact same pattern as Reindeer R1–R4 (24)
- R5: ch 1, (7 sc, inc)*3, sl st (27)
- R6–R10: ch 1, 27 sc, sl st (27)
- R11: ch 1, (7 sc, inv dec)*3, sl st (24)
- R12: ch 1, (inv dec, 2 sc)*6, sl st (18)
- R13 (BLO): ch 1, 18 BLO sc, sl st (18)
- R14–R16: ch 1, 18 sc, sl st (18)
- Stuff firmly with fiberfill.
- R17: ch 1, (1 sc, inv dec)*6, sl st (12)
- R18: ch 1, 6 inv dec, sl st (6)
- Fasten off and weave closed.
Part 2: Character Accessories & Features
Reindeer Accessories
- Horns (Make 2): Using Dark Brown yarn, ch 4, ch 1, 3 sl st in back bumps. Ch 3, insert in 2nd ch from hook, 4 sl st down (inserting 3rd sl st into same join stitch), 1 sl st in base chain. Fasten off.
- Ears (Make 2): Using Brown yarn, ch 4. In 2nd ch from hook work 2 sc. In last ch work (1 sc, ch 2, 1 sc). Working on opposite side of chain, work 2 sc, sl st in first st. Fasten off with long tail.
- Nose & Yellow Bell (Make 1 Red for Nose, 1 Yellow for Bell):
- R1: MR 5 sc, sl st (5)
- R2: ch 1, 5 sc, sl st (5)
- Fasten off with tail for sewing.
- Green Collar: Using Green yarn, ch 20 (or size to fit neck). Ch 1, work sl st in each back bump across. Fasten off.
Santa Accessories
- Santa’s Beard: Join White yarn to FLO loops left on R11 of Santa head. In the same stitch work (1 sc, 1 hdc, 2 dc, 1 hdc, 1 sc). Fasten off and weave end inside.
- Santa Hat: Using Red yarn:
- R1: MR 4 sc, sl st (4)
- R2: ch 1, (1 sc, inc)*2, sl st (6)
- R3: ch 1, (2 sc, inc)*2, sl st (8)
- R4: ch 1, (3 sc, inc)*2, sl st (10)
- R5: ch 1, (4 sc, inc)*2, sl st (12)
- R6: ch 1, (5 sc, inc)*2, sl st (14)
- R7: ch 1, (6 sc, inc)*2, sl st (16)
- R8: ch 1, (7 sc, inc)*2, sl st (18)
- Fasten off Red. Join White yarn to edging and work 18 surface sl st or fluffy edging.
- Pom-Pom: Using White yarn, MR 5 sc, sl st. Fasten off and sew to hat tip.
- Nose: Using Pink/Skin yarn, work same pattern as Reindeer Nose (MR 5 sc, 1 round of 5 sc).
Snowman Accessories
- Orange Nose: Using Orange yarn, work MR 5 sc, 1 round of 5 sc. Fasten off with long tail.
- Red Scarf: Using Red yarn, ch 24 (or desired length). Ch 1, work 24 sl st in back bumps across. Fasten off.
- Hat: Work same pattern as Santa Hat using Red or contrast color.
Part 3: Assembly & Finishing
Reindeer Assembly:
- Sew Red Nose onto face center at Rounds 7 to 8.
- Embroider French knot or straight stitch black eyes on either side at Round 8.
- Attach Dark Brown Horns onto head top at Rounds 1 to 2.
- Sew Ears slightly lower on sides at Round 4.
- Wrap Green Collar around neck and sew Yellow Bell to center front.
- Embroider Pink cheeks right below eyes at Rounds 8 to 9.
Santa Assembly:
- Sew Pink Nose in middle of face area at Rounds 8 to 9.
- Embroider Black eyes at Round 8 and White eyebrows directly above eyes.
- Embroider White beard detail between Rounds 9 and 10 beneath nose.
- Embroider Yellow square buckle onto Black belt on body.
- Attach Red Hat securely to top of head and add Pink cheeks.
Snowman Assembly:
- Sew Orange Nose to center face at Rounds 8 to 9.
- Embroider Black eyes at Round 8 and Pink cheeks at Rounds 8 to 9.
- Wrap Red Scarf around neck section and stitch down.
- Embroider Blue yarn snowflake button on body at Round 15.
- Sew Hat on top of head. Add hanging yarn loop to all three ornaments.
Detailed Pattern Breakdown
1. Unified 3in1 Base Body Geometry
The brilliant design foundation relies on a single continuous teardrop amigurumi shape:
- Head Foundation (R1 to R8): Starting with a standard MR 6 sc expansion up to 27 stitches creates a rounded sphere for facial feature placement.
- Muzzle Color Switching (R9 to R10): Precise color changes introduce a distinct 13-stitch patch for the Reindeer muzzle or 8-stitch patch for Santa’s face without interrupting the overall round stitch counts.
- Neck Taper & BLO Ridge (R11 to R13): Strategic invisible decreases reduce total stitches from 27 down to 18. Working Round 13 in Back Loops Only (BLO) generates a sharp, defined structural ledge separating the head from the body, serving as an anchor line for scarves and collars.
- Lower Body Closure (R14 to R18): Maintains 18 stitches for lower body volume before rapidly tapering down using sc dec sequences to seal the base seamlessly.
2. Character-Specific Facial Contouring & Textures
- Santa’s Embedded Beard (R11 FLO): Leaving the front loops unworked during Round 11 creates a built-in canvas. The shell pattern sequence (sc, hdc, 2 dc, hdc, sc) directly fills this ridge to create a curved beard without separate sewing steps.
- Reindeer Horn Architecture: Constructed using chained foundation branches worked in back bumps with slip stitches, forming structured mini antlers without wire inserts.
- 3D Snout Accessories: Tiny 5-sc cylinders form sturdy noses for all three characters, adding dimensional realism.
3. Decorative Edgings & Tailored Accents
- Santa Belt Buckle Integration: A simple embroidery square over the black waist round immediately transforms the simple round body into Santa’s coat.
- Conical Holiday Hats: A steady expansion rate of 2 increases per round across 8 rounds generates a proportional conical shape that sits naturally on top of the rounded heads.
Pattern Question
Question: How do I ensure clean color transitions on Santa’s face and the Reindeer’s muzzle without leaving loose loops or gaps?
Answer: To achieve seamless color changes, always perform the final yarn-over of the stitch preceding the color swap using the new yarn color. Pull the new color loop through to complete the stitch, then carry the unused yarn color loosely along the inside back of your work. Keep your stitch tension consistent so carried yarn strands do not pull or warp the shape of the face.