

Ever feel like your ears are staging a chilly protest the second autumn breezes hit, yet hats totally ruin your hair? Say hello to your new cold-weather bestie: the Wheat Stitch Earwarmer!
Featuring lush, braided-looking texture running horizontally across your forehead and a trendy twisted front, this project transforms a simple flat rectangle into a boutique-worthy accessory in just an evening.
Best of all, you can easily customize the stitch count across seven sizes from baby to large adult, or hold a strand of fluffy mohair alongside your yarn for an ultra-cozy halo effect.
Materials and Preparation
Materials:
- Yarn:
- Worsted weight yarn (Category 4) such as Malabrigo Rios (100% Superwash Merino Wool, 210 yards per skein) in your favorite tonal or speckled shade (like Daphne, Pearl, or Crisp).
- Optional Fluffy Accent: Fine lace-weight mohair yarn (Category 0) held double with your worsted weight yarn for an extra soft, haloed finish.
- Finishing Touches (Optional): Faux leather tag with metal brads, or a printable care tag tied with a double strand of rustic twine.
Tools:
- Crochet Hook: 4.5 mm crochet hook (or size needed to obtain gauge).
- Yarn Needle: Tapestry needle for seaming the twist and weaving in ends.
- Stitch Marker: To mark the first stitch of every row and keep your edges straight.
- Scissors: For trimming yarn tails and twine.
- Hole Punch: If attaching paper care tags with twine.
Preparation Notes:
- If you choose to hold a strand of lace-weight mohair together with your worsted weight yarn, simply treat both strands as a single piece of yarn throughout the project. Keep an eye on your tension, as holding two strands can slightly widen your fabric.
- Working your foundation row into the bottom humps (back bumps) of the starting chain creates a clean, elastic edge that matches the top of your earwarmer seamlessly.
Abbreviations and Notes
Abbreviations:
- ch: Chain
- sc: Single Crochet
- BLO: Back Loop Only
- sk: Skip
- yo: Yarn Over
- mod puff: Modified Puff Stitch (see Special Techniques below)
- st(s): Stitch(es)
- RS / WS: Right Side / Wrong Side
Pattern Notes:
- This pattern uses standard US Crochet Terms and is worked back and forth in flat rows.
- Turning chains (
ch 1) at the beginning of rows do not count as a stitch. - Stitch count remains identical on every single row for whichever size you choose to make.
- While the wheat stitch is reversible, designating a Right Side (RS) and Wrong Side (WS) keeps your horizontal “wheat stalks” leaning neatly in the same direction.
- Original pattern by Briana K.

Gauge, Approximate Size, and Pattern Notes
Gauge:
Consistent tension is key so the earwarmer hugs your head snugly without stretching out. If holding mohair double, check your width and length after a few rows and tighten your tension slightly if needed.
Finished Size:
The pattern easily adapts to 7 sizes (from Baby up to Large Adult) by adjusting your starting chain length (must be an odd number for the foundation chain, yielding an even number of stitches).
- Baby Size (demonstrated below): Approx. 14 to 15 inches (35.5 to 38 cm) in circumference before stretching, and 3 to 3.5 inches (7.5 to 9 cm) wide.
- Adult Sizes: Approx. 19 to 21 inches (48 to 53 cm) in circumference and 4 to 4.5 inches (10 to 11.5 cm) wide.
Special Techniques:
- Modified Puff Stitch (mod puff): After skipping 1 stitch and working
1 scinto the next stitch, reach back into the skipped stitch:yo, insert hook into skipped stitch,yoand pull up a tall loop (to the height of the current row),yo, insert hook into the exact same skipped stitch,yoand pull up a second tall loop (5 loops on hook).Yoand pull through 4 loops (2 loops left on hook),yoand pull through the remaining 2 loops to complete the stitch. - The “C” Join (Pac-Man Seam): A clever folding method that creates a seamless, twisted turban knot at the front without bulky sewing.
Step-by-Step Pattern
Part 1: Foundation and Ribbed Base (Baby Size)
Note: To make larger sizes, increase your starting chain in multiples of 2 so you always begin with an odd number of chains and end up with an even stitch count.
- Foundation: Leaving a 10-inch tail for seaming later, make a slip knot and
ch 57. - R1 (RS): Working into the bottom humps of the chain,
scin the 2nd ch from hook and in each ch across. Turn. (56 sc) - R2 (WS):
ch 1,BLO scin each st across. Turn. (56 sc)
Part 2: Horizontal Wheat Stitch Body
- R3 (WS):
ch 1,1 scin the first st, (sk next st,1 scin next st, work1 mod puffback into the skipped st) repeat across until 1 st remains,1 scin the last st. Turn. (56 sts) - R4 (RS):
ch 1,1 scin the first st, (sk next st,1 scin next st, work1 mod puffback into the skipped st) repeat across until 1 st remains,1 scin the last st. Turn. (56 sts) - R5 (WS):
ch 1,BLO scin each st across. Turn. (56 sc) - R6 (RS):
ch 1,BLO scin each st across. Turn. (56 sc) - Repeat Rows: Repeat R3 to R6 until your rectangular strip reaches your desired earwarmer width (typically 2 to 3 full wheat stitch repeats for Baby, or 3 to 4 full repeats for Adult). Fasten off, leaving a 12-inch yarn tail for seaming.

Part 3: The Twist Seam (“C” Join) & Finishing
Step 1: Folding the “C” Join
- Lay your finished strip flat on your table with the Right Side (RS) facing up.
- Bring the two short ends together toward the center so the Wrong Side (WS) is now facing you.
- Pinch one short end into a “C” shape and the opposite short end into a backwards “C” shape.
- Slide the two “C” shapes inside one another (like two interlocking Pac-Man mouths) so all four fabric edges stack evenly.
Step 2: Seaming and Flipping
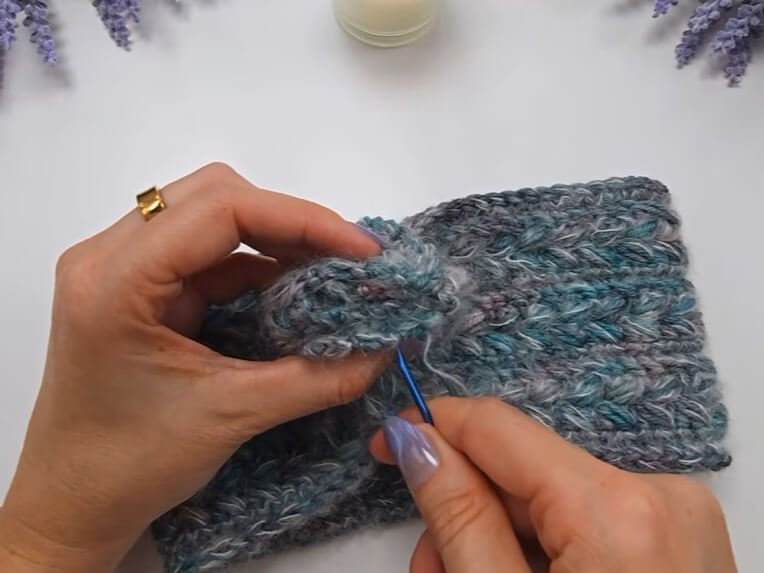
- Thread your long yarn tail onto a tapestry needle.
- Sew straight back and forth through all four stacked layers along the raw edge, making sure your needle catches every layer securely.
- Tie a secure knot, weave in the remaining yarn ends, and flip the earwarmer right side out to reveal the woven front twist.
Step 3: Adding Labels or Tags
- Faux Leather Tag: Fold a leather tag over the bottom edge near the twist and secure it with metal brads.
- Printable Care Tag: Fold a paper label strip around the edge, punch two holes through both layers at once, thread a double strand of twine from back to front, and tie a neat bow. Gently pull the twine ends between your thumb and fingernail to give them a soft curl.
Detailed Pattern Breakdown
1. Horizontal Construction vs. Vertical Construction
Traditional wheat stitch earwarmers are worked in short rows vertically, meaning the braided wheat motifs run up and down. By chaining the full circumference of the head first (ch 57 for Baby) and working lengthwise across R1 to R6, the puffed wheat stalks wrap horizontally around your head. Adding a single sc border stitch at the very start and end of R3 and R4 creates crisp, sturdy edges that make aligning the layers during assembly effortless.
2. Geometry of the 4-Row Repeat
The signature look of the wheat stitch relies on alternating textures over a 4-row cycle:
- Two Rows of
BLO sc(R5 & R6): Working strictly into the back loop pushes the unused front loop forward, forming crisp horizontal ridge lines that frame each braided wheat row. - Two Rows of Crossed Modified Puffs (R3 & R4): Skipping a stitch, placing an anchor
scahead, and reaching backward with a 2-loop modified puff forces the stitch to slant diagonally. When you turn your work and repeat this on R4, the second row slants in the opposite direction, interlocking to form the plump V-shape of a wheat stalk.
3. Why the “C” Join Works Like Magic
Instead of twisting the fabric manually and risking a lumpy knot, interlocking the two ends in opposing “C” curves automatically folds the fabric over itself twice. When you stitch flat across the four layers and turn the band right side out, the seam disappears completely inside the fold while the exterior drapes into a smooth, professional twist.
Pattern Question:
Question: My modified puff stitches look tight and are pulling the edges of my earwarmer inward. How can I fix this?
Answer: When working the mod puff back into the skipped stitch, make sure you pull your loops up generously to match the full height of the single crochet stitch next to it. Pulling up tall, relaxed loops prevents the diagonal stitch from tugging on the fabric, keeping your horizontal wheat stalks plump and your earwarmer edges completely straight.
Question: Can I hold two strands of yarn together without changing my hook size?
Answer: Yes! Holding a fine lace-weight mohair strand together with worsted weight yarn adds minimal bulk to your stitch gauge around the head, though it may make the band slightly wider (which just means extra ear warmth). If you notice your gauge growing a bit loose, simply tighten your hand tension slightly or drop down half a hook size to 4.0 mm.
Question: How do I adjust this pattern for adult sizes or thicker yarn?
Answer: Because the wheat stitch repeat requires an even number of stitches plus 1 turning chain, simply chain any odd number that comfortably wraps around the recipient’s head without stretching. Always measure your starting chain (or first row of sc) against a head circumference chart before working the puff stitch rows to guarantee a cozy fit.