
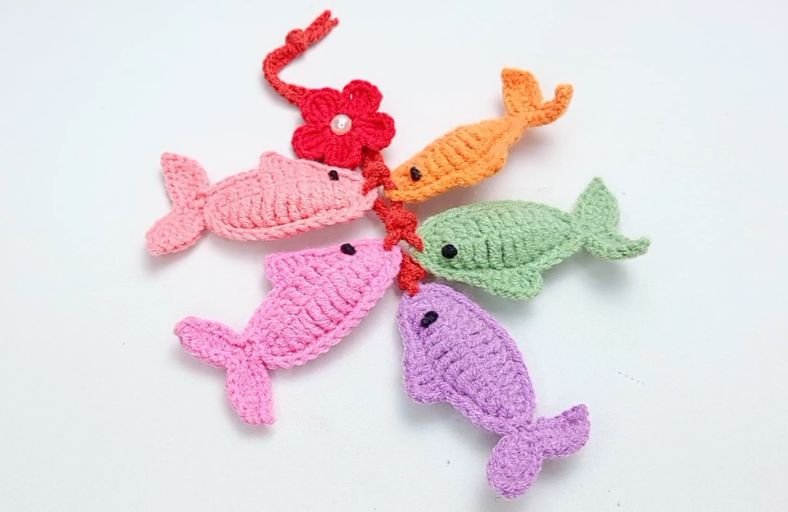
Ever wondered how to invite a little extra luck, fortune, and swimmingly cute charm into your living space without buying an entire aquarium?
In traditional symbolism, fish represent abundance and prosperity, making this adorable multi-colored fish cluster ornament the perfect handmade charm for your home, bag, or rear-view mirror.
Whether you are looking for a quick stash-buster project or a soulful gift that screams “abundance every year,” this beginner-friendly tutorial will have you hooking up a school of colorful little swimmers in no time!
Materials and Preparation
Materials:
- Yarn: 4-ply milk cotton yarn in your choice of vibrant colors (e.g., pink, orange, green, purple, and red for the main fish, flower, and lanyard hanging cord).
- Embroidery Thread: Small amount of black thread or yarn to embroider the fish eyes.
- Embellishments: A small flatback pearl or decorative patch for the center of the flower.
Tools:
- Crochet Hook: 2.0 mm crochet hook (or size suitable for 4-ply milk cotton yarn).
- Yarn Needle: Tapestry/yarn needle for assembling and weaving in ends.
- Stitch Markers: Optional, to keep track of key turning chains.
- Scissors: Craft scissors.
Preparation Notes:
- Work with an even, firm tension so that the flat fish body holds its shape without curling excessively.
- Basic stitches used in this project include the chain (
ch), single crochet (sc), half double crochet (hdc), double crochet (dc), and slip stitch (sl st).
Abbreviations and Notes
Abbreviations:
- ch: Chain stitch
- sc: Single Crochet
- hdc: Half Double Crochet
- dc: Double Crochet
- sl st: Slip Stitch
- inc: Increase (2 stitches worked into the same stitch)
- dec: Decrease
Pattern Notes:
- The fish is constructed by first crocheting two symmetrical tail pieces, then working the flat body pieces, joining them together, and working a decorative edging around the outer perimeter.
- Five individual fish are made and strung onto a long crocheted lanyard topped with a 5-petal flower charm.

Gauge, Approximate Size, and Pattern Notes
Gauge:
Gauge is not critical for this project. Keep stitches uniform to ensure all 5 fish match in overall proportions.
Finished Size:
- Each fish measures approximately 2.5 inches to 3 inches in length (6.35 cm to 7.62 cm).
- Total pendant height depends on the custom hanging length, averaging around 10 inches to 12 inches (25.4 cm to 30.48 cm).
Special Techniques:
- Working into the Back Ridge / Back Bumps of Chain: Yields a neat, clean edge when starting the body rows.
- Edging and Seaming in One Step: Joining the two flat body halves together using a border row of
scandsl stto form a sturdy 2D flat fish.
Step-by-Step Pattern
Part 1: Small Fish Main Body & Tail
Make 5 fish in total using different vibrant yarn colors.
Tail Piece 1:
- Row 1: Start with a slip knot, ch 7. Starting in the 2nd chain from hook (working into inner loop), work 1 sc, 1 hdc, 2 dc, 1 hdc, 1 sc (6)
- Row 2: Ch 1, turn. Repeat the same sequence across: 1 sc, 1 hdc, 2 dc, 1 hdc, 1 sc (6)Fasten off first tail fin.
Tail Piece 2:
- Repeat Row 1 and Row 2 of Tail Piece 1. Do not fasten off at the end of Tail Piece 2; you will now transition to the main body.
Main Fish Body:
- Body Foundation: From Tail Piece 2, ch 15.
- Row 1 (First Side Panel): Turn and pick up the back ridge/bumps of the chain. Starting in the 2nd ch from hook: 1 sc, 1 hdc, 4 dc, 3 dc, 1 hdc, 1 sc (11).
- Row 2: Turn work around to the opposite side of the chain foundation. Repeat the same sequence across: 1 sc, 1 hdc, 4 dc, 3 dc, 1 hdc, 1 sc (11).
- Row 3 & Row 4 (Second Side Panel): Repeat the body sequence to create the second identical body layer.
- Fold the two body layers flat on top of each other and align the edges.
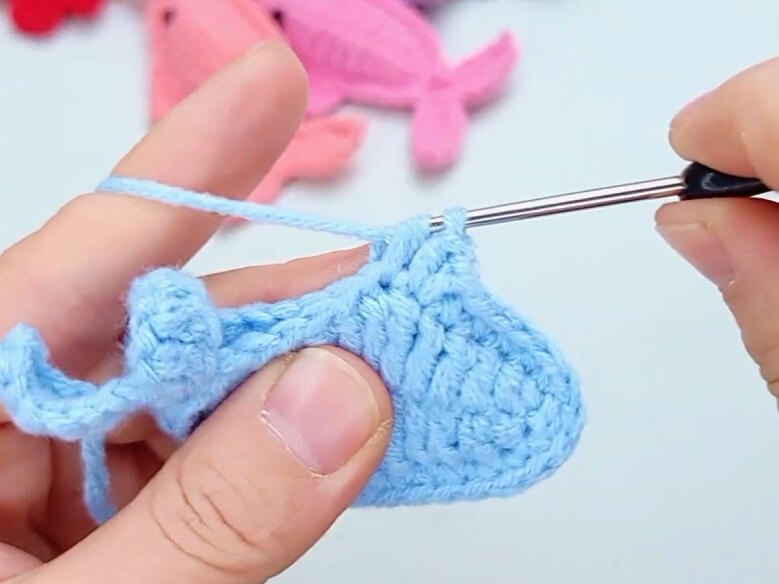
Joining & Edging Border:
- Row 5 (Seaming & Fins): Work through both layers simultaneously to join them together.
- Work 14 sc along the main bottom/body edge.
- Ch 2, then work 5 sc along the front section.
- In the next stitch, work (1 sc, ch 1, 1 hdc) to form the dorsal fin accent.
- Row 6 (Outer Slip Stitch Trim):
- Work 6 sl st in sequence along the top ridge.
- Ch 2, 1 sl st into the same stitch (forming a tiny fin tip).
- Work 12 sl st in sequence along the upper body.
- Ch 2, 1 sl st into the same stitch.
- Work 6 sl st in sequence to return to the tail base.
- Fasten off and hide thread ends inside the body.
Eye Details:
- Thread a needle with black thread and embroider a small French knot or stitch on both sides of the head to create the eyes.
Part 2: Lanyard Cord
Crochet with red yarn:
- Foundation: Start with a slip knot, ch 156.
- Finishing: Fasten off smoothly at the end of the long cord.
Part 3: Decorative Flower Charm
- Round 1: Start with a Magic Ring (or ch 2). Ch 1 (starting chain), work 5 sc into the ring. Pull ring tight and sl st to the first sc to join (5)
- Round 2 (Petals):
- Petal 1: (Ch 3, 3 dc into the first sc, ch 3, sl st into the next stitch).
- Petals 2–5: Repeat sequence (Ch 3, 3 dc, ch 3, sl st into next stitch) 4 more times to create 5 petals total.
- Fasten off, leave a tail to weave in, and attach a small pearl/flatback patch to the center of the flower.
Part 4: Assembly & Finishing
- Thread the ends of the red lanyard through the top edges/fins of each of the 5 finished small fish, arranging them gracefully at staggered lengths.
- Slide the decorative 5-petal flower onto the top cluster node where the fish meet to cover the joining knot nicely.
- Secure all hanging strands firmly and trim any excess yarn tails.
Detailed Pattern Breakdown
1. Fish Tail and Body Structural Geometry
- Tail Construction (Rows 1–2): The fish tail relies on symmetrical stitch heights. By transitioning smoothly from short stitches (
sc) to medium (hdc) to tall (dc) and back down tosc, a natural parabolic fin shape is established. Creating two identical tail fins gives the ornament structural balance. - Body Shaping (Rows 1–4): The body pattern uses a center-heavy distribution of tall
dcstitches flanked byhdcandscends. This creates a natural oval bulge that mimics the realistic silhouette of a small koi or goldfish without needing complex 3D spherical stuffing.
2. Seaming and Integrated Fin Detailing
- Dual-Layer Joining (Row 5): Rather than sewing the two flat body halves with a tapestry needle, the pattern unifies them directly with a single row of
scthrough both layers. This provides crisp, firm outer edges. - Fin Accents (Row 6): The top dorsal and ventral fins are produced using quick chain-and-slip-stitch combos (
ch 2, sl st) inserted directly during the final edging pass, streamlining the process so no separate small fin parts need sewing later.
3. Lanyard and Flower Accent Geometry
- Flower Petal Formation: Each petal achieves its rounded teardrop shape by using
ch 3as structural side pillars while packing three talldcstitches into a single base stitch, then anchoring back down with anotherch 3slip stitch.
Pattern Question:
Question: How do I keep the fish from twisting awkwardly on the hanging cord once the ornament is fully assembled?
Answer: To ensure all five fish hang facing outward nicely, thread the lanyard cord through two distinct stitches along the top ridge of each fish (rather than just a single loop).
This creates a firm two-point anchor for each fish. Additionally, placing a small drop of craft glue or making a tiny knot behind the flower charm locks the cluster tightly in place so the fish won’t slide or twist out of position.