
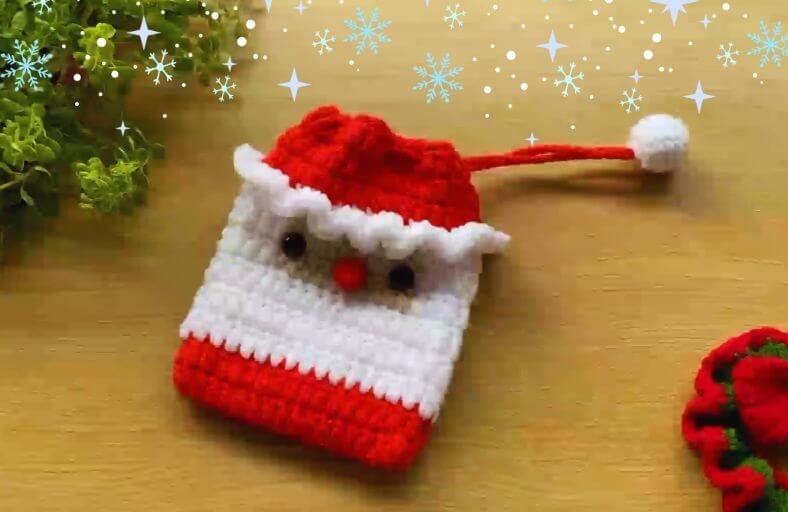
Looking for the ultimate festive pouch to tuck away holiday treats, tiny gifts, or Christmas coins?
Santa Claus himself just donated his iconic style to your yarn collection, and this jolly drawstring bag is guaranteed to spread instant holiday cheer!
Grab your favorite hook, channel your inner elf, and let us whip up this adorable Santa bag step by step.
Materials and Preparation
Materials:
- Yarn: 4-ply cotton yarn (approx. 2.0 mm diameter) in Red, White, and Beige/Skin Tone.
- Safety Eyes: 2 black safety eyes (approx. 8 mm – 10 mm).
- Nose: 1 small red pom-pom or a small red crocheted ball.
Tools:
- Crochet Hook: Size 3.5 mm crochet hook.
- Tapestry Needle: For weaving in loose yarn ends and attaching tiny details.
- Stitch Markers: To keep track of rounds.
- Scissors: For trimming yarn.
Preparation Notes:
- Maintain a neat, even tension throughout the bag so that small items inside will not slip through the stitches.
- Get familiar with working double crochet stitches (
dc) in rounds, as well as textured techniques like working in the Front Loops Only (FLO) for hat trim and ruffle details.
Abbreviations and Notes
Abbreviations:
- ch: Chain
- sl st: Slip Stitch
- sc: Single Crochet
- dc: Double Crochet
- inc (2dc): Double Crochet Increase (2
dcin the same stitch) - 3dc inc (3dc): 3 Double Crochets worked into the same stitch
- sk: Skip stitch
- FLO: Front Loop Only
- BLO: Back Loop Only
- MR: Magic Ring
Pattern Notes:
- Each round of the main pouch starts with
ch 2(orch 3as the firstdc) and joins with asl stto the first stitch of the round. - Color changes happen seamlessly at the end of the specified rounds before joining with a
sl st. - Original design and pattern credit belongs to Kane Crochet.

Gauge, Approximate Size, and Pattern Notes
Gauge:
- 18
dcx 9 rounds = 4 inches x 4 inches (10 cm x 10 cm) using a 3.5 mm hook.
Finished Size:
- Approximately 5.5 inches wide by 7.0 inches tall (14 cm x 18 cm) when laid flat.
Special Techniques:
- Drawstring Shell Eyelets: Created by skipping stitches and working chain spaces to thread the drawstring cord smoothly through the top cuff.
- Layered Ruffle Trim: Created by working in the
FLOof a previous round, leaving the back loops available to continue building the body.
Step-by-Step Pattern
Part 1: Main Bag Base and Body
Base (Red Yarn)
- Foundation: Start with Red yarn. Ch 22.
- R1: Work 1
dcin 3rdchfrom hook, 18dc, 3dcin lastch(3dc inc). Working along opposite side of chain: 18dc, 2dcin lastch(2dc inc). Join withsl stto firstdc(42). - R2: Ch 2, 2dc inc in first 2 sts, 18
dc, 2dc inc in next 3 sts, 18dc, 2dc inc in last st. Join withsl st(48).
Lower Body – Santa’s Suit (Red Yarn)
- R3–R5: Ch 2, 48
dcaround. Join withsl st(48). - Switch to White yarn at the end of R5.
Santa’s Beard (White Yarn)
- R6–R8: Ch 2, 48
dcaround. Join withsl st(48). - Switch to Beige/Skin Tone yarn at the end of R8.
Santa’s Face (Beige/Skin Tone Yarn)
- R9–R10: Ch 2, 48
dcaround. Join withsl st(48). - Switch to White yarn at the end of R10.
Part 2: Hat Brim, Drawstring Holes & Top Cuff
Hat Fluffy Brim (White Yarn)
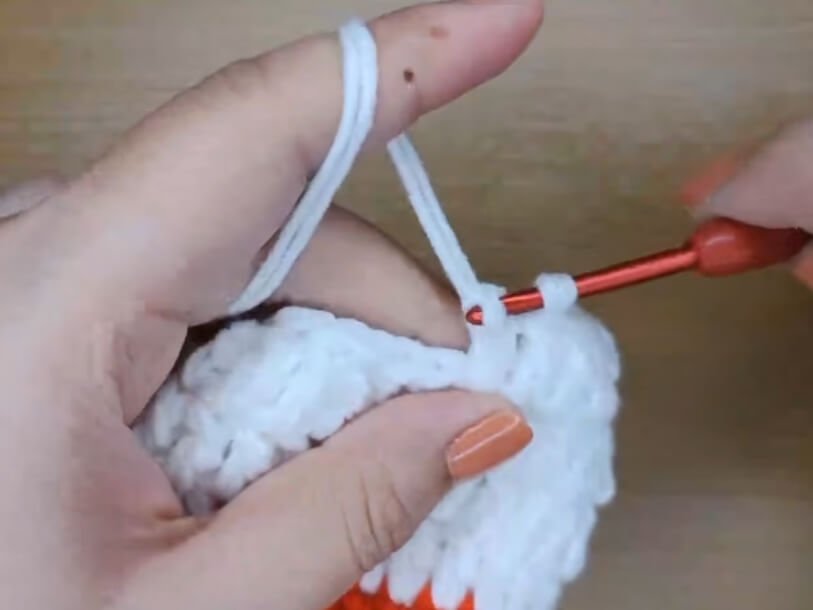
- R11: Ch 2, in
FLOwork 48dcaround. Join withsl st(48). - Switch to Red yarn for Santa’s Hat.
Drawstring Round (Red Yarn)
- R12: Attach Red yarn to the remaining
BLOof R10. Ch 2, [1dc, ch 1, sk 1 st] repeat 24 times around to create drawstring eyelets. Join withsl st(48 sts & ch spaces).
Top Ruffle Cuff (Red Yarn)
- R13: Ch 2, 48
dcaround. Join withsl st(48). - R14: Ch 3, work 3
dcin each st around to form a ruffled top border. Join withsl stand fasten off (144).
Part 3: Drawstring Cord and Accessories
Drawstring Cord (Red Yarn)
- Foundation: Ch 80 (or desired length to wrap around pouch with extra tail).
- Finishing: Fasten off and knot ends.
Pom-Poms / Cord Ends (White Yarn)
- R1: MR 6
sc(6). - R2: [1
sc, inc] 3 times (9). - R3: 9
sc(9). - R4: Dec 4 times, sl st to close. Attach to the ends of the drawstring cord.
Part 4: Assembly & Finishing
- Eye Placement: Insert safety eyes on the Beige section (between R9 and R10) spaced about 4 to 5 stitches apart.
- Nose Attachment: Glue or sew a small red pom-pom in the center directly between and slightly below the eyes.
- Drawstring Threading: Weave the Red drawstring cord in and out through the eyelet spaces created in R12.
- Final Touches: Attach white mini pom-poms to both ends of the drawstring cord, weave in all loose yarn ends neatly inside the bag.
Detailed Pattern Breakdown
1. Main Bag Construction Breakdown
The body is constructed from the bottom up in continuous oval-to-tubular double crochet rounds:
- Base Foundation (R1–R2): Starts with an oval base worked around both sides of a central foundation chain using
2dcand3dcincreases at both ends to create rounded corners. - Color Blocking Strategy (R3–R10): Structured color shifts build Santa’s outfit layer by layer:
- Red (R3–R5): Represents Santa’s classic red suit at the lower section.
- White (R6–R8): Represents Santa’s iconic white beard.
- Beige (R9–R10): Represents Santa’s face area where eyes and nose are set.
2. Brim & Drawstring System Breakdown
- Front Loop Ruffle (R11): Working R11 into the
FLOof R10 leaves the back loops open for seamless attachment of the upper hat section. - Eyelet Round (R12): Alternating
1 dcandch 1, sk 1creates built-in eyelet channels for the drawstring cord without needing separate buttonholes. - Ruffled Cuff Top (R14): Tripling the stitch count (
3dcin every st) produces a decorative wavy edge at the top opening.
3. Assembly & Facial Feature Breakdown
- Symmetry: Align the safety eyes symmetrically over the white beard line before securing backings.
- Drawstring Function: Threading the drawstring cord through eyelets allows the top ruffle to gather tightly, keeping stored goodies safe inside.
Pattern Question:
Question: How do I ensure the drawstring gathers smoothly without warping the top ruffle?
Answer: Make sure to strictly follow R12 by alternating 1 dc and ch 1, sk 1 to form clear, even gaps. Thread the drawstring cord evenly through these openings. When pulled shut, the ruffled cuff in R14 will gather naturally into a decorative top accent without stretching the main body.