
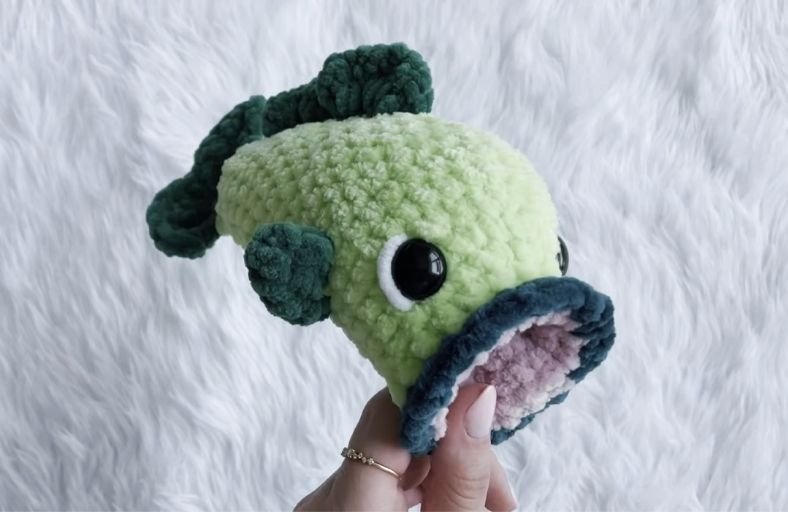
Ever dreamed of reeling in a big catch without leaving your cozy crochet corner? Meet your new aquatic best friend, the NO SEW Crochet Bass Fish!
This hilarious, wide-mouthed plushie features realistic 3D lips, sculpted dorsal and side fins, and a textured tail fin, all worked in one seamless, clever piece so you can put your sewing needles away for good!
Materials and Preparation
Materials:
- Chunky Chenille / Velvet Yarn (Super Bulky / Category 6):
- Light Green (Key Lime) for the main body
- Dark Green (Emerald / Peacock) for the side fins, dorsal fin, and tail fin
- Pink (Rose) for the inside of the mouth
- Dark Teal / Navy Blue for the outer lips
- Scrap piece of plush white yarn for eye highlight details
- Safety Eyes: 20 mm black safety eyes
- Stuffing: Polyfill polyester fiberfill stuffing
Tools:
- Crochet Hook: Size 5.0 mm (H/8) crochet hook
- Tapestry / Embroidery Needle: For weaving in yarn ends and shaping eye details
- Stitch Marker: Essential for tracking continuous rounds
- Scissors: Craft scissors
Preparation Notes:
- No-Sew Assembly: All fins, tail, and mouth layers are joined directly during the crocheting process using surface crochet or crocheting through loops and pieces simultaneously.
- Tension Control: Keep your stitches firm and tight so the polyfill stuffing remains completely hidden inside the plushie.
- Right/Wrong Side Awareness: Pay close attention to flipping the mouth piece inside-out and flipping the body right-side out at specified rounds to ensure the seamless construction works properly.
Abbreviations and Notes
Abbreviations:
- MR: Magic Ring
- ch: Chain stitch
- sc: Single crochet
- inc: Single crochet increase (2 sc in the same stitch)
- dec: Single crochet decrease / sc2tog (2 sc worked together)
- hdc: Half double crochet
- 3 hdc inc: 3 half double crochet worked into the same stitch
- dc: Double crochet
- 3 dc inc: 3 double crochet worked into the same stitch
- sl st: Slip stitch
- FLO: Front Loop Only
- BLO: Back Loop Only
Pattern Notes:
- The pattern is worked in continuous spiral rounds unless indicated otherwise (such as turning rows for fins and tail).
- The stitch marker is kept in the last stitch of each round for accurate counting and centering.
- Shift Stitches: Extra sc stitches may be added as needed to keep the bottom center line aligned straight between the side fins down to the tail.
- Original design and pattern credit belongs to Crochet with Kyra.
Gauge, Approximate Size, and Pattern Notes
Gauge:
Gauge is not critical for this plushie project; however, stitches must remain tight enough to prevent fiberfill from showing through.
Finished Size:
Approximately 8–9 inches (20–23 cm) in length when using Category 6 chenille yarn and a 5.0 mm crochet hook.
Special Techniques:
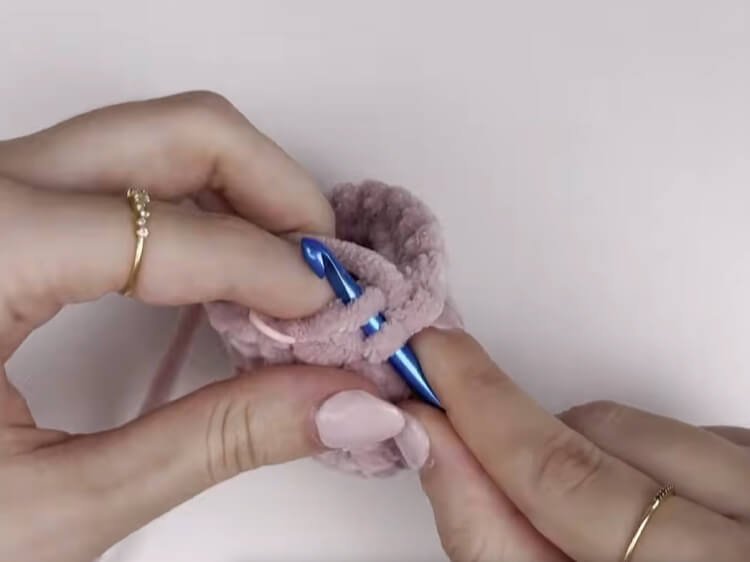
- Inverted Mouth Assembly: The mouth lining is constructed first, turned inside out, and then worked into using unworked Back Loops.
- Seamless Fin Join: Side fins are crocheted through both the fin edge and body stitches in a single round.
- Surface Crochet Dorsal Fin: The back fin is anchored directly onto the body surface using surface single crochet stitches.
Step-by-Step Pattern
Part 1: Inside Mouth & Side Fins
Mouth Lining (Pink Yarn):
Worked in continuous spiral rounds:
- R1: MR 6 sc (6)
- R2: 6 inc (12)
- R3: (sc, inc)*6 (18)
- R4–R8: 18 sc around for 5 rounds (18)
- R9: 18 FLO sc (18)
- R10: sl st into the next stitch. Fasten off (no long tail needed). Turn the mouth piece inside-out so the neat side faces inward and the MR starting tail points outward.
Side Fins (Make 2 – Dark Green Yarn):
Worked in turning rows on the magic ring:
- R1: MR 6 sc. Do NOT join. Ch 2, turn. (6)
- R2: Starting in 3rd ch from hook, 4 dc across the top edge of MR, ch 2, sl st into the same stitch as 4th dc (4 dc) Fasten off. Set both fins aside for seamless body attachment.
Part 2: Main Body & Head
Main Body Construction (Light Green Yarn):
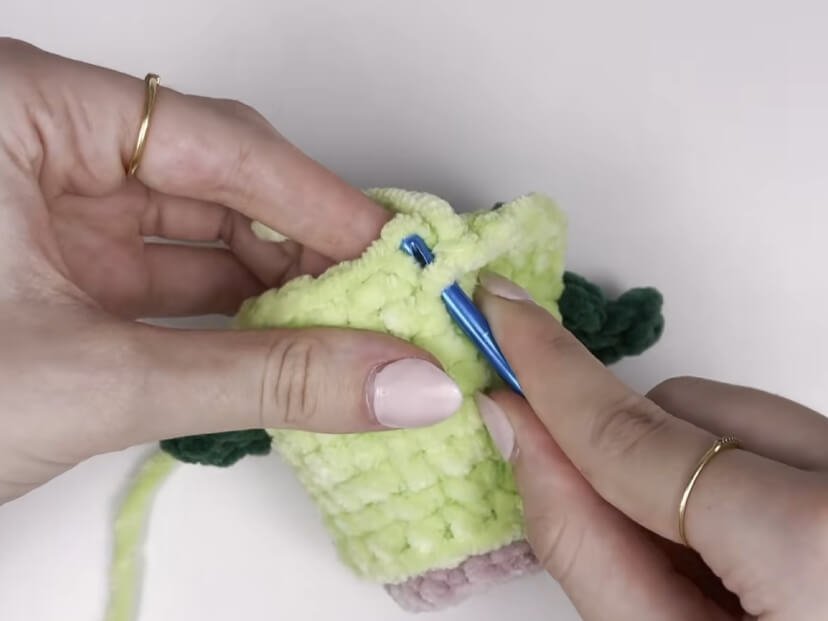
Attach Light Green yarn with a slip knot. Place hook into any unworked BLO loop from Round 9 of the mouth with the open mouth facing toward you:
- R10: 18 BLO sc around unworked mouth loops (18)
- R11: 18 BLO sc around light green stitches (18)
- R12: 7 sc, 3 inc, 8 sc (21)
- R13: 7 sc, (sc, inc)*3, 8 sc (24)
- R14: 7 sc, (2 sc, inc)*3, 8 sc (27)
- R15–R16: 27 sc around for 2 rounds (27)
Flip the light green body section backward over the top of the pink mouth so the project is right-side out! Align the stitch marker to the exact bottom center (work 1 shift stitch if necessary).
Fin Attachment & Body Shaping:
- R17: 3 sc, hold 1st fin to body and work 3 sc through both fin and body simultaneously, 15 sc, hold 2nd fin to body and work 3 sc through both fin and body simultaneously, 3 sc (27)
- R18: 12 sc, dec, 13 sc (26)
- R19: 12 sc, dec, 12 sc (25)
- R20: 11 sc, dec, 12 sc (24)
- R21: 11 sc, dec, 11 sc (23)
- R22: 10 sc, dec, 11 sc (22)
- R23: 10 sc, dec, 10 sc (21)
- R24: 9 sc, dec, 10 sc (20)
- R25: 9 sc, dec, 9 sc (19)
Attach 20 mm safety eyes between R13 and R14, spaced 8 stitches apart on the top of the head. Add stuffing into the head and tail, keeping fiberfill behind the pink mouth lining.
- R26: 8 sc, dec, 7 sc, dec (17)
- R27: 7 sc, dec, 6 sc, dec (15)
- R28: 6 sc, dec, 5 sc, dec (13)
- R29: dec, 11 sc (12)
- R30: (sc, dec)*4 (8)
- Add final stuffing to the body.
Part 3: Tail Fin & Dorsal Fin
Tail Fin (Dark Green Yarn):
- Flatten tail opening horizontally and work 4 sc through both layers to seal body (4) Change color to Dark Green in 4th sc stitch:
- Row 31: Ch 1, turn. Starting in 2nd ch from hook, 4 inc (8)
- Row 32: Ch 1, turn. Starting in 2nd ch from hook, 8 sc across (8)
- Row 33: Ch 2, turn. In 3rd ch from hook: 3 dc inc, 3 dc inc in next st, 2 dec, 3 dc inc, 3 dc inc, sl st in last st. (14) Fasten off and weave ends into the body.
Dorsal Fin (Dark Green Yarn):
Locate 4th row back from top center line between side fins. Attach Dark Green yarn with a slip knot:
- Row 1 (Surface Crochet): 7 surface sc down center back of body. Ch 2, turn. (7)
- Row 2: Starting in 3rd ch from hook: 3 hdc inc, 3 hdc inc, 2 sc, (3 dc inc)*3, sl st into base. (17) Fasten off and weave in yarn ends.
Part 4: Outer Lips & Eye Finishing
3D Outer Lips (Dark Teal / Navy Yarn):
Attach yarn at bottom center of mouth, inserting hook through both the unworked FLO green loop from mouth setup and the corresponding pink mouth stitch:
- R1: (sc, inc)*9 around through both loops simultaneously (27)
- R2: Sl st to first st to join, fasten off, and weave ends inside.
White Eye Detail:
- Thread white plush yarn onto an embroidery needle.
- Pass yarn from top center of safety eye to bottom outer edge to create a crescent accent.
- Tie ends together inside the head tissue and hide.
Detailed Pattern Breakdown
1. Mouth Lining & Inverted Base Architecture
- Round 1 to 8 (Pink Yarn): Establishes an inner cylinder (
MR 6 sc, expanding to18 sc). The inversion step at Round 10 places the correct plush side facing inward while exposing the raw Back Loops on the outer ring for seamless attachment. - Rounds 1 to 2 (Light Green Yarn): Anchors the outer fish skin onto the exposed Back Loops of the pink lining. Double-layer loop construction prevents stuffing from pushing into the mouth cavity.
2. Body Sculpting & Integrated Side Fins
- Rounds 3 to 7: Increases (
3 increpeated over rounds) build the forehead curve and upper crown structure of the bass. - Round 8: The side fins (
MR 6 sc,4 dc) are attached seamlessly by working3 scdirectly through both the edge stitches of the fin and the main body wall in a single round. - Rounds 9 to 21: Gradual, single-stitch reduction rounds slim the torso down to the tail end while maintaining a symmetrical spine line.
3. Surface Dorsal Fin & Tail Fan Construction
- Tail Fin (Rounds 22–Row 3): Closing the rear body with
4 scthrough both sides creates a flat plane. Switching to Dark Green and expanding with4 incinto aRow 3fan pattern (3 dc incanddec) creates the signature rippled bass tail. - Dorsal Fin: Uses surface crocheting (
7 surface sc) straight along the spinal ridge, followed by high-stitch clusters (3 hdc inc,3 dc inc) to form realistic fin waves.
Pattern Question
Question: How do I prevent polyfill stuffing from bulging into the pink mouth cavity, and how do I keep the side fins aligned properly?
Answer: When filling the fish with polyfill, push the stuffing upward toward the top curve of the head and backward toward the tail. Avoid stuffing directly around or behind the pink mouth lining.
You can hold the mouth open with your thumb while filling to maintain its hollow 3D shape. To keep side fins perfectly aligned, adjust your position before Round 8 using 1 or 2 shift stitches (sc) so that your stitch marker remains centered along the bottom belly line between both fins.