
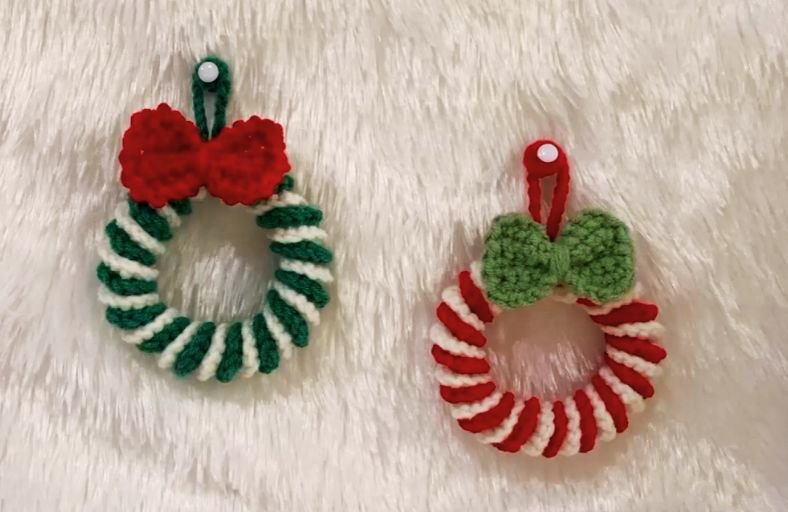
Are you ready to sprinkle a little handmade magic onto your Christmas tree this holiday season?
These festive twisted candy cane wreaths complete with adorable bows are fast, fun, and strangely addictive to whip up!
Whether you are looking for last-minute handmade gifts or just want to spruce up your holiday decor, this simple project turns two strands of yarn into a cheerful holiday keepsake in under 30 minutes.
Materials and Preparation
Materials:
- Yarn: 4-ply cotton yarn (approx. 2 mm thickness) in festive color combinations:
- White and Green yarn for the green-and-white spiral wreath.
- White and Red yarn for the red-and-white spiral wreath.
- Contrast green or red yarn for the decorative accent bow.
- Stuffing: Not required for this flat spiral technique.
Tools:
- Crochet Hook: Size 5.0 mm (H-8 US) hook (using a larger hook with held-together strands creates the plush, flexible twist).
- Yarn Needle: Tapestry needle for weaving in ends and sewing the bow onto the wreath.
- Scissors: Craft scissors.
Preparation Notes:
- You will be working with two strands of yarn held together simultaneously to achieve the signature candy cane stripe contrast.
- Maintain an even, relaxed tension so the twisted spiral naturally curls into its circular wreath form without warping.
Abbreviations and Notes
Abbreviations:
- ch: Chain stitch
- sc: Single crochet
- (3sc): 3 single crochet stitches worked into the exact same stitch
- sk: Skip stitch
- sl st: Slip stitch
Pattern Notes:
- The wreath body is crocheted as a single textured strip where multiple stitches per chain foundation force the work to coil naturally into a circular wreath ring.
- The accent bow is created separately and stitched securely to the bottom center of the wreath ring.
- A hanging loop is formed using a long chain strand attached directly to the top of the ornament.

Gauge, Approximate Size, and Pattern Notes
Gauge:
Exact gauge is not crucial for this project. Consistent stitch tension ensures the spiral curls evenly around itself.
Finished Size:
Approximately 3.15 inches (8 cm) in diameter.
Special Techniques:
- Multi-Strand Crochet: Working two contrasting colors side-by-side on one hook to produce the dual-color ribbon swirl effect.
- Curly Spiral Contouring: Working 3 sc into single chain stitches forces the foundation chain to curve automatically into a neat circle.
Step-by-Step Pattern
Part 1: Main Wreath Ring (Twisted Spiral)
Hold two contrasting strands of yarn together (e.g., White + Red OR White + Green) using a 5.0 mm crochet hook:
- Foundation Chain: Make a slip knot, ch 61 (or desired length for an 8 cm diameter ring).
- Row 1: Starting in the 2nd ch from the hook, work (3sc) into each ch across until you reach the end of the foundation chain.
- Finishing Ring: Curl the spiraled strip into a closed circle and use sl st to join both ends securely together. Fasten off and weave in ends.
Part 2: Accent Bow & Hanging Loop
Using a single strand of contrasting color yarn (Red or Green) and a 5.0 mm hook:
Bow Wings:
- Foundation: Make a slip knot, ch 10.
- Row 1: Sc in 2nd ch from hook, sc in each ch across (9 sc).
- Row 2: Ch 1, turn, sc across (9 sc).
- Fasten off, leaving a long tail. Wrap the tail tightly around the center of the rectangular piece to pinch it into a bow shape.
Hanging Loop:
- Attach yarn to the top inside edge of the completed wreath ring.
- Ch 20–25 (or until the hanging loop reaches your desired hanging length).
- Sl st back into the base stitch where you started. Fasten off and secure ends.
Part 3: Assembly & Finishing
- Place the pinched accent bow at the base junction of the wreath ring.
- Use a yarn needle and the long yarn tail to sew the bow firmly onto the front of the wreath.
- Trim any excess yarn and hang your new ornament on your Christmas tree!
Detailed Pattern Breakdown
1. Wreath Ring Construction:
- Dual-Strand Swirl Effect: By holding two distinct yarn colors (such as green and white or red and white) together on the hook at the same time, every single crochet stitch displays a blended color pattern. As the crocheted row coils, the color changes visually line up to mimic a classic holiday candy cane twist.
- Ruffling Mechanism: Creating three single crochet stitches
(3sc)into every single foundation chain creates three times as many stitches as the length of the base chain allows. This sudden increase in fabric volume forces the crocheted strip to curl and twist tightly into a ring geometry without needing an inner plastic or wire frame.
2. Bow and Finishing Mechanics:
- Structural Pinching: Mounding two rows of solid single crochet forms a sturdy mini fabric strip. Wrapping yarn tightly around the center condenses the middle stitches, forcing the sides to flare out like natural ribbon loops.
- Integrated Loop: Working a simple chain string directly into the main spiral structure ensures a sturdy attachment point that can support the ornament on pine branches without sagging.
Pattern Question:
Question: Why does my wreath look like a wiggly line instead of a round circle, and how do I fix it?
Answer: When you work (3sc) into every chain, the strip will naturally curl into a tight spiral coil (like a curly ribbon). Once you finish all your stitches, simply use your fingers to gently twist and manipulate the spiral in a uniform direction.
Wrap the ends toward each other so they meet, then use a slip stitch or yarn needle to join the two ends together. This turns the coiled ribbon into a beautiful 3D circular wreath!