
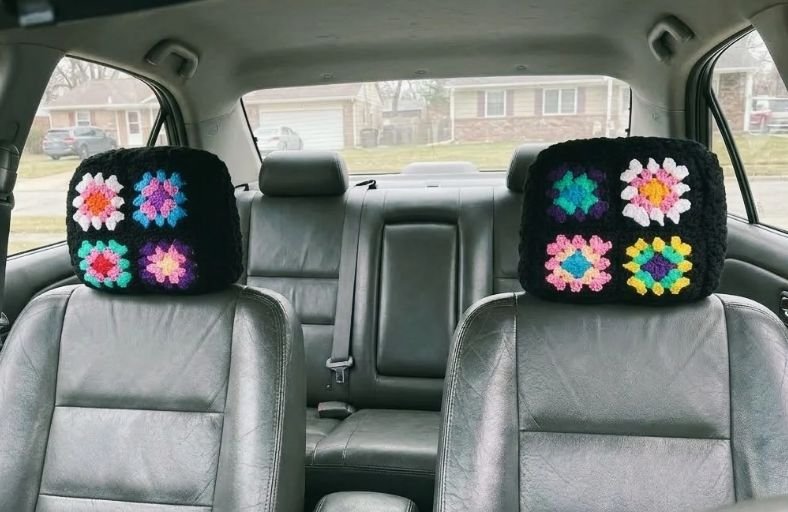
Is your car interior feeling a bit boring, or are your headrests starting to show a little wear and tear?
Why settle for basic store-bought seat covers when you can transform your ride into a retro, cozy oasis on wheels?
This fun and vibrant granny square headrest cover project lets you bring handmade charm straight to your commute, turning plain car seats into a colorful statement piece.
Materials and Preparation
Materials:
- Yarn:
- Medium weight yarn (Worsted Weight / Weight 4) in various bright colors for the inner granny square motifs (pink, turquoise, purple, yellow, white).
- Medium weight yarn in Solid Black (or your preferred main color) for the borders and solid granny squares.
- Stuffing: Not required for this project.
Tools:
- Crochet Hook: Size H-8 (5.0 mm) or size needed to obtain your desired gauge.
- Yarn Needle: Tapestry needle for joining squares and weaving in ends.
- Stitch Markers: Useful for securing corners when joining panels.
- Scissors: Sharp scissors for cutting yarn.
Preparation Notes:
- You should be comfortable with basic crochet stitches including chain (
ch), single crochet (sc), double crochet (dc), and slip stitch (sl st). - Make sure to measure your car headrest beforehand. If your headrest is larger or smaller than standard size, you can easily adjust the fit by adding or subtracting border rounds around your panels.
Abbreviations and Notes
Abbreviations:
- ch: Chain
- sc: Single Crochet
- dc: Double Crochet
- sl st: Slip Stitch
- sp: Space
- ch-sp: Chain space
- cluster: 3 double crochet stitches worked into the same space
Pattern Notes:
- The classic granny square is worked in joined rounds starting from the center outward.
- Each granny cluster consists of 3 double crochet stitches.
- Corners are formed by making (3 dc, ch 2, 3 dc) all in the same corner space.
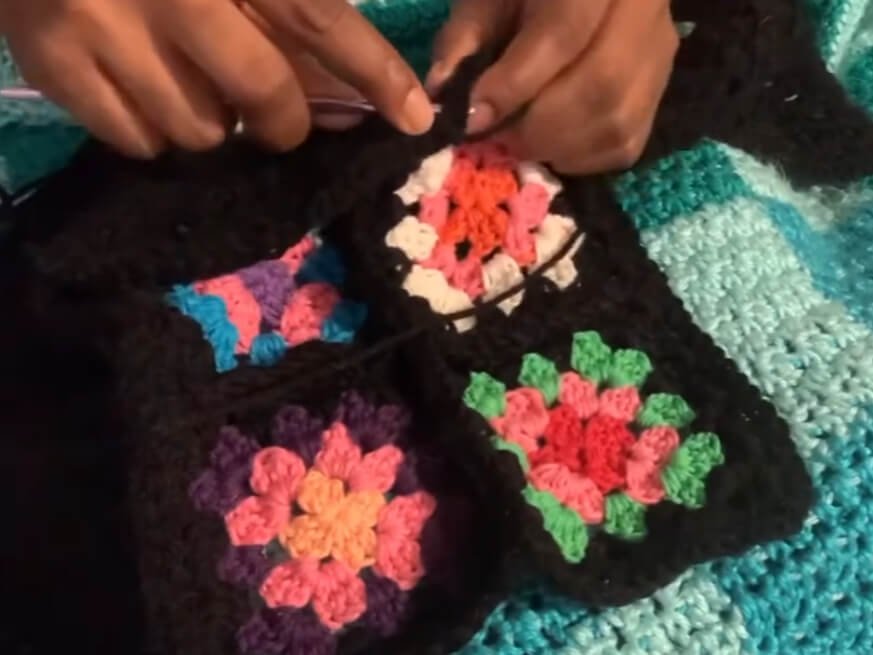
- Joining of completed squares is done on the wrong side using slip stitches (
sl st) across the edges for a clean finish.
Gauge, Approximate Size, and Pattern Notes
Gauge:
Each standard 3-round classic granny square measures approximately 3.5 inches x 3.5 inches (8.9 cm x 8.9 cm).
Finished Size:
- Width: Approx. 10.5 inches (26.7 cm)
- Height: Approx. 10.5 inches (26.7 cm)
- Depth (Side Panel): Approx. 3.5 inches (8.9 cm) (Fits most standard automobile front seat headrests).
Special Techniques:
- Granny Square Joining: Seaming motif blocks edge-to-edge using continuous slip stitches worked through both loops on the back side.
- 3D Box Assembly: Connecting front, back, and side strip panels together inside out to form a fitted, 5-sided box cover with an open bottom.
Step-by-Step Pattern
Part 1: Front and Back Multi-Colored Granny Panels
Make 8 Classic 3-Round Granny Squares in total (4 for Front Panel, 4 for Back Panel):
- Round 1: With central color, ch 4, sl st into first ch to form a ring (or start with MR). Ch 3 (counts as 1 dc), 2 dc into ring, ch 2, (3 dc into ring, ch 2) 3 times. Sl st to top of starting ch-3 to join. Fasten off color. (4 clusters, 4 ch-2 corner spaces)
- Round 2: Join second color in any corner ch-sp. Ch 3, (2 dc, ch 2, 3 dc) in same corner sp. (Ch 1, [3 dc, ch 2, 3 dc] in next corner sp) repeat 3 times, ch 1, sl st to top of starting ch-3. Fasten off color. (8 clusters)
- Round 3: Join third color in any corner ch-sp. Ch 3, (2 dc, ch 2, 3 dc) in same corner sp. [Ch 1, 3 dc in next ch-1 sp, ch 1, (3 dc, ch 2, 3 dc) in corner sp] repeat 3 times, ch 1, 3 dc in last ch-1 sp, ch 1, sl st to top of starting ch-3. Fasten off color. (12 clusters)
Assembling the Front Panel (2×2 Grid):
- Take 4 completed multi-colored granny squares.
- Arrange them into a 2×2 square layout.
- Align 2 squares with right sides together. Join black yarn at corner, sl st across matching stitches to connect them. Repeat for the other 2 squares.
- Join the two sets together along the middle seam with sl st across.
- Border Round: Attach black yarn to any corner. Work 1 round of granny pattern (3 dc in each space, [3 dc, ch 2, 3 dc] in corners) all the way around the 2×2 grid. Fasten off.
Assembling the Back Panel (2×2 Grid):
- Repeat the exact same assembly process using the remaining 4 multi-colored granny squares to create an identical second panel.
Part 2: Top and Side Connecting Panel (Side Strip)
Make 6 Solid (or Multi-Colored) Granny Squares for the perimeter band:
- Rounds 1–3: Work identical to the classic granny square pattern using solid black yarn (or alternating colors).
- Joining the 6 Squares:
- Line up all 6 squares in a single straight row (1×6 strip).
- With right sides facing together, sl st the short edges of the squares together to create one long continuous band.
- Border Round: Attach black yarn to any corner space along the outer edge of the strip. Work 1 complete round of granny cluster border (3 dc in each space, [3 dc, ch 2, 3 dc] in corners) around the entire 1×6 band to clean up the edges.
Part 3: Additional Details and Motifs
Main Motif Variations:
- You can customize your 8 main squares with different color palettes for each round to create a eclectic scrap-yarn look, or keep them uniform for a coordinated interior style.
Solid Side Squares:
- Using solid black yarn for the 6 side squares gives the headrest cover a sleek frame that highlights the colorful front and back granny square grids.
Part 4: Edging, Assembly & Finishing
- Step 1 (Connecting Side Strip to Front Panel):
- Place the 2×2 Front Panel and the 1×6 Side Strip with right sides facing each other.
- Align one short end of the 6-square strip at the bottom corner of the Front Panel.
- Using black yarn, sl st through both layers along the first side, turn at the top corner, sl st across the top edge, and sl st down the second side.
- Sl st the remaining end of the side strip around to meet the bottom edge, forming a 3-sided canopy cover. Fasten off and tie a secure knot.
- Step 2 (Connecting Back Panel):
- Flip the assembly inside out.
- Align the 2×2 Back Panel with the open side of the 3D canopy cover, right sides facing.
- Attach yarn at a bottom corner and sl st continuously along the three edges (up the side, across the top, and down the opposite side).
- Fasten off securely and weave in all loose ends.
- Step 3 (Final Fitting):
- Turn the completed headrest cover right side out.
- Slide the cover over your car headrest from top to bottom through the open bottom section.
Detailed Pattern Breakdown
1. Front and Back Motif Panels Breakdown:
The front and rear faces of the headrest cover are built upon classic 3-round granny motifs connected into a 2×2 matrix:
- Motif Construction: Round 1 sets up the central 4-corner foundation using a ring base. Round 2 doubles the corner count, and Round 3 expands the sides by introducing intermediate chain-1 spaces between corner clusters.
- Grid Assembly: Connecting four 3-round squares into a 2×2 square block creates a large central focal piece.
- Unifying Frame: Working a continuous granny border round in black yarn around the entire 2×2 grid ties the individual colorful motifs together and expands the overall dimensions to match headrest proportions.
2. Side Band Panel Breakdown:
The depth of the headrest is created by building a continuous U-shaped perimeter band:
- Linear Array: Joining 6 individual 3-round granny squares end-to-end creates a long 1×6 rectangular strip.
- Edging Frame: Running a full border round around the entire 1×6 strip adds structural stability and provides clean, matching stitch counts for final 3D seaming.
3. 3D Structure and Seaming Breakdown:
The conversion from flat 2D motifs into an ergonomic 3D slipcover relies on specific right-angle joining techniques:
- Corner Turning: Wrapping the 1×6 side band around the left, top, and right edges of the front panel transforms the flat piece into a 5-sided box enclosure with an open bottom for easy installation over headrest posts.
- Slip Stitch Seaming: Working sl st joins on the wrong side creates strong, clean hidden seams that withstand stretching when pulling the cover over car headrests.
Pattern Question:
Question: How can I adjust the pattern if the headrest cover is too loose or too tight for my specific car model?
Answer: Car headrests vary in size depending on the vehicle make and year. If the finished 2×2 grid is too small for your headrest, simply add an extra border round of granny clusters (or a round of single crochet) around your front/back 2×2 panels and side strip before seaming them together.
Conversely, if the cover feels too large, work your granny squares with 2 rounds instead of 3, or use a smaller hook size (such as 4.0 mm) to achieve a tighter, smaller fit.