

Keep your feet warm and festive all season long with these adorable Christmas slipper stockings! Complete with fluffy side pom-poms, this quick crochet project comes together effortlessly.
Whether you are whipping up a thoughtful holiday gift or making a cozy pair for yourself, these plush stockings are the ultimate addition to your winter wardrobe.
Materials and Preparation
Materials:
- Super Bulky Weight Yarn (Category 6): Lion Brand Wool-Ease Thick & Quick (or similar super bulky yarn):
- Main Color (MC): Cranberry (approx. 2 skeins).
- Contrast Color (CC): Celebration / White (a small amount for the fluffy pom-poms).
Tools:
- Crochet Hook: 8.0 mm (US L/11) hook.
- Notions: Scissors, yarn needle for seaming, and an 85 mm (3.35 in) pom-pom maker.
Preparation Notes:
- You will need a basic mastery of standard US stitches including half double crochet (
hdc), decreases (hdc2tog,hdc3tog), and working in both joined rounds and turned rows. - Ensure your tension remains steady throughout to maintain a plush texture that holds warmth without feeling overly stiff.
Abbreviations and Notes
Abbreviations:
- MR: Magic Ring
- ch: Chain
- sl st: Slip Stitch
- hdc: Half Double Crochet
- hdc2tog: Half Double Crochet 2 Together (Decrease across 2 stitches)
- hdc3tog: Half Double Crochet 3 Together (Decrease across 3 stitches)
- st(s): Stitch(es)
Pattern Notes:
- Sizing: This written step-by-step tutorial demonstrates Woman’s size 7/8.
- Chains: The starting
ch 1at the beginning of rounds or rows does NOT count as a stitch throughout the pattern. - Symmetry: The main slipper stocking body is worked identically for both feet; the side fold-down triangle tabs are worked on opposite sides so that the pom-poms naturally hang on the outer side of each leg.
- Original design and pattern credit belongs to KnitcroAddict.

Gauge, Approximate Size, and Pattern Notes
Gauge:
- Gauge is not strictly critical due to the stretchy nature of bulky yarn, but keeping stitches snug prevents cold air drafts.
Finished Size:
- Fits US Women’s shoe size 7–8 (approx. 9.25–9.75 in / 23.5–25 cm foot length).
Special Techniques:
- Magic Ring Start: Creates a seamless, hole-free toe base.
- Back Heel Seaming: Folded heel seam sewn using a yarn needle on the wrong side for a clean finish.
- Bulky Pom-Pom Crafting: Fluffy 85 mm pom-poms secured to side accent flaps.
Step-by-Step Pattern
Part 1: Toe and Foot
Crochet using main color yarn (Main Color – Cranberry) in joined rounds:
- R1: MR, ch 1, 9 hdc into ring. Pull tail tight to close hole. Sl st to first hdc to join (9 hdc).
- R2: ch 1, 2 hdc in each st around, sl st to first hdc to join (18 hdc).
- R3: ch 1, 1 hdc in each st around, sl st to first hdc to join (18 hdc).
- R4–R10: Repeat R3 (18 hdc in each round).
Part 2: Heel Construction
Work back and forth in flat rows:
- Row 11: ch 1, 1 hdc in each of the next 13 sts. Leave remaining 5 sts unworked. Turn (13 hdc).
- Row 12: ch 1, turn, 1 hdc in each st across (13 hdc).
- Row 13: ch 1, turn, 1 hdc in each st across (13 hdc).
- Row 14: ch 1, turn, 1 hdc in each st across (13 hdc).
- Fasten off leaving a 10-inch tail for seaming.
- Seaming the Heel: Turn slipper inside out. Fold the heel edge in half and sew the back seam closed using a yarn needle. Weave in ends and turn right side out.
Part 3: Cuff / Leg Section
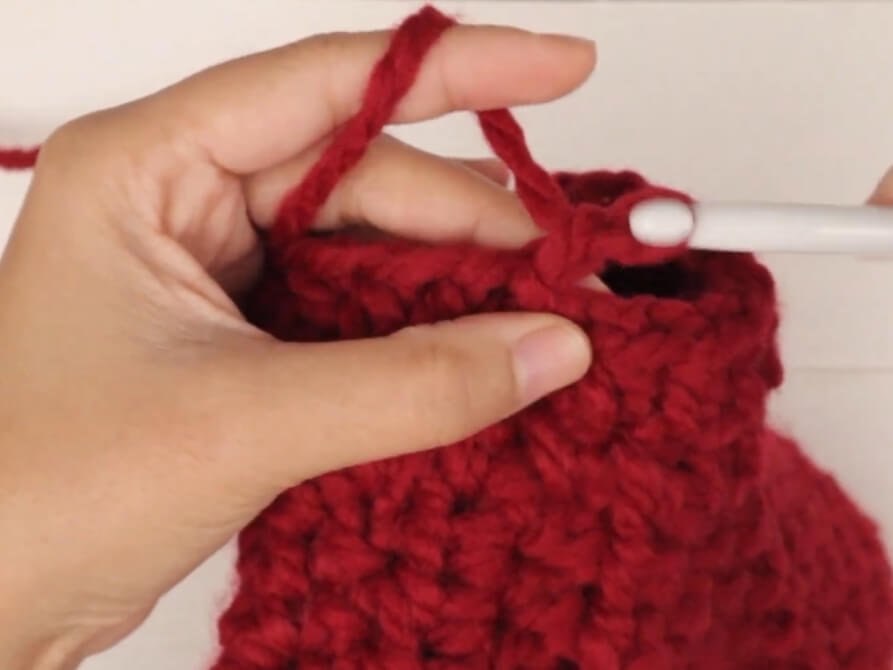
Attach the yarn to the seam at the back of the heel (Center Back Seam) and work in joined rounds:
- R1: Attach yarn at center back heel seam, ch 1, 2 hdc in same space. Work 1 hdc into the end of each of the 4 heel rows, work 2 hdc in corner, 1 hdc in each of the 5 unworked front sts from the foot, 2 hdc in next corner, 1 hdc in end of each of the 4 heel rows, sl st to first hdc to join (19 hdc).
- R2: ch 1, 1 hdc in each st around, sl st to join (19 hdc).
- R3–R11: Repeat R2 (19 hdc in each round). Fasten off and weave in ends.
(Make a second identical stocking base before adding the side pom-pom flaps).
Side Triangle Flap (Left Leg):
- Row 1: Attach yarn at Center Back of cuff, ch 1, 1 hdc in same st and in next 8 sts (9 hdc).
- Row 2: ch 1, turn, hdc2tog, 1 hdc in next 5 sts, hdc2tog (7 hdc).
- Row 3: ch 1, turn, hdc2tog, 1 hdc in next 3 sts, hdc2tog (5 hdc).
- Row 4: ch 1, turn, hdc2tog, 1 hdc in next st, hdc2tog (3 hdc).
- Row 5: ch 1, turn, hdc3tog across last 3 sts, ch 1. Fasten off.
Side Triangle Flap (Right Leg):
- Row 1: Attach yarn at Center Front of cuff, ch 1, 1 hdc in same st and in next 8 sts (9 hdc).
- Row 2: ch 1, turn, hdc2tog, 1 hdc in next 5 sts, hdc2tog (7 hdc).
- Row 3: ch 1, turn, hdc2tog, 1 hdc in next 3 sts, hdc2tog (5 hdc).
- Row 4: ch 1, turn, hdc2tog, 1 hdc in next st, hdc2tog (3 hdc).
- Row 5: ch 1, turn, hdc3tog across last 3 sts, ch 1. Fasten off.
Part 4: Assembly and Finishing
- Pom-Poms: Make two large white pom-poms using the 85 mm maker. Leave long securing tails.
- Attachment: Thread pom-pom tails through the top point of each side triangle flap (Row 5). Tie securely on the inner side, weave in all loose ends, and trim neatly.
Detailed Pattern Breakdown
1. Toe and Foot Construction:
- Starting with a magic ring of 9
hdcsts provides a neat round toe box without gaps. Doubling the stitch count in Round 2 to 18hdcquickly expands the piece to standard foot width. Keeping 18hdcfor Rounds 3–10 builds the body of the foot straight to the ankle line.
2. Heel Turn and Seaming Logic:
- Transitioning to rows across 13 stitches creates a flat flap under the heel while leaving 5 front stitches open for instep flexibility. Folding this flat flap in half and whip-stitching the back seam creates a contoured, 90-degree heel cup.
3. Leg Cuff and Flap Positioning:
- Picking up 19 stitches around the ankle edge joins the foot and leg seamlessly. Adding extra corner stitches prevents noticeable holes between the foot top and heel turn. Working the triangle flaps from center-back (Left) and center-front (Right) guarantees that both folded flaps sit symmetrically on the outer sides of your legs.
Pattern Question:
Question: How do I avoid getting large holes at the heel corners when picking up stitches for the cuff?
Answer: Corner gaps are common when transitioning from rows to rounds. To avoid them, make sure to place 2 hdc stitches directly into the corner junction where the heel flap meets the unworked instep stitches.
When working your first round around the ankle opening, pull those corner stitches slightly firmer than usual to close any natural gaps.