
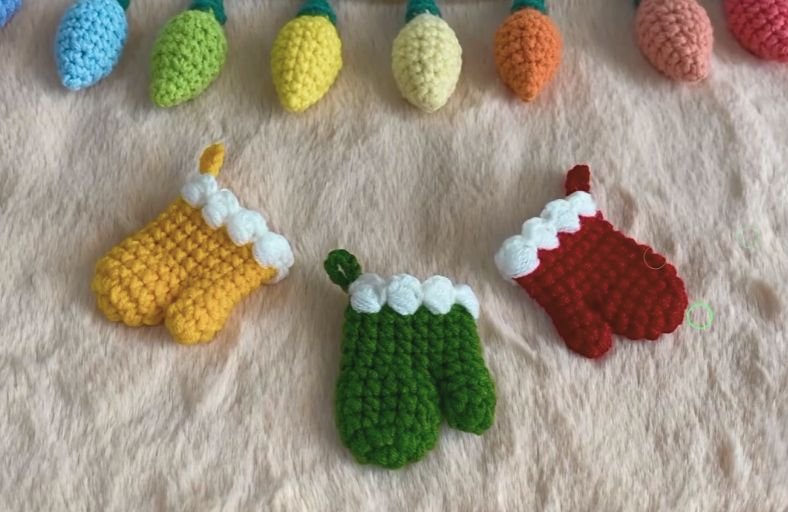
Ever looked at your holiday tree and thought it needed an extra dash of handmade cozy magic?
These adorable miniature Christmas mittens are here to steal the show!
Perfect as tree ornaments, festive garland accents, or sweet gift toppers, these tiny gloves bring all the warm holiday vibes in just a short evening of stitching.
Materials and Preparation
Materials:
- Yarn: 4-ply cotton yarn (approx. 2 mm thickness) in classic festive colors like dark red, forest green, mustard yellow, and fluffy white for the cuff.
- Embroidery Thread: Small amount of white, brown, or black thread for embroidering cute sleeping faces or happy expressions.
- Stuffing: Polyfill stuffing to give your mini mittens a soft, plump 3D shape.
Tools:
- Crochet Hook: 2.5 mm size hook.
- Yarn Needle: Tapestry needle for weaving in ends and embroidering facial features.
- Stitch Marker: Essential for keeping track of continuous rounds.
- Scissors: Sharp craft scissors.
Preparation Notes:
- Maintain a firm, tight tension throughout so the polyfill stuffing remains invisible between stitches.
- Practice the half double crochet cluster stitch beforehand, as it forms the adorable thumb pop on your glove!
Abbreviations and Notes
Abbreviations:
- MR: Magic Ring
- ch: Chain
- sc: Single Crochet
- inc: Single Crochet Increase (2 sc in the same stitch)
- dec: Single Crochet Decrease (sc2tog)
- hdc cl: Half Double Crochet Cluster (used to form the thumb)
- sl st: Slip Stitch
- sk: Skip
Pattern Notes:
- The main body of the mitten is worked in continuous spiral rounds without joining at the end of each round unless specified.
- The textured white cuff is added at the top to give a snowy, fluffy finish before adding the hanging loop.

Gauge, Approximate Size, and Pattern Notes
Gauge:
Gauge is not critical for this project, but aiming for tight, uniform stitches ensures a crisp shape.
Finished Size:
Approximately 2.4 inches in height by 1.6 inches in width (6 cm x 4 cm).
Special Techniques:
- HDC Cluster (hdc cl) for the Thumb: Work a cluster of half double crochet stitches into a single stitch to create a prominent, rounded mitten thumb without needing any separate sewing!
- Puffy Cuff Border: Alternating textured stitches along the top edge to mimic cozy sheepskin or snowy fur trim.
Step-by-Step Pattern
Part 1: Main Mitten Body
Start with main color yarn (Red, Green, or Yellow):
- R1: MR 6 sc (6)
- R2: 6 inc (12)
- R3: (1 sc, inc)*6 (18)
- R4–R6: 18 sc (18) (3 rounds)
- R7: 8 sc, 1 hdc cl (thumb), 9 sc (18)
- R8: 18 sc (18)
- R9: (1 sc, dec)*6 (12)
- R10–R11: 12 sc (12) (2 rounds)
- Pause here to stuff the lower portion of the mitten lightly with polyfill.
Part 2: White Fluffy Cuff
Switch to White yarn:
- R12: Join white yarn, ch 1, (1 sc, ch 2, sl st in next st)*6 around to form a ruffled, bobble-like snowy cuff (12)
- Fasten off white yarn and weave in ends.
Part 3: Hanging Loop & Facial Details
Hanging Loop:
- Attach main color yarn to the inner side of the cuff top.
- Ch 10–12, then sl st back into the same starting stitch to form a sturdy hanging loop for your tree. Fasten off and secure tightly.
Facial Expressions:
- Using a tapestry needle and contrasting thread, stitch two minimalist sleeping eyes (“v” or “^ ^” shape) or a smiling mouth onto the front face of the mitten right between R5 and R7.
Part 4: Edging, Assembly & Finishing
- Make sure the polyfill is tucked neatly below the cuff level so it does not pull through the stitches.
- Shape the mitten with your fingers, pushing the thumb cluster outwards to give it a defined 3D look.
- Trim all remaining yarn tails and hide them cleanly inside the body using a yarn needle.
Detailed Pattern Breakdown
1. Mitten Dome & Expansion Breakdown:
- R1 to R3: The mitten starts at the fingertips using a standard Magic Ring of 6 sc, expanding evenly with increases up to 18 sc. This creates a smooth, rounded dome base that comfortably holds shape once stuffed.
- R4 to R6: Maintaining 18 stitches over three rounds builds up the hand portion of the mitten before creating the thumb separation.
2. Built-in Thumb & Wrist Shaping Breakdown:
- R7 (Thumb Creation): Instead of making a tiny separate piece to sew on later, a single
hdc clis worked directly into the 9th stitch of Round 7. This instantly pops out as a 3D thumb while keeping the round count perfectly at 18. - R8 to R11 (Wrist Tapering): After completing the hand, a reduction round
(1 sc, dec)*6pulls the fabric inward from 18 down to 12 stitches, mimicking the snug wrist fit of a real mitten.
3. Textured Cuff & Finishing Breakdown:
- R12 (Fluffy Trim): Switching to crisp white yarn and combining single crochets with short chain loops creates an instantly fluffy, fur-like border around the cuff.
- Integrated Loop: Attaching a simple chain loop directly to the top corner allows the mini mitten to hang straight and balanced on Christmas branches or holiday garlands.
Pattern Question:
Question: How do I make sure the thumb pops out on the correct side and doesn’t get pushed inside when stuffing?
Answer: When working Round 7, ensure your hdc cl is pushed outward toward the right side (exterior) of your work using your finger tip before continuing to the next sc.
When adding polyfill at Round 11, insert small bits of stuffing into the main mitten cavity first, using the back of a crochet hook or pencil to gently nudge a tiny pinch of fiberfill into the thumb pocket so it stays plump and perfectly shaped.