
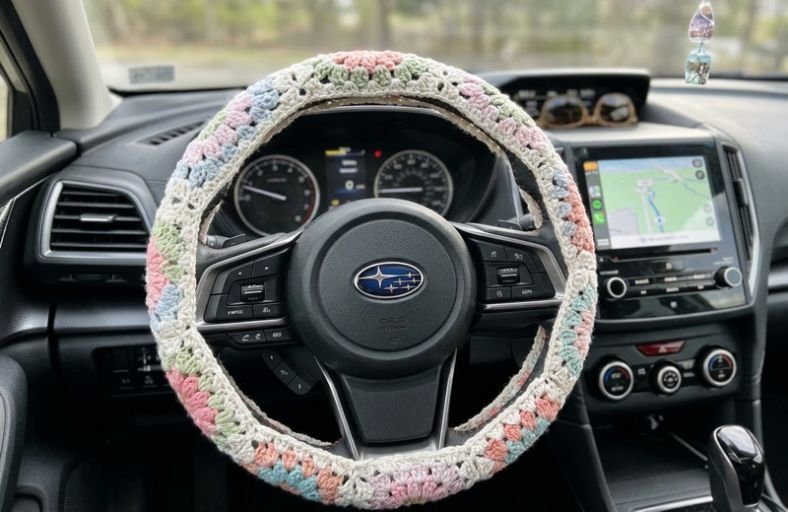
Did you know your car is secretly begging for a handmade makeover?
Trading that cold, boring vinyl steering wheel for a cozy, colorful texture might just be the ultimate upgrade your daily commute needs.
Whether you are driving to work or heading out on a weekend road trip, this retro-chic Granny Square Steering Wheel Cover adds a touch of bohemian flair right under your fingertips.
Grab your hook and colorful yarn leftovers, because this project is pure bliss to stitch up!
Materials and Preparation
Materials:
- Yarn: Worsted weight (Category 4) or Cotton Blend yarn in various colors. Cotton yarn is highly recommended for its durability, stretch resistance, and non-slip grip.
- Attachment Ties: 8 small scrap yarn pieces (approx. 6–8 inches / 15–20 cm long each) to anchor the cover securely onto the wheel.
Tools:
- Crochet Hook: 4.0 mm (US G-6) or 4.5 mm (US 7) hook.
- Yarn Needle: Tapestry needle for weaving in loose ends.
- Measuring Tape: Soft flexible measuring tape.
- Scissors: Standard yarn scissors.
Preparation Notes:
- Measure First: Wrap your soft tape measure tightly around the outer circumference of your steering wheel. (For example, a standard wheel measures around 46 inches / 117 cm).
- The Stretch Factor: Your finished crochet strip MUST be made shorter than your wheel measurement to ensure a snug, non-slip fit. Aim for 5–6 inches (13–15 cm) less than your actual wheel circumference (e.g., a 40-inch / 101-cm strip for a 46-inch / 117-cm wheel).
- Tension & Safety: Keep your stitches firm and tidy. Safety comes first, so the cover must fit tightly around the wheel.
Abbreviations and Notes
Abbreviations:
- MR: Magic Ring
- ch: Chain
- sl st: Slip Stitch
- sc: Single Crochet
- hdc: Half Double Crochet
- dc: Double Crochet
- popcorn: 3-dc Popcorn Stitch
- dc3tog: Double Crochet 3 Together (Cluster)
- JAG: Join-As-You-Go technique
Pattern Notes:
- The motif is worked as a traditional 4-round modified boho granny square.
- Round 4 incorporates a Join-As-You-Go (JAG) method using slip stitches to seamlessly link the squares into a continuous band.
- If you prefer not to use Join-As-You-Go, you can finish all individual squares and seam them together using a yarn needle.
- Original pattern by Play Hooky with Me.
Gauge, Approximate Size, and Pattern Notes
Gauge:
Each finished motif square measures approximately 4.4 inches × 4.4 inches (11.2 cm × 11.2 cm). 9 motifs joined together span approximately 40 inches (101 cm) relaxed.
Finished Size:
- Band Circumference: Approx. 40 inches (101 cm). Fits standard steering wheels measuring 45–47 inches (114–119 cm) in circumference.
- Width: Approx. 4.4 inches (11.2 cm), ideal to wrap comfortably around standard wheel grips.
Special Techniques:
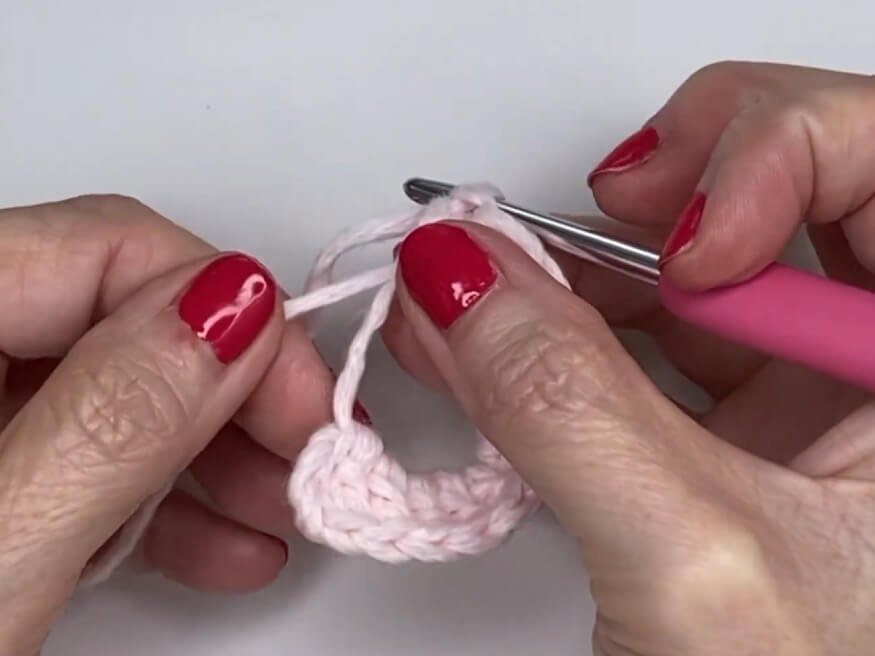
- 3-dc Popcorn Stitch: Work 3 dc into the same stitch, remove hook, insert hook from front to back into the top of the first dc, grab the dropped loop, and pull it through.
- dc3tog Corner Cluster: (Yarn over, insert hook, pull loop through, yarn over, pull through 2 loops) 3 times into the same space. Yarn over and pull through all 4 loops on hook.
- Join-As-You-Go (JAG): Replacing the second chain in corner spaces and joining side spaces with sl st directly into the adjacent completed motif during Round 4.
Step-by-Step Pattern
Part 1: Main Motif Square (Make 9-10 squares depending on wheel size)
Round 1: Floral Center
- R1: Start with a MR (or ch 5, sl st to first ch to form ring). Ch 3 (counts as 1 dc), work 11 dc into the ring. Sl st to the top of the initial ch-3 to join. Fasten off. (Total: 12 dc)
Round 2: Popcorn Petals
- R2: Attach new color yarn in top of any dc. Ch 3, work 2 dc in same st, join into 3-dc popcorn. Ch 2, work 3-dc popcorn in next st; repeat from * to * around. Ch 2, sl st to the top of the first popcorn to join. Fasten off. (Total: 12 popcorns, 12 ch-2 spaces)
Round 3: Granny Clusters & Corners
- R3: Attach new color in any ch-2 space. Ch 3, 2 dc in same space. 3 dc in next ch-2 space. In next ch-2 space (Corner): work (dc3tog, ch 3, dc3tog).
- Work (3 dc in next ch-2 space) 2 times, then in next space work (dc3tog, ch 3, dc3tog); repeat from * to * around. Sl st to top of starting ch-3 to join. Fasten off. (4 corners, 8 side clusters)
Round 4: Half Double Crochet Border (First Square Only)
- R4: Attach outer color yarn in any side space between clusters. Ch 2 (counts as hdc), 2 hdc in same space. 3 hdc in next space.
- In corner ch-3 space: (3 hdc, ch 2, 3 hdc).
- Continue around working 3 hdc in each side space and (3 hdc, ch 2, 3 hdc) in corners. Sl st to top of initial ch-2 to join. Fasten off.
Part 2: Join-As-You-Go Assembly (Squares 2 through Final Square)
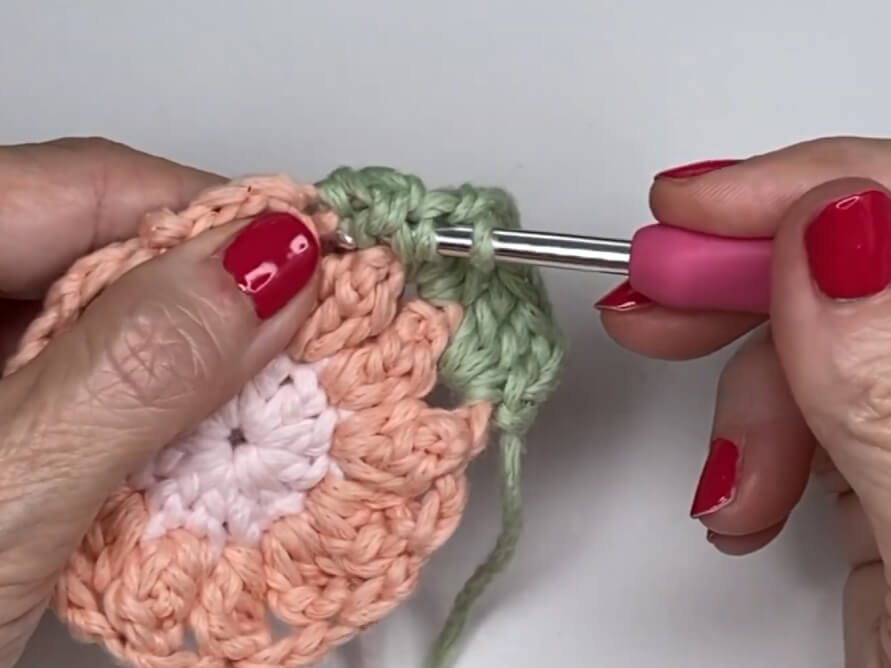
Work Rounds 1–3 for subsequent squares normally. On Round 4, attach to adjacent square(s) as follows:
- R4 (Joining Edge): Work R4 normally until reaching the corner adjacent to the completed square.
- Corner Join: Work 3 hdc in corner, ch 1, sl st into corner ch-2 space of the finished square, 3 hdc back into current corner.
- Side Join: Sl st into next space on finished square, work 3 hdc in next space of current square; repeat across side.
- Next Corner Join: Work 3 hdc in corner, ch 1, sl st into corner ch-2 space of finished square, 3 hdc into current corner.
- Complete remaining unjoined sides of R4 normally. Sl st to join, fasten off.
Part 3: Final Ring Connection & Assembly
Final Ring Seam:
- Joining the Ends: When completing your final square (e.g., Square 9), work R4 while using the Join-As-You-Go technique on BOTH sides: join side A to Square 8 and side B to Square 1.
- Your strip is now transformed into a seamless continuous donut loop!
Part 4: Attachment & Finishing
Securing to the Steering Wheel:
- Stretch the completed continuous crochet band over your steering wheel.
- Prepare 8 short lengths of yarn (approx. 6–8 inches / 15–20 cm each).
- Pass yarn ties through the open spaces of the granny squares along the inner circumference of the wheel (distribute evenly at roughly 8 points around the wheel).
- Tie tight double knots on the inside/back facing portion of the steering wheel rim. Weave or trim the short ends neatly behind.
Detailed Pattern Breakdown
1. Central Flower Construction Breakdown:
- Round 1 (Foundation): Building a tight 12-dc foundation ring serves as the anchor. The 12-stitch count is crucial because it cleanly divides by 4 corners and 2 side sections.
- Round 2 (Popcorn Texture): The 3-dc popcorn stitches create dimensional floral petals. Leaving a ch-2 gap between each petal sets up 12 spaces for turning the round circle into a square grid.
2. Geometry & Corner Squaring Breakdown:
- Round 3 (Cluster Transition): By alternating two standard 3-dc side clusters with a sharp (dc3tog, ch 3, dc3tog) corner, the round flower expands into a clean 4-corner square. Using dc3tog for corners keeps the angles tight and flat rather than bulky.
- Round 4 (HDC Smooth Border): Switching from dc to hdc provides a denser, smooth edge while keeping the height uniform across all sides.
3. Join-As-You-Go (JAG) & Attachment Mechanics:
- Continuous Seaming: Slip-stitching directly into corresponding spaces during Round 4 eliminates thick sewn seams, ensuring the wheel cover lies flat against your hands without bumpy ridges.
- Anti-Slip Anchoring: Because yarn can slip against smooth vinyl or leather, anchoring the cover at 8 key points using hidden yarn ties prevents rotational slipping during driving, guaranteeing both safety and style.
Pattern Question:
Question: My steering wheel cover feels loose and slides around when I turn the wheel. How can I fix this?
Answer: Safety is paramount when crocheting car accessories! A loose cover means it was made too long for your specific wheel diameter. Remember that crochet fabric stretches significantly.
Unjoin one full square to shorten the overall length (aim for the cover to measure 5–6 inches / 13–15 cm shorter than your wheel).
Additionally, make sure to secure the inner edges of your squares to the steering wheel spokes or rim using yarn ties in at least 8 evenly spaced locations. This locks the cover in place and prevents any side-to-side or front-to-back shifting!