

Ready to upgrade your festival wardrobe or channel your inner vintage bohemian goddess?
Whether you are heading to the beach or catching golden hour at a music festival, this gorgeous Filet Diamond Bandana (or kerchief) is the ultimate airy accessory.
Using delicate filet crochet techniques, you will build repeating geometric diamond motifs into a breezy triangular headscarf complete with romantic picot edging and sturdy tie straps.
Grab your hook and yarn, because this project works up fast and looks stunning on everyone!
Materials and Preparation
Materials:
- Yarn: Charme yarn by Círculo (100% Mercerized Cotton) in Natural / Off-White (or any Fine / Sport weight cotton yarn).
- Tie Straps: Formed directly from the main body using the same yarn.
Tools:
- Crochet Hook: Size 3.0 mm (US C-2 or D-3).
- Yarn Needle: Tapestry needle for weaving in loose ends.
- Scissors: Sharp craft scissors.
- Stitch Markers: Optional, to mark central spaces or repeats if desired.
Preparation Notes:
- Skill Level: Advanced Beginner.
- Basic Stitches: Make sure you are comfortable chaining (
ch), single crochet (sc), double crochet (dc), and slip stitching (sl st). - Tension Control: Keep a light, relaxed tension to maintain the airy drape and clear mesh grid characteristic of filet crochet.
Abbreviations and Notes
Abbreviations:
- ch: Chain stitch
- sc: Single Crochet
- dc: Double Crochet
- sl st: Slip Stitch
- picot: Picot Stitch (
ch 3, sl stinto first chain/base loops) - sk: Skip
- sp / sps: Space / Spaces
- st / sts: Stitch / Stitches
- RS / WS: Right Side / Wrong Side
Pattern Notes:
- Filet Grid Logic: The bandana is worked flat in turning rows from the top neck edge/peak downwards, expanding outwards by increasing 2
dcinside the edge spaces on every row. - Diamond Cycle: Each diamond motif follows a strict cycle:
- Expansion Phase: 2
dcblock (peak expansion) rightarrow 6dcblock rightarrow 10dcblock (widest point). - Decrease / Mesh Phase: Once a diamond reaches 10
dc, it opens up into open mesh spaces, while new diamonds begin expanding in adjacent spaces.
- Expansion Phase: 2
- Turning Chains:
ch 4at the start of a row counts as 1dcplus 1chseparation space.
Gauge, Approximate Size, and Pattern Notes
Gauge:
- 22
dcx 10 rows = 4″ x 4″ (10 cm x 10 cm) in soliddcpattern using a 3.0 mm hook. Exact gauge is not critical, but maintaining consistent tension ensures neat diamond windows.
Finished Size:
- Main Bandana Triangle: Approx. 18.5 inches wide across the top edge x 10.5 inches deep from top center to bottom point (47 cm x 27 cm), excluding straps.
- Tie Straps: Approx. 12 inches (30.5 cm) each.
Special Techniques:
- Picot Edging (
picot):ch 3, insert hook into the front loop and side loop of the previous stitch base, yarn over, and pull through all loops to close. - Slip Stitch Strap Extension: Working a foundation chain of 50
ch, then returning across withsl stin back ridge loops to create non-twisting, sturdy ties.
Step-by-Step Pattern
Part 1: Top Peak & First Diamond Setup
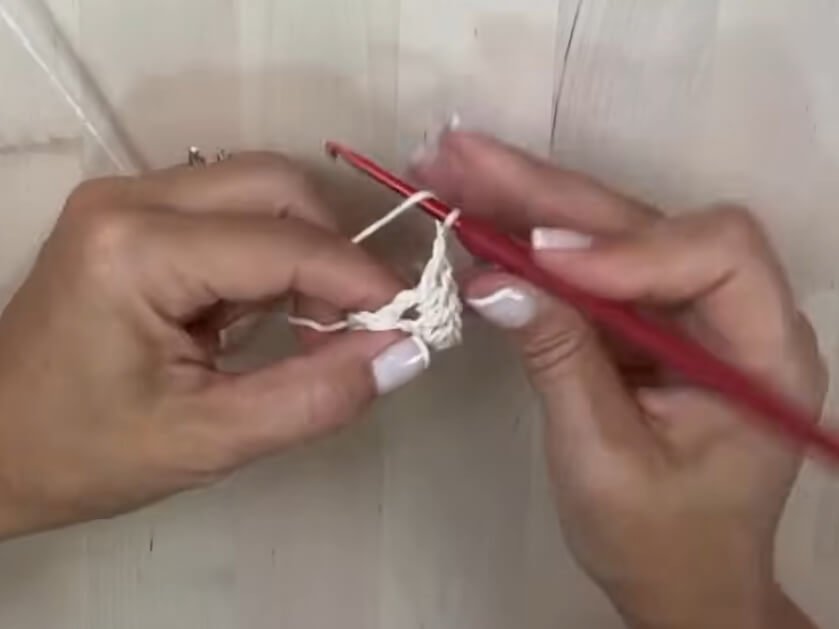
Start at the top edge center with a foundation ring:
- Foundation: Make a slip knot,
ch 4, join with asl stto the firstchto form a ring. - Row 1:
ch 4(counts as 1dc+ 1ch), working into the ring: 2dc,ch 1, 1dc. Turn work. (4dc, 2ch-1 sps) - Row 2:
ch 4, 2dcin firstch-1 sp, 1dcin next 2dc, 2dcin lastch-1 sp,ch 1, 1dcin same lastsp. Turn work. (6dcdiamond block, 2 edgech-1 sps) - Row 3:
ch 4, 2dcin firstch-1 sp, 1dcin next 6dc, 2dcin lastch-1 sp,ch 1, 1dcin same lastsp. Turn work. (10dcdiamond block – full diamond width)
Part 2: Diamond Expansion & Mesh Body
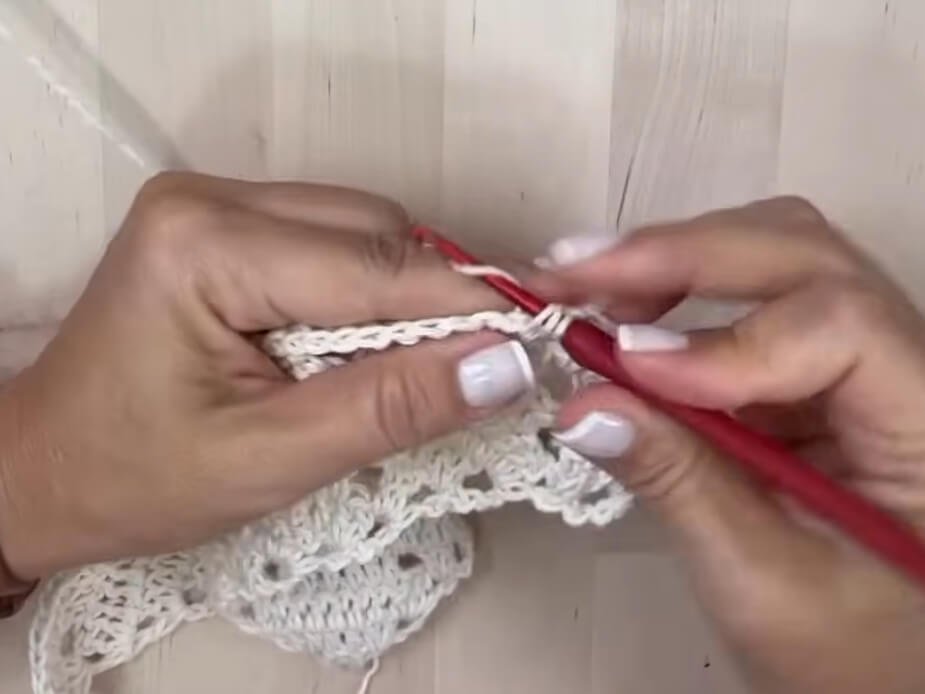
Now we begin decreasing the central diamond while opening new diamond motifs on both sides:
- Row 4:
ch 4, 2dcin firstch-1 sp,ch 1, sk 2sts, 1dcin next 6dc,ch 1, sk 2sts, 2dcin lastch-1 sp,ch 1, 1dcin samesp. Turn work. - Row 5:
ch 4, 2dcin firstch-1 sp, 1dcin next 2dc, 2dcin nextch-1 sp(6dcblock),ch 1, sk 2sts, 1dcin next 2dc,ch 1, sk 2sts, 2dcin nextch-1 sp, 1dcin next 2dc, 2dcin lastch-1 sp,ch 1, 1dcin samesp. Turn work. - Row 6:
ch 4, 2dcin firstch-1 sp, 1dcin next 6dc, 2dcin nextch-1 sp(10dcblock),ch 1, sk next 2dc, 2dcin nextch-1 sp, 1dcin next 6dc, 2dcin lastch-1 sp,ch 1, 1dcin samesp. Turn work. (2 completed diamond centers) - Rows 7–20: Continue in established filet pattern logic:
- Expand edge/new diamonds: 2
dcinsp, 6dcblock, 10dcblock. - Decrease existing diamonds: 10
dcrightarrow 6dc+ch-1 sprightarrow 2dc+ch-1 sprightarrow open mesh. - Repeat until 7 full diamond motifs span across the bottom width.
- Expand edge/new diamonds: 2
Part 3: Straps & Edging Construction
Left Strap:
- Step 1: At the end of Row 20, do not fasten off. Chain 50 for the first tie strap.
- Step 2: Sk 1st
ch, work 1sl stin each of the remaining 49chback to the bandana corner.
Right Strap:
- Step 1: After completing the main body and edging around the triangular sides, reach the opposite corner.
- Step 2:
ch 50, sk 1stch, work 1sl stin each of the remaining 49chback to the bandana corner.
Part 4: Edging, Assembly & Finishing
- Decorative Picot Edging:
- Attach/continue yarn along the two diagonal bottom edges of the triangle.
- Work 2
scaround the post of each edgedc, followed by 1scinto the row junction. - Every 3rd
sc, work apicot(ch 3, sl stinto base ofsc). - At the bottom tip/peak: Work (
1 sc, picot, 1 sc) all in the center point stitch to form a sharp, decorative point.
- Top Front Edge Finishing:
- Work a clean row of
sl stevenly across the flat top forehead edge (from strap base to strap base). - Fasten off yarn, weave in all ends securely using a yarn needle, and steam block gently to open up the filet diamond motif windows.
- Work a clean row of
Detailed Pattern Breakdown
1. Diamond Motif Geometry (Top Peak Setup)
The pattern begins at the center top edge with a small foundation ring.
- Rows 1 to 3: You expand a single central diamond starting with 2
dcincreases inside the boundarych-1spaces. By Row 3, the block reaches 10dcin width. This 10dcrow serves as the widest point (equator) of every diamond motif in the pattern.
2. Filet Mesh Transition & Multi-Diamond Multiplication
Once a diamond reaches its 10 dc peak, it must contract while creating space for new diamonds on either side.
- Rows 4 to 6: You introduce
ch-1separation spaces over the central stitches, skipping 2ststo reduce the central block from 10dcdown to 6dc, and finally to 2dc. Simultaneously, the newly formedch-1spaces at the outer boundaries are filled with 2dcincreases, initiating new diamond motifs. This geometric rhythm expands the bandana outward while maintaining an even, lace-like mesh grid.
3. Edging & Strap Finishing Dynamics
The structural integrity of the kerchief relies on firm outer borders and comfortable ties.
- Rows 7+ & Edging: The 50-chain foundation extensions are filled with firm
sl stridges, preventing the tie straps from stretching out or curling during wear. The diagonal edges are bordered withscgroups and delicate 3-chain picots, anchoring the raw row-ends into a polished, scalloped lace trim.
Pattern Question:
Question: How do I scale this bandana to a larger size, and how do I prevent the filet grid from warping or curling?
Answer: To make a larger bandana or turn this pattern into a full-sized triangular shawl, simply continue repeating the main row logic: expand new diamonds from 2 dc→ 6 dc→ 10 dc while contracting older diamonds down to open mesh spaces.
Keep adding rows until you reach your desired wingspan before working the 50-chain straps and picot border.
To keep the filet grid crisp and prevent curling, use a mercerized cotton yarn (like Charme) and lightly steam block your finished bandana using a wet press cloth or garment steamer, pinning the picot points outward to reveal the geometric diamond shapes.