
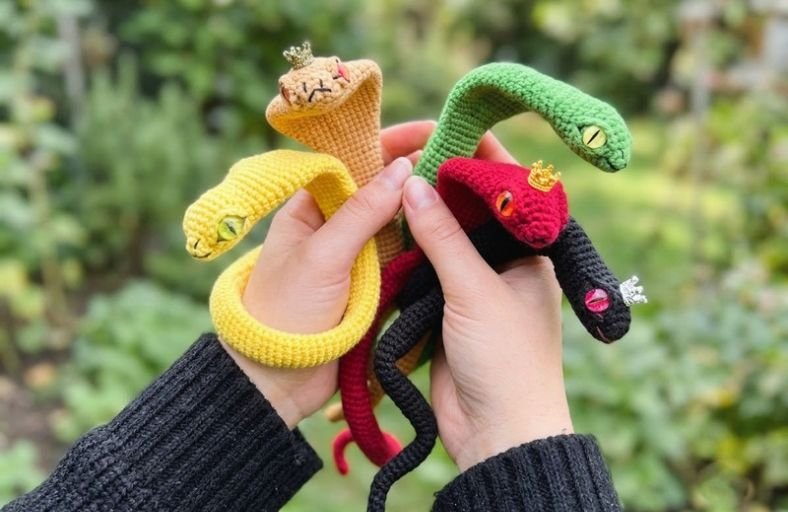
Who says snakes can’t be absolute royalty?
If you are looking to charm your yarn basket with a project that is equal parts sassy, elegant, and dangerously cute, this regal cobra is ready to slither straight onto your hook.
Complete with a flared hood, expressive eyelids, and a bendable wire armature, this pattern turns a simple strand of yarn into a stunning desktop companion.
Materials and Preparation
Materials:
- Yarn: Fine or Sport weight cotton yarn in your choice of color (Red, Gold, or Ochre Yellow for the main snake body). Black embroidery thread for facial details.
- Eyes: 1 pair of safety eyes or flat oval glass/plastic eyes (approx. 6–8 mm).
- Wire Armature: Craft wire / iron wire approx. 23.6 inches (60 cm) long (or customized to your preferred body length).
- Tape & Glue: Electrical/craft tape to wrap wire ends (prevents sharp tips from poking through stitches) and fabric glue for positioning eyes.
- Stuffing: Polyfill stuffing (used exclusively in the head).
- Mini Crown (Optional): Small metallic crown charm for decoration.
Tools:
- Crochet Hook: 2.0 mm – 2.5 mm hook (use a smaller size than recommended on the yarn label to keep stitches firm and tight).
- Yarn Needle: For sewing eyelids and weaving in ends.
- Stitch Marker: Essential for tracking spiral continuous rounds.
- Scissors & Wire Cutters: For yarn and armature wire shaping.
Preparation Notes:
- Work all rounds in a continuous spiral without joining unless specified otherwise.
- Keep your gauge tight to ensure no stuffing shows through the head stitches and the wire stays hidden inside the body.
Abbreviations and Notes
Abbreviations:
- ch: Chain stitch
- sc: Single crochet
- inc: Single crochet increase (2 sc in the same stitch)
- dec: Single crochet decrease (sc2tog)
- w / 3-inc: 3 single crochet in the same stitch (3 sc in 1 st)
- sl st: Slip stitch
- st(s): Stitch(es)
Pattern Notes:
- The head and hood are worked continuously, transitioning smoothly into the slender body tube.
Wdenotes 3 single crochet stitches worked into a single stitch to create rapid widening (used for the cobra hood flaring).- Only the head is stuffed with polyfill. The long body remains unstuffed and is shaped entirely by the inner wire core.
Gauge, Approximate Size, and Pattern Notes
Gauge:
Gauge is not critical for this pattern, but your stitches must be tight enough to conceal the inner wire armature and prevent polyfill leakage.
Finished Size:
Approximately 15.7 to 19.6 inches (40 to 50 cm) in total coiled length, depending on yarn weight and wire size.
Special Techniques:
- Working into Foundation Chain: Starting round 1 by crocheting on both sides of a foundation chain to form an oval base.
- Hood Contouring (3-sc Increases): Strategic placement of
w(3-inc) anddecto expand and contract the broad cobra hood flatly. - Armature Security: Folding wire ends, binding them with tape, and gluing the top end into the head cavity for stability.
Step-by-Step Pattern
Part 1: Snake Head & Cobra Hood Expansion
Continuous spiral:
- R1: Ch 4, starting in 2nd ch from hook: 2 sc, 3 sc in last st (
w), turn to work along opposite side of chain: 1 sc, 1 inc (8) - R2: 1 sc, 1 inc, 6 sc (9)
- R3: (1 sc, 1 inc)*2, 5 sc (11)
- R4: 3*(1 inc, 1 sc), 1 inc, 4 sc (15)
- R5: 1 sc, 1 inc, 7 sc, 1 inc, 5 sc (17)
- R6: 2 sc, 1 inc, 8 sc, 1 inc, 5 sc (19)
- R7–R8: 19 sc (19) (2 rounds)
- R9: 2 sc, 1 dec, 3 sc in next st (
w), 1 dec, 4 sc, 1 dec, 3 sc in next st (w), 1 dec, 3 sc (19) - R10: 3 sc, 3 sc in next st (
w), 4 sc, 1 dec, 4 sc, 3 sc in next st (w), 2 sc, 1 dec (21) - R11: 4 sc, 3 sc in next st (
w), 3 sc, 1 dec, 1 sc, 1 dec, 3 sc, 3 sc in next st (w), 2 sc, 1 dec (22) - R12: 5 sc, 2 inc, 10 sc, 3 sc in next st (
w), 4 sc (26) - R13: 7 sc, 3 sc in next st (
w), 12 sc, 3 sc in next st (w), 5 sc (30) - R14: 8 sc, 3 sc in next st (
w), 14 sc, 3 sc in next st (w), 6 sc (34) - R15: 9 sc, 3 sc in next st (
w), 16 sc, 3 sc in next st (w), 7 sc (38) - R16: 38 sc (38)
- R17: 10 sc, 1 inc, 18 sc, 1 inc, 8 sc (40)
- R18: 40 sc (40)
Part 2: Hood Contouring & Tapering
- R19: 10 sc, 1 dec, 19 sc, 1 dec, 7 sc (38)
- R20–R21: 38 sc (38) (2 rounds)
- R22: 10 sc, 1 dec, 18 sc, 1 dec, 6 sc (36)
- R23: 36 sc (36)
- R24: 10 sc, 1 dec, 16 sc, 1 dec, 6 sc (34)
- R25: 10 sc, 1 dec, 15 sc, 1 dec, 5 sc (32)
- R26: 9 sc, 1 dec, 15 sc, 1 dec, 4 sc (30)
- R27: 9 sc, 1 dec, 13 sc, 1 dec, 4 sc (28)
- R28: 8 sc, 1 dec, 13 sc, 1 dec, 3 sc (26)
- R29: 8 sc, 1 dec, 11 sc, 1 dec, 3 st (24)
- R30: 8 sc, 1 dec, 10 sc, 1 dec, 2 sc (22)
- R31: 7 sc, 1 dec, 10 sc, 1 dec, 1 sc (20)
- R32: 7 sc, 1 dec, 9 sc, 1 dec (18)
- R33: 16 sc, 1 dec (17)
- R34: 6 sc, 1 dec, 9 sc (16)
- R35: 16 sc (16)
- R36: 15 sc, 1 dec (15) (Note: Move stitch marker 1 st to the left after this round)
- R37: 5 sc, 1 dec, 8 sc (14)
- R38–R40: 14 sc (14) (3 rounds)
- R41: 10 sc, 1 dec, 2 sc (13)
Stuff the head section firmly with polyfill at this point. Do NOT stuff past the neck.
Part 3: Eyelids & Tail Section
Eyelids:
- Upper Eyelid (Make 2): Ch 6 (leave long tails at both ends for sewing).
- Lower Eyelid (Make 2): Ch 5 (leave long tails at both ends for sewing).
Long Snake Body & Tail Tapering:
Prepare Wire Armature: Take a 23.6 inch (60 cm) iron wire, fold it in half, wrap tape securely around both ends to prevent sharp edges, apply glue to the tip, and insert it firmly into the stuffed head.
- Rounds without decrease: Continue crocheting 13 sc around until the body reaches approximately 3.9 inches (10 cm) away from the end of the inner wire core. Then begin gradual reduction:
- Stage A: 9 sc, 1 dec, 2 sc (12) rightarrow Crochet 3 rounds of 12 sc without decrease.
- Stage B: 2 sc, 1 dec, 8 sc (11) rightarrow Crochet 3 rounds of 11 sc without decrease.
- Stage C: 7 sc, 1 dec, 2 sc (10) rightarrow Crochet 3 rounds of 10 sc without decrease.
- Stage D: 2 sc, 1 dec, 6 sc (9) rightarrow Crochet 3 rounds of 9 sc without decrease.
- Stage E: 5 sc, 1 dec, 2 sc (8) rightarrow Crochet 3 rounds of 8 sc without decrease.
- Stage F: 2 sc, 1 dec, 4 sc (7) rightarrow Crochet 3 rounds of 7 sc without decrease.
- Stage G: 3 sc, 1 dec, 2 sc (6) rightarrow Crochet 3 rounds of 6 sc without decrease.
- Stage H: 2 sc, 1 dec, 2 sc (5) rightarrow Crochet 3 rounds of 5 sc without decrease.
Fasten off, cut yarn, weave through remaining stitches, pull tight to close the tail tip, and weave in ends.
Part 4: Assembly & Finishing
- Eye Attachment: Glue safety/glass eyes onto the sides of the head after R5 (adjust slightly based on visual preference).
- Eyelid Sewing: Position the upper (ch 6) and lower (ch 5) eyelids over each eye with the wrong side facing out (forming an oval shape). Secure with glue in the center and sew the tail ends tightly into the head stitches.
- Facial Details: Using a single strand of black embroidery thread, stitch thin eyeliner accents and eyebrows to give the snake an expressive expression. Blush powder or fabric markers can be applied around the eyes for subtle shading.
- Crown Attachment: Glue or sew a mini metal crown charm directly between the eyes/top of the head.
Detailed Pattern Breakdown
1. Snake Snout & Hood Expansion (Part 1):
- R1 – R4: Begins with a small oval foundation ring (
Ch 4), working both sides to shape a rounded snout tip. Rapid increase steps (inc) quickly expand the face width. - R9 – R15: Introduces
w(3-inc: working 3 sc into 1 st) placed symmetrically at the outer edges. This geometric expansion forces the stitches to flare out laterally, forming the distinctive flat cobra hood.
2. Hood Shaping & Tapering (Part 2):
- R19 – R41: Features systematic decrease rounds (
dec) spaced along the sides. This steadily narrows the broad hood down to a refined, slim neck line while maintaining a flat back profile. - R36: Includes a marker shift instruction (moving 1 stitch left) to keep decreasing points perfectly aligned along the snake’s spine despite spiral drift.
3. Wire Armature & Body Gradation (Part 3 & 4):
- Wire Core: Inserting a bent, taped wire structure transforms the soft tube into an endlessly posable sculpture capable of coiling around fingers or standing upright.
- Gradual Tail Reduction: Decreases are separated by 3 constant rounds at every stage (from 13 sc down to 5 sc). This creates a seamless, natural taper toward the tip of the tail without sharp angles.
Pattern Question:
Question: How do I ensure the wire inside the snake body doesn’t poke out through the stitches or tear the yarn over time?
Answer: Always fold the wire tips back on themselves by about 0.2 to 0.4 inches (0.5 to 1 cm) using pliers. Wrap both folded tips tightly with cloth or electrical tape so no sharp metallic point remains exposed.
Adding a dab of strong craft glue to the head-end wire tip before pushing it into the polyfill-stuffed head will anchor it in place, keeping the armature centered throughout the entire body as you bend and pose your snake.